Review: GPS Receiver for Apple Devices – GNS 5870 MFI

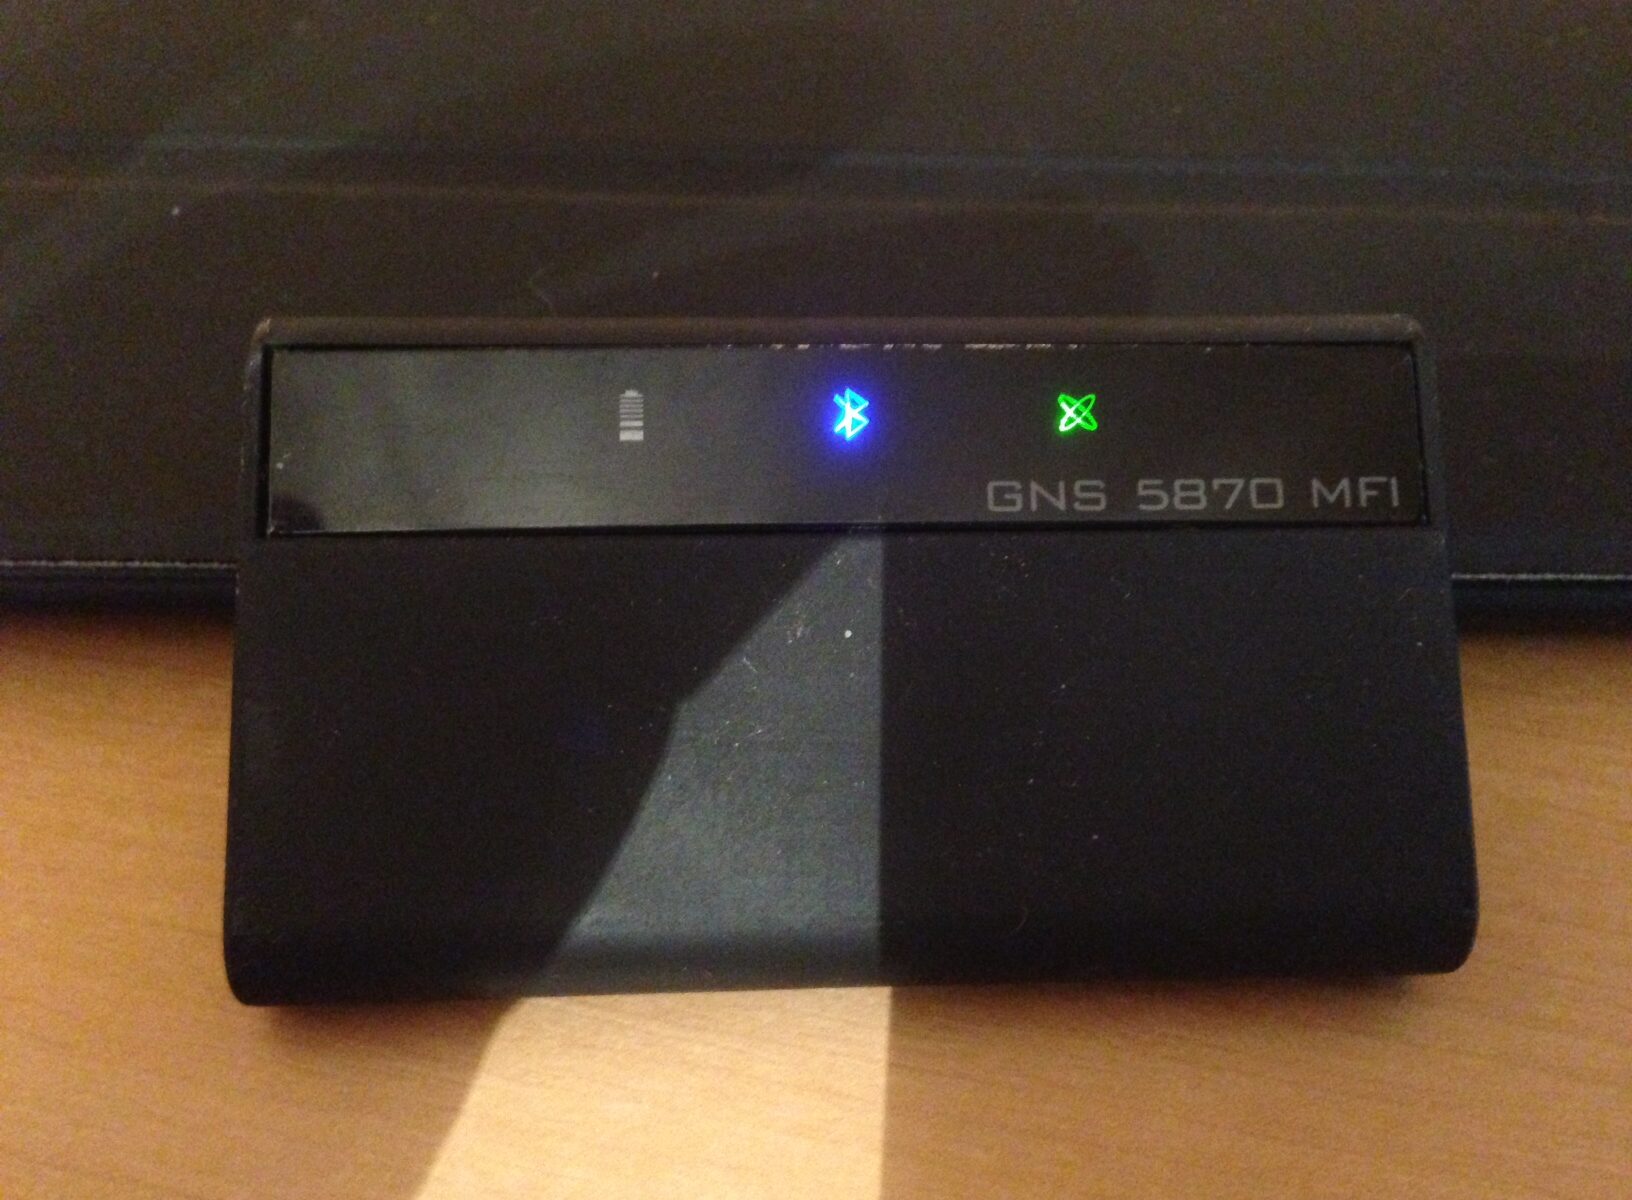
As is commonly the case with the technology I review, I have had a real life requirement for the device; I haven’t simply been handed the gadget to review. This is particularly the case with this GPS unit, the GNS 5870. I have been using it for the last year to enable my Apple devices to obtain and process GPS information, commonly for satellite navigation. It’s safe to say that this has been tested to within an inch of its life; you will see that clearly enough from the pictures.

My iPad isn’t 3G enabled. Although I can tether it to my iPhone, I find the 3G signal to be flaky at best. Whether you’re using your device to navigate mountain trails or Birmingham motorways, the last thing you want at the crucial turn is for the signal to drop.

When I surveyed the tech world to find a solution, it quickly became apparent that unless you want to jailbreak your Apple device, the GPS options are limited. A lot of devices claim to be Bluetooth enabled generically. I’ve discovered though that fickle Apple devices only work consistently with GPS receivers that are certified Apple-compatible. As is usually the case with Apple, that then means they can charge silly money for the device. A receiver for which everyone else is charging £20 goes up to £60+.

I wouldn’t usually spend that kind of money on a device like this, but I’d tried 2 of the generic type without success. Frustrated that I couldn’t get my iPad to work as a proper Ordnance Survey Map navigation tool, I bit the bullet.

So what do you get for your money? To be honest, a fantastically designed and very reliable device. It’s very small, almost too small for the £69 price tag! Happily, the majority of its surface is covered in tactile and grippy rubber. Brilliant for when you want to sit it on your dash to receive that all-important satellite signal. The next thing you notice is the complete absence of any buttons. Gulp! Not sure I was ready for that but do you know what – the touch screen panel and operation is intuitive and seamless. I’m already realizing why this device commands its price. Okay, it doesn’t always register my finger swipes instantly but given it’s been sliding around my dash for a few months and covered in mud, I’ll forgive it that!

GNS 5870 against iPad

First thing to do is connect it to your device via Bluetooth. Switch it on and immediately all my Apple devices see it. Pairing is an utter doddle with the pre-stored passcode. Switching it on and off with a swipe of my finger across the touch screen, I’m starting to feel like Captain Kirk.

It charges via a mini USB connection. So far I’ve found it charges in about 3 hours and lasts about 15 hours, although I usually plug it in the lighter socket in my Land Rover and then chuck it on the dash.

Friends of mine have a variety of other GPS receivers, although they use them with laptops. This GNS will almost always connect faster and more reliably that theirs so another feather in its cap!

Just two slight wrinkles. Firstly, I have found that very occasionally, when I use it for the first time in a while, it struggles to connect via Bluetooth smoothly. Following Geek’s mantra (“Switch it off and on again!”) I restart toggle Bluetooth on the Apple device and it then connects flawlessly.

Second wrinkle: a word of caution for any fans of jail-breaking. This immediately stopped this device from working. Nothing I tried could make it work while my iPad was in that state. I reinstalled iOS and everything was back to normal. The GNS doesn’t seem to like jail-broken devices.

In summary, if you use software like Memory-Map (see my recent how-to) or any sat-nav apps on Apple kit and don’t like relying on your 3G, then you need this in your life and it’s worth every penny. Grab it here or on your favourite online store.

[easyreview title=”Dummy rating” icon=”dummy” cat1title=”Ease of use” cat1detail=”Once you’ve sussed the swipe ‘on and off’ feature, it’s so simple it’s genius.” cat1rating=”4.5″ cat2title=”Features” cat2detail=”It’s designed to interface and feed GPS data to Apple devices. It does that almost faultlessly” cat2rating=”3.5″ cat3title=”Value for money” cat3detail=”It’s the most expensive of its type but it’s the only one that works.” cat3rating=”3.5″ cat4title=”Build quality” cat4detail=”It’s real quality this. You won’t be disappointed.” cat4rating=”5″ summary=”Another star buy for me. I’ve really enjoyed using it and perhaps it’s ignited the frustrated photographer in me.”]

This slideshow requires JavaScript.

How-to: Improve your online privacy – level 1 – Tor

[easyreview title=”Complexity rating” icon=”geek” cat1title=”Level of experience required, to follow this how-to.” cat1detail=”Your granny could do it. :-)” cat1rating=”1″ overall=”false”]

Introduction to Tor

It seems that not a day goes by now without reading some news about this or that government’s ability to scrutinise your internet activity. Our very own Dummy blogged about PRISM not so long ago. He concluded that at some level, we probably already suspected our every online move was being tracked. It’s just that we’re now sure of it. The worst that’s happened is we’ve sacrificed the illusion of privacy for the illusion of security, right?

The thing that’s making me distinctly uncomfortable though is that my data seems to be available to foreign powers. I am not a citizen of the U.S., but with vast quantities of my email sat on Google or Microsoft’s servers, it seems that for U.S. intelligence agencies, it’s open season on Geek’s mailbox. Now I can probably wrap my head around that, but what about other governments – governments with poor track records when it comes to human rights and civil liberties? If the U.S. can see my data, why not them too? It’s worrying because I have absolutely no doubt that some of my views would be viewed as offensive and immoral by those states. No names no pack drill, but the feeling is mutual.

Tor logoSo is there anything we can do to reclaim some of our privacy? Turns out that there is. There are a few options in fact. Today I’m going to look at just one such option: boosting your online privacy through the anonymising network, Tor.

Say what now?

Tor used to stand for “The Onion Ring [network]”. Like an onion, Tor provides layers between you and the web sites you’re visiting. Within those layers, your activity is scrambled, redirected and encrypted.

To explain this in simple terms: your web browser sits within the Tor network. All communication within the network is secured. When you browse to a web site, your web traffic is sent to an exit point from the Tor network – any one of several thousand relays – which talks to the internet on your behalf.

Think of it like a middleman who never reveals who he’s working for, but hands messages to and fro. That’s oversimplified, because what actually happens is more like several middlemen between you and the final web site, none of whom know quite who the original “client” is, nor what the message is that the middleman is relaying on behalf of the client. It’s these layers of security and encryption that led to the onion metaphor.

Tor Quick Start

By far the easiest way to get going with Tor is to download the “Browser Bundle”. This includes a specially configured web browser that will send all traffic via the Tor network. Yes, that’s right: Tor cannot magically make all your internet activity private. You have to use tools that know how to make use of the network. The Tor Browser is a version of Firefox that has been configured to use the Tor network. I’m going to assume that you’re using Windows, for the purposes of this tutorial, but there are bundles available for Mac and Linux too.

Download and run the Tor Browser Bundle. Tor isn’t installed as such – you won’t find a link in your Start Menu after this. It extracts all its files wherever you direct and you run it from there. This means that you can put the files (less than 100MB) on a USB thumb drive and take it with you from computer to computer.

Within the “Tor Browser” folder, you’ll find a program called “Start Tor Browser”. When you run that, your system will be initialised to run Tor:

Tor loading

Once you’re connected, the Tor Browser will load:

Tor Browser 1

After that, you can browse the web almost as normal. Web browsing will inevitably be slower than you’re used to; privacy in this case comes with a price. Traversing all those layers of encryption and randomisation takes time, but while you’re waiting for your page to load during that brief delay enjoy the warm sense of anonymised well-being.

Tor Browser 2

Note: web sites will not always function as they do outside the Tor network. This is a by-product of anonymity and safety. See the FAQ to understand some of the issues you may encounter.

Caveats

You need to be aware that Tor is not a panacea. If you wish to prioritise privacy, you may need to change some of your browsing habits. From the Tor’s download page:

Want Tor to really work?

  1. Use the Tor Browser
    Tor does not protect all of your computer’s Internet traffic when you run it. Tor only protects your applications that are properly configured to send their Internet traffic through Tor. To avoid problems with Tor configuration, we strongly recommend you use the Tor Browser Bundle. It is pre-configured to protect your privacy and anonymity on the web as long as you’re browsing with the Tor Browser itself. Almost any other web browser configuration is likely to be unsafe to use with Tor.
  2. Don’t enable or install browser plugins
    The Tor Browser will block browser plugins such as Flash, RealPlayer, Quicktime, and others: they can be manipulated into revealing your IP address. Similarly, we do not recommend installing additional addons or plugins into the Tor Browser, as these may bypass Tor or otherwise harm your anonymity and privacy. The lack of plugins means that Youtube videos are blocked by default, but Youtube does provide an experimental opt-in feature (enable it here) that works for some videos.
  3. Use HTTPS versions of websites
    Tor will encrypt your traffic to and within the Tor network, but the encryption of your traffic to the final destination website depends upon on that website. To help ensure private encryption to websites, the Tor Browser Bundle includes HTTPS Everywhere to force the use of HTTPS encryption with major websites that support it. However, you should still watch the browser URL bar to ensure that websites you provide sensitive information to display a blue or green URL bar button, include https:// in the URL, and display the proper expected name for the website.
  4. Don’t open documents downloaded through Tor while online
    The Tor Browser will warn you before automatically opening documents that are handled by external applications. DO NOT IGNORE THIS WARNING. You should be very careful when downloading documents via Tor (especially DOC and PDF files) as these documents can contain Internet resources that will be downloaded outside of Tor by the application that opens them. This will reveal your non-Tor IP address. If you must work with DOC and/or PDF files, we strongly recommend either using a disconnected computer, downloading the free VirtualBox and using it with a virtual machine image with networking disabled, or using Tails. Under no circumstances is it safe to use BitTorrent and Tor together, however.
  5. Use bridges and/or find company
    Tor tries to prevent attackers from learning what destination websites you connect to. However, by default, it does not prevent somebody watching your Internet traffic from learning that you’re using Tor. If this matters to you, you can reduce this risk by configuring Tor to use a Tor bridge relay rather than connecting directly to the public Tor network. Ultimately the best protection is a social approach: the more Tor users there are near you and the more diverse their interests, the less dangerous it will be that you are one of them. Convince other people to use Tor, too!

Additional point: there’s some anecdotal evidence that using Tor can cause issues for PayPal and eBay.

Bonus: Use Tor with mobile devices

That’s all well and good for desktops and laptops, but what about my phone and my tablet? Good news: you can also use Tor on Android and iOS. For Android, you have the free Orbot, which you can couple with the browser Orweb (also free). You do not need to have rooted your phone to use these, though there are some advantages if you do.

For iOS folks, there’s Onion Browser, which is cheap, but not free.

At the moment, I’m not aware of any Tor packages for BlackBerry or Windows Phone.

Safe browsing

Please remember that no amount of encryption or obfuscation can guarantee your privacy or safety. Nor does it absolve you of moral accountability. Stay safe and keep your nose clean.

How-to: Laravel 4 tutorial; part 1 – installation

[easyreview title=”Complexity rating” icon=”geek” cat1title=”Level of experience required, to follow this how-to.” cat1detail=”A good level of familiarity with web hosting will come in handy here, especially if your hosting environment is different from mine. It will also help if you’re comfortable at the command line.” cat1rating=”4″ overall=”false”]

Laravel Tutorials

Introduction

If, like me, you spend much time coding for the web – for pleasure or profit – sooner or later you’re going to find that you benefit from using a development framework. A framework is a collection of scripts that help you create an application much more quickly. Frameworks typically include a lot of the “nuts and bolts” components – scripts that assist with database connections for example, plus components that impose some structure on your programming.

For a long time, my framework of choice was CodeIgniter. CodeIgniter has stagnated of late and concerns have arisen over licensing. Partly as a consequence, many PHP developers like me have searched for an alternative. In the search, I came across a framework that many programmers are turning to: Laravel. My early experiences with Laravel have been extremely positive and I have found many things I prefer about it. In this series of tutorials, I’ll show you how to get up and running with Laravel and begin creating an application. The application will involve some web-scraping, so you may wish to stay tuned for that reason alone.

Before we dive in though, one word of caution: Laravel is a young open source project. Like many such projects, its documentation is less complete than you might wish, particularly when compared to CodeIgniter. In fact CodeIgniter’s great documentation was one of the reasons why I initially chose it as a development framework. Documentation is a core commitment of the Laravel team, but at the time of writing, with the recent release of Laravel 4, I’m finding the documentation is not quite up to scratch. Possibly you’ve found that too, which is why you’ve made it here to this tutorial. In fact one of the worst parts of the documentation at the time of writing is the installation procedure! With that caveat in place, let’s move on – it’s still well worthwhile.

Prerequisites

All my web coding is done within a Linux environment, usually CentOS or Ubuntu Server. For the easiest experience following these tutorials, you may wish to create a similar environment. (I’ve written about that elsewhere.) Alternatively, you should be able to follow the tutorials with some tweaking – but you’re on your own there. At the very least, I recommend you have in place:

  • Apache web server
  • Shell access to the server (preferably SSH)
  • Root access to install Composer globally (not essential)
  • Git must be installed in your environment.

Installing Composer

With the latest release (4) Laravel has taken a leap forward in several areas. One such area is the management of third party libraries and packages. Laravel previously made use of an external project called “Composer“, to install dependent packages. With Laravel 4, you now use Composer to install Laravel itself. To install Composer, from a root login shell, do the following:

cd /usr/local/bin
curl -sS https://getcomposer.org/installer | php
mv composer.phar composer

Provided /usr/local/bin is in your $PATH environment variable, you will now be able to call Composer with “composer [options] command [arguments]“.

Installing Laravel


The beauty of Composer is the simplicity it brings to library/application installation. There is an overwhelming range of tutorials on how to install Laravel with Composer. Please bear in mind that many of these were written while Laravel 4 was in beta or even alpha. Now it has been released, the installation is quite straightforward. Having prepared a new environment for a web site (a virtual host or whatever), navigate to the directory above the default web root directory. Then install using Composer. Eg:

cd /home/geek/domains/test.geekanddummy.com/
composer create-project laravel/laravel

You should see a fair bit of output indicating that Composer is creating a directory “laravel” and pulling in all the dependencies for a basic installation. The laravel directory contains a folder entitled “public“, intended to be your web root. Your easiest way to complete the configuration is to point your web site at that directory. For example, using Virtualmin, you would go to Server Configuration –> Website Options and change “Website documents sub-directory” from “public_html” to “laravel/public”.

Having done that, when I browse to my test web site, I see:

Laravel landing page

Installing other frameworks

Now would be a good time put to put Twitter’s Bootstrap and jQuery in place, if you’re planning to use them. Naturally, we’ll use Composer for this. You might use other frameworks in your web applications – check out Packagist to see if anyone has made a Composer package available.

Composer demands a tutorial all of its own, but I’ll keep it simple here. I’m going to make my new Laravel application depend on the latest compatible branches of Bootstrap and jQuery. This will potentially allow us to upgrade these two frameworks with a simple Composer command at a later date.

In the root of your Laravel application you’ll find the main Composer configuration file, composer.json. You don’t need to get your hands dirty editing the file, just from a shell in that root directory, issue the following commands:

composer require "components/jquery":"*"
composer require "twitter/bootstrap":"*"

This updates the composer.json file to include these dependencies and goes ahead and downloads them. It can take a while – be patient.

You’ll end up with jQuery files under ./components/jquery and Bootstrap files under ./vendor/twitter/bootstrap. These are locations not visible to your web server (the root is at ./public, you’ll recall). This is a particular problem in the case of Bootstrap. For now, here’s a quick-and-dirty way of accessing these files. I’m on the lookout for a more elegant solution, but this will get you up and running rapidly. Navigate to the “public” folder in a login shell and issue the following commands:

mkdir -p assets/css
mkdir assets/img
mkdir assets/js
ln -s ../../../vendor/twitter/bootstrap/img/glyphicons-halflings.png ./assets/img
ln -s ../../../vendor/twitter/bootstrap/docs/assets/css/bootstrap.css ./assets/css
ln -s ../../../vendor/twitter/bootstrap/docs/assets/css/bootstrap-responsive.css ./assets/css
ln -s ../../../components/jquery/jquery.min.js ./assets/js

And so on, for whichever bits you’ll use. This will only work if your web server allows following symbolic links. The .htaccess directive “Options +SymLinksIfOwnerMatch” may help here, but that’s outside the scope of this tutorial.

Configure your development environment

I use NetBeans for development. If you don’t already have a preferred IDE (integrated development environment), I recommend you check it out. Another favourite is Eclipse. You could use an ordinary text editor, but then you’d be missing out on a lot of things that can make your coding more comfortable and efficient.

Having installed Laravel and the other frameworks on my web server, next I use NetBeans to pull the code across to my development environment. In the NetBeans “New Project” wizard, select the option “PHP Application from Remote Server”. In the remote configuration, ensure that you choose as your “upload directory”, the laravel. From there, you’ll want to download the app and public directories.

Conclusion

That’s it for today’s tutorial. Next time, we’ll look at orientating ourself within the framework (“what goes where?”).

Review: Panasonic Lumix DMC-FZ48

Let’s get something straight with this review, right up front. I am no David Bailey and I don’t really have any aspirations to be a photographer. When I bought this camera I had one objective: to improve the quality of the pictures I took beyond that of my existing point-and-click happy snapper. I wanted something simple to use with menu options that a non camera buff could understand without sitting a 2 day course.

Okay then, that established, on with this review.

I’ll start with my usual first impressions. I may not want to be a photographer but I feel like one with this kit in my hands. It’s a completely different beast to my usual compact in so many ways. But it also feels familiar, with simple and obvious buttons; you can take it out of the box and immediately start taking ultra-sharp pictures. It’s ergonomic to hold and I had no problems while traversing rocks and perching in strange positions for interesting angles on my pictures.

It’s here I really started to feel the appeal of this camera, which Panasonic bills as a “bridge camera”. Don’t know what a bridge camera is? (I didn’t.) From Wikipedia:

Bridge cameras are cameras which fill the niche between the single-lens reflex cameras (SLRs) and the point-and-shoot camera.

You can make it as easy or as technical as you like; I found that the results were so good it started to encourage me to take more time and effort in composing my pictures. Very quickly my ‘happy snapping’ progressed to something altogether different – I found interest developing as the results improved. All in all, a very enjoyable process in which good results were achieved quickly. Just the way I like it!

The zoom on this camera is amazing considering the price tag. On a recent camping trip I was able to demonstrate this to its full potential when my daft brother climbed a hill overlooking our camp-site and I captured one image without zoom and one zoomed right in.

There are buttons and features aplenty. I have only started to scratch the surface but the image clarity is truly amazing. For someone who was very used to taking very average images the pictures it produces are nothing short of incredible. It uses standard SD memory cards which is a bonus for me as all my other equipment uses these.

Okay, so I’m very happy indeed with the pictures it’s producing but what’s this – it also records in HD? Now I wasn’t expecting much from this. In my experience a device designed to do one task that has a second task bolted on, tends to handle that extra task quite poorly. Not so in this case. I was pleasantly surprised with the quality of the HD video and how easy it was to use that feature. Coupling HD video with the power of the zoom it is a brilliant add-on. There’s one drawback: the noise of the motorised zoom is intrusive and has to be edited out of the final video, oh yes and I guess I could do with a tripod to eliminate the camera shake.

As I felt like I was getting on better with the camera I became more ambitious and started trying to shoot wildlife. It’s here I found myself frustrated by the time it takes to process images.

I had this image in my mind of rattling off shot after shot but the camera needed a second or two to sort itself out between pictures. There may well be a setting to alter this but out of the box, a little slow, as demonstrated by my attempts to capture a Red Kite.

So just to finish, going back to my very basic requirements of this camera, I’m really happy with the results. I’ve literally picked it up out of the box and not read a thing from the manual. With a minimum of tinkering I’ve been impressed with the image quality I’ve been able to achieve. See the gallery below for examples of my first efforts.

[easyreview title=”Dummy rating” icon=”dummy” cat1title=”Ease of use” cat1detail=”For the results here I’ve barely scratched the surface of this camera’s abilities.” cat1rating=”3″ cat2title=”Features” cat2detail=”Certainly everything I need in a camera. So many automated focus settings, how can I go wrong?” cat2rating=”4″ cat3title=”Value for money” cat3detail=”It’s well over double what I would usually pay for a camera but the image quality is a big step up.” cat3rating=”4″ cat4title=”Build quality” cat4detail=”I must admit, I feel I have to take care with it. This is no action camera.” cat4rating=”2.5″ summary=”Another star buy for me. I’ve really enjoyed using it and perhaps it’s ignited the frustrated photographer in me.”]

Review: Joytek High Speed 7 Port USB 2.0 Hub

Most modern PCs are designed with an abundance of USB sockets. Great; exactly what the doctor ordered. Then pop along to Amazon and eBay happily buying a plethora of USB gizmos from fans to phone docks and you realise that the cable with your device is 1m long and the PC under your desk is 10cm further away than the cable will reach. Then when I want to remove that device and attach it to another PC there is the great cable hunt as I root around spaghetti junction, invariably unplugging at least one vital device before I get the correct one.

So off I went shopping for yet another office gadget to help me with this problem.

There are all sorts of solutions out there, mass-produced in gay abandon by our Chinese cousins. I use external USB hard drives and charge my phone and tablet from my PC so I wanted a powered USB hub. As ever, when I look for desktop kit I want it to be compact, well designed and generally a nice item to have on my desk. With that remit in mind, I bought this High Speed 7 Port USB 2.0 HUB from Amazon.

Out of the box it looked the part. A sleek, piano black centrepiece edged in nice tactile rubber moulding with the option to sit it in a simple desktop stand. I thought this to be the best option although it also looked okay lying on its side.


On the side of the hub with the power inlet, there is a cool looking blue LED. In low light this slightly illuminates the other ports from the rear. All in all, a very nice looking bit of kit clearly designed with a little care and attention. A miracle considering the bargain price.

On to testing. The first thing I noticed was that the connection from the hub to the PC is via one of those square USB printer connection affairs (Geek tells me it’s a “type B”, whatever that means). The supplied cable is a useful 2M long. Luckily for me my PC wasn’t 2.1m away from where I wanted the hub!

This cable connects on the same side as the power adapter. On this side of the hub there are 2 standard (“type A”!) USB sockets. I started by testing my little BlueTooth keyboard receiver and found the connections were well made and solid. The connector located easily and immediately found my keyboard. So far so good. Next I tried my iPhone 5, which is usually very selective about what it will charge from; the hub sailed through that test as well. Similarly with my tablet and then my desk fan and all was looking great.

I moved on to my external USB drives and it was here that this funky bit of kit came unstuck. It simply didn’t have the juice to run the drive which was a real shame because up till then it was looking like a faultless piece of tech. I could hook it up to a powered external drive and it was fine; for some reason it wasn’t getting the juice it needed from the hub that it could get from a PC.

A bit disappointing but weighing it up as a whole it has allowed me to remove a load of inaccessible cables from behind my PC and does mean I have a nice looking accessible USB port for any new desktop paraphernalia, providing it isn’t too power hungry.

On the downside I need to finish up this review now and go and pull my hard drive from the back of my…………


[easyreview title=”Dummy rating” icon=”dummy” cat1title=”Ease of use” cat1detail=”The very essence of plug & play” cat1rating=”5″ cat2title=”Features” cat2detail=”Perfect performer until it fell at the last jump” cat2rating=”2.5″ cat3title=”Value for money” cat3detail=”I have seen these going for as little as £4 but for the £8.93 I paid, it feels like good value” cat3rating=”4″ cat4title=”Build quality” cat4detail=”It’s nice, it’s tactile, it looks cool!” cat4rating=”4.5″ summary=”A tad disappointed at it not powering my USB drives but even so, I liked it enough to buy another for home.”]

How-to: Put Licensed Version of Memory-Map on your Samsung Note (Android)

[easyreview title=”Complexity rating” icon=”dummy” cat1title=”Level of experience required, to follow this how-to.” cat1detail=”It all make perfect sense and it’s very easy to do. Why Memory Map just don’t share this with us all, no idea!” cat1rating=”1″ overall=”false”]

I do a lot of off road driving in my spare time and navigating using OS maps is essential. So imagine my excitement when the Samsung Galaxy Note tablet hit my radar claiming to have inbuilt GPS. So no more cumbersome laptop with a separate GPS unit and instead a much more portable tablet. Then when I checked with Memory-Map, Android is fully supported and I thought this was going to be a foolproof installation.

I have used Memory-Map on the iPad before and it has always been a pain to set up. I have to say that the support of it as a product is complete comedy. I would have thought that with every half-decent tablet that emerged on the market, Memory-Map would be looking to investigate and provide detailed instructions. That can only aid their sales of their mapping product, surely? But oh no, that’s too much work for them. Instead I was wading through half-baked, inaccurate ReadMe files before I finally gave in and asked Geek to help me out.

So then, without further ado, how do you put a licensed copy of Memory-Map on your Samsung Galaxy Note 10.1 tablet?

Firstly, you will need your own licensed copy of the software (which has come down a lot in price of late) and that will need to be installed and registered on your PC. Happily the instructions for that are very simple. Just create a Memory-Map account and hey presto you have access to whatever number of licenses are allocated with your version, one of which will be dedicated to your PC.

Directory MM

Next you need to connect your Samsung tablet to your PC via the usual USB lead and go to the Memory-Map site’s mobile downloads section and download the Android app.

It’s here that you can sometimes stumble at the first fence. The mobile install appears to be designed to encourage people to buy the rights to chunks of OS map via your Memory-Map account. Doing this puts a file on your system called a .DMS, which has the effect of signalling to your tablet that all map content is currently unlicensed. I guess I can understand why Memory-Map doesn’t go into detail with that but to be honest in the majority of cases if you don’t know about that and remove it, it’s never going to work! For now, don’t worry about that aspect.

Copy all content from os_50 or whatever your Memory-Map program folder is called. There will usually be 4 files in here. Memory-Map says just to copy the .qc3 file, which doesn’t work. Even if you copy the .qc3 and .qct files, the place name search function wont work. Better to get them all.So far so good. Now what you should find is that you can browse to your Samsung tablet via your PC. In the download directory there will be a Memory-Map folder and very probably a .DMS file. On your PC you will have a Memory-Map folder in your Programs directory from the install I discussed previously. The name of it can vary depending on what Memory-Map service you have bought, usually prefixed with os. Mine is os50. From here its a matter of a step by step approach.

MM dir to copy

  1. Next paste them into a directory on your Samsung tablet where the Memory-Map software can see them. The correct location to copy the files is /Download/Memory-Map. You must be precise about this. No sub-directories. The software will only check that directory for content.
  2. Check for the presence of a DMS file. In some cases (I’m not completely sure how but probably linked to accessing the digital map store or original Android download), the system will have created a “DMS” sub-folder under Memory-Map.  Within that, files indicate you have not paid for any of the OS maps, so it wont show you unscrambled OS maps but will prompt you to pay for them.
  3. If this folder has found its way onto your tablet, you will need to remove it.

That should be it. All files loaded in the correct place with no restrictions.

If you open MM on your tablet and select Menu then More Maps you should now see your OS map listed. Just select it and the software should check your online licence and add this device to your account using a further licence.

Now why can’t Memory-Map include these simple bits of advice. I mean rocket science it is not!!

How-to: Make your Browser Open on Start-up and Auto Open Your Frequently Used Sites

[easyreview title=”Complexity rating” icon=”dummy” cat1title=”Level of experience required, to follow this how-to.” cat1detail=”The Geek had this info in his back pocket but I managed to complete it and get it running after a 2 minute conversation. Seriously, if I can do it your granny can!” cat1rating=”1″ overall=”false”]

Here is an interesting little How-to. Well I thought it was. Geek, who put me onto it just laughed and said it was obvious stuff but he is a geek after all.

My issue was that whenever I powered up my PC I found myself going through the same old ritual of starting a browser session, opening up a tab for each of the websites I use or regularly monitor during the day. A tab for my AdSense account, YouTube and Gmail. Then another for my banking, Bendifroot website and good old Geek & Dummy and another for my 4×4 club, the Lowrangers. All a bit of a pain. A right pain if I inadvertently closed my browser session and had to open each one again.

So, I wanted something that when I fired up my PC, automatically opened Chrome and all of these sessions. Even better, something that could be kicked off again subsequently without any major headache.

Okay, the Startup menu folder can be used to open individual programs on login, but I wanted something more controlled and flexible. Geek explained it was very easy to create a batch script in Notepad that listed the actions you required to be completed on login. Sounded like witchcraft to me but it’s actually very simple.

First thing: open up Notepad. Whichever version of Windows you’re running, it will probably be in your Start menu under Accessories/Notepad. This is a very rudimentary text editor that has none of the MS Word type formatting options.

There’s some very basic syntax. I’m assuming you use Chrome (because I do) but the concept works equally well with other browsers.

start chrome --new-window

This does exactly what you would think. Opens Chrome in a new window. After that it’s a simple matter of listing what tabbed sessions you want Cchrome to load for you.
Here’s an example of my own:


Now the key part: you need to save this as a .bat file. Call it what you like. I call mine “internet.bat”. Then save it into your Startup folder. This can be in slightly different places depending on your user profile settings but most likely Windows/Start Menu/Startup.


I also create a shortcut to the .bat file on my desktop. If I inadvertently close my browser session, I can start it all again with a double-click.

And there you go; simples. A nice easy way of creating a batch script your PC automatically runs, and you can manually run too. I bet you feel like a computer programmer now don’t you?!

News: PRISM scandal – tech giants flatly deny allowing NSA direct access to servers

I read this story with interest. So a highly secretive branch of the American government has been snooping on our emails, messages and calls using a sophisticated bit of software and the big tech giants may be complicit?!? Surely that’s not really a surprise to anyone is it?

It seems there are various disapproving camps forming around this.

First: a band of technophobes, incredulous at the thought that a government organisation would be able to spy on them in this way. I mean come on get real. Yes, conspiracy theory nuts have raved on about this for decades. But we the public, know that phone bugging can be done legally under a warrant; why would we think this has any limit?

The second camp is on a corporate witch hunt. How could Google and Microsoft not have known about this? Or worse, how dare they allow the government to put its sticky paws on our private correspondence?

You’ve seen Will Smith on the silver screen battling shadowy branches of American government ably assisted by Gene Hackman, a master of tech surveillance. It transpires that this shadowy branch has gone rogue and is targeting innocent members of the public. Is there anything unbelievable about this? The fact that the technology exists to allow this surveillance or that a government organisation can go rogue? (Or worse, conduct the surveillance without legal approval but with state support.)

It may sound like science fiction but the technology exists. Once that’s accepted I have my own view on its existence and use. A government organisation going rogue? The conspiracy theorists will be screaming at me but it is pretty implausible in this age of information and accountability.

For a start, why think that what you are saying and doing online is so interesting to the NSA? Let’s take that thought a stage further: if you are saying something that interests the NSA, I’d suggest I want you to be secretly monitored by them.

I know this will be at odds with many of you technically savvy people in this brave new I.T. world but I personally feel that I am willing to sacrifice a little bit of privacy for the greater good. I mean how do you think the security services in the UK foil terrorist attacks and keep us safe in our beds? Information and the control of it is the secret war no one likes to tell us about.

But do you know what, when I stand back and look at this again from a more suspicious angle I find myself asking a number of left-field questions that make me doubt the whole story.

If this technology does exist and is being used, why would an organisation like the NSA (arguably the most secure organisation in the world) allow the Guardian to learn of its existence and so make it redundant. I mean, any self-respecting terrorist would read this and not use the internet again, right? Lets remember the information regarding its existence was anonymously leaked and the online message boards are already full of anti-American rhetoric raving about Prism and civil liberties.

Whether the technology exists or not, don’t expect the Googles of this world to admit they let the NSA trawl through their servers. I guess I may be in the minority in not caring if they did. But if they stood up and said, ‘Yeah we share your data with the NSA,’ I think the shareholders would be none too pleased.

We know Google already mines internet usage to target users with appropriate adverts. For example, if I insert an advert from Google’s AdSense below this paragraph you should see adverts popping up relevant to things you searched or shopped for recently. Shame on you if Tracy, a single and very friendly lady is offering to visit!! 😉

This is all feels a bit like PR spin to me. On one hand I think we all know our internet usage is being monitored in some way by someone. I’m ambivalent to that fact. It being drawn to the public’s attention in this way has the smack of an opposition group attempting to stir up ill will against ‘Big Brother’.

On the flip side, come on tech giants, don’t treat us like fools. You obviously mine our data for your own purposes and as it suits you. Its not a huge leap to assume you’d allow selected organisations to do the same for the “greater good”.

So a sensational headline but really, is any of it big news or really that shocking or are we all just kidding ourselves about our personal internet privacy?

(Hint: we’re kidding ourselves. But don’t worry – Geek is here to help improve our online privacy: read on.)

How-to: Reinstate the delete button in Android Gmail app

Google’s development philosophy is a process called “evergreening”. Make sure your business profile is always new, always interesting. This is one reason why Google Doodles are actually a big deal for the company. It is also a reason why ultra conservative companies struggle to integrate Google Apps into their I.T. infrastructure. Constant change is unsettling, especially when you need to support end users who are not particularly tech-savvy.

So, Google has done it again. The latest update to the Android Gmail app changes a few things and, most irritatingly, moves the delete button off to a menu. Now, when you select an email, you have three buttons – archive, mark unread and move to folder:

Gmail_01

You can delete, but you need to tap the menu, then select “Delete”. Who has time for that?!

Fortunately, there’s a solution; the delete button can be reinstated through a configurable setting. Go to Settings then “General Settings”:

Gmail_02

Choose “Archive & delete actions”:

Gmail_03


Select “Show archive & delete”:

Gmail_04

Breathe a contented sigh of relief:

Gmail_05

Note to Google: Please think before you release gratuitous changes in future. This busy Geek doesn’t have time to be undoing all your mistakes!