Review: Kodak PlaySport ZX3 & ZX5 Action Camera – Waterproof & Shockproof

One of my intentions when creating Geek & Dummy was to review cutting edge and newly emerging tech but every now and again, I hit on an old favourite that just does its job so well it deserves to be re-visited.

Let me set the scene for my requirements in an action camera. I am an avid off-roader. I want a camera that can be bashed by branches, submersed in water and generally shaken to within an inch of its life. Through all that it still needs to shoot images of sufficient quality to edit into films.

I’ve tried numerous budget options where picture quality is laughable, especially in low light. I’ve also toyed with the high end GoPro range that, whilst capable, has so many drawbacks and reliability issues for such a high price tag, I struggle to see why they are the go-to answer for most professionals wanting an action camera.

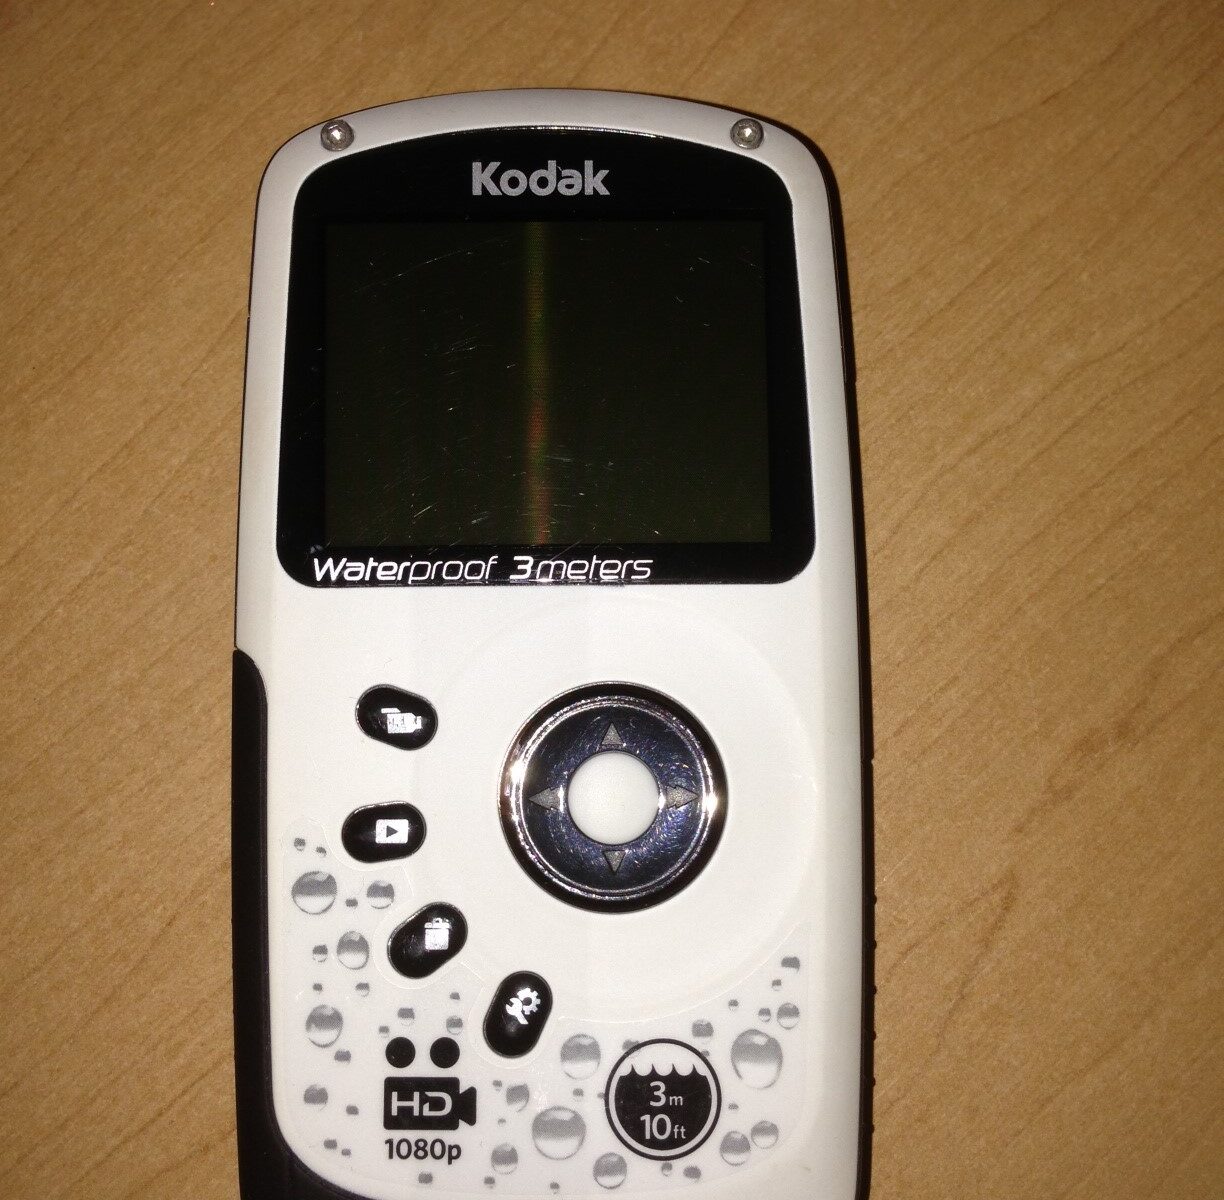
So step up the Kodak PlaySport ZX3 and more recently the updated ZX5 variant. The action camera that makes the lofty claim of being shockproof, waterproof with in-built image stabilisation and HD quality images. Many action cameras claim it but is it true of the Kodak?

Kodak Playsport ZX3

The camera itself is mobile phone size (approx 55mm x 115mm) with a rubberised finish and feels comfy in the hand. It has only 5 buttons and the main control is a 5-way rubberised button, positioned ergonomically for its operation. On first inspectio,n given the shape of the camera when compared with a GoPro, you could be forgiven for making the assumption it simply won’t be up to the job. This camera is nothing short of astonishing, however. It has the standard 1/4” threaded adaptor on its base so, unlike the GoPro, your mounting options are cheap and varied.

The compartments that house the battery, SD memory card and charge points are all positioned under water tight sliding compartments. Having fully submerged this camera on a number of occasions, Kodak’s claim of a waterproof design is completely true. And I haven’t just dipped this in a pool or the bath. This camera has been through rivers of mud at speed and still come out smiling!

Here’s a short demo of the cameras size and compartments and some examples of a few of the knocks and dips it’s taken.

Pretty cool, right?

The image clarity is fantastic although I find full 1080p too detailed for the action footage I shoot. 720 at 60 fps gives a perfect balance between file size and quality. The in-built image stabilisation means it’s easy to mount on say a Land Rover bonnet and still get a relatively stable image as the car bounces all over the road.

Sure there are some trade-offs. There is no option for an external mic. The built-in mic is sufficient for close up action though. In my extensive testing and editing of the footage, the PlaySport takes better quality images than cameras costing triple the price.

Kodak has gone for the middle ground in firmware, falling between the idiot-proof Flip and the overcomplicated Toshiba Camileo, with simple and obvious operation. It still has everything it needs to be an action camera – even a decent zoom feature.

So after I’ve ticked the boxes for rugged build, quality image, waterproof and shockproof, what else is essential in an action camera? Battery life! It’s this area where all action cameras seem to be weak. I remember being particularly fed up with the GoPro because not only did the battery give me only 45 minutes of continuous video, it was a pain to open the waterproof housing and replace or charge the battery. And the battery cost silly money. Again the Kodak excels in this area. I get between an hour and 2 hours of continuous use, depending on the conditions. Then when it is time to change the battery it’s simplicity itself; the waterproofing is built into the camera and replacement batteries slot in easily. Considering the PlaySport’s battery is a standard 3.6V camera battery and can be bought anywhere for a few pounds this camera, on the market for 3 years now, is shaping up to be a Go-Pro killer!

I stumbled on this camera by accident but I’m so glad I did. I’ve spent hundreds of pounds on handhelds, Go-Pros and everything in-between. In the end this little £80 marvel stands out in every area and puts far more expensive models to shame.

You’ll be buying this camera for its rugged and waterproof claims, and in those points the camera performs in a class of its own.

[easyreview title=”Dummy rating” icon=”dummy” cat1title=”Ease of use” cat1detail=”Fairly simple, point and shoot for good results” cat1rating=”4.5″ cat2title=”Features” cat2detail=”Almost everything it needs as an action camera” cat2rating=”4″ cat3title=”Value for money” cat3detail=”Considering what other action cameras sell for, its a snip” cat3rating=”4.5″ cat4title=”Build quality” cat4detail=”I literally haven’t been able to break one yet!” cat4rating=”5″ summary=”You can still buy these on Amazon but they are getting rare. If you see one then snap it up because they are amazing.”]


How-to: Administer Active Directory/Windows Server remotely using a privileged account

[easyreview title=”Complexity rating” icon=”geek” cat1title=”Level of experience required, to follow this how-to.” cat1detail=”Though this wasn’t easy to work out, hopefully the how-to is easy-peasy to follow. You may need to do a little research if your platform differs much from mine (Windows 7/Server 2008).” cat1rating=”1.5″ overall=”false”]Oh my, how hard did Microsoft make this?

The scenario: like all good domain administrators, I have a day-to-day non-privileged account, for normal access and a domain account for use as and when I need it.

The objective: use an MMC (Microsoft Management Console) to administer the domain from my normal workstation, with my domain admin account.

This should be easy, right? Fire up the MMC, type in your domain administrator credentials and you’re away? Wrong. What you actually need to do is something like this. This is to administer AD running on Windows Server 2008 from a Windows 7 workstation:

Step 1: Install Remote Server Administration Tools

Install the Administration Tools Pack for the server[s] you intend to administer. For Windows 7, this pack is amongst the features you can install for the o/s. There are however some caveats and you would do well to read the comments on this Technet article, if you get stuck.

Step 2: Configure WinRM

If you want to manage a server such as Windows Server 2008 remotely (not just Active Directory), you’ll need to configure WinRM (Windows Remote Management) on the remote server. Until you do, your attempts to connect may result in error messages like “Server Manager cannot connect to Server1. Click Retry to try to connect again”. Certainly, this is what happened for me:

07 Server Manager cannot connect

On the remote server, in an elevated command prompt:

C:\Users\rob.admin>winrm quickconfig
WinRM already is set up to receive requests on this machine.
WinRM is not set up to allow remote access to this machine for management.
The following changes must be made:

Create a WinRM listener on HTTP://* to accept WS-Man requests to any IP on this machine.
Enable the WinRM firewall exception.

Make these changes [y/n]? y

WinRM has been updated for remote management.

Created a WinRM listener on HTTP://* to accept WS-Man requests to any IP
on this machine. WinRM firewall exception enabled.


That alone, might not be enough. The next hurdle I encountered was similar, but this time the issue concerned the WS-Management catalog (whatever that is):

08 The resource URI was not found in the WS-Management catalog

For Windows Server 2008, you also need to install a feature called “WinRM IIS Extension”. In Server Manager –> Add Features:

09 Add WinRM IIS extension

This feature installation takes forever (well, quarter of an hour, for me). Why? Who knows.

You still might not be able to connect to a Server 2008 box after this. Try installing version 3 of the Windows Management Framework. You can download that here. Note: this depends on Service Pack 2 of Windows Server 2008, the previous version of Windows Management Framework (which gives you PowerShell 2.0) and .NET 4.

If you still can’t connect, shrug your shoulders and just accept the fact that Remote Management is one of the things that Microsoft improved dramatically in R2 of Server 2008. You will still be able to use many MMC snap-ins, but some (like the “Server Manager” snap-in, ironically) will just fail.

Step 3: Create your MMC

I’ll just use a simple example here. First: Start –> Run –> mmc.

Within the console, Add/Remove Snap-in:

01_Add_Remove_Snap-in

Choose your desired snap-in (e.g. AD Users and Computers):

02_Choose_desired_snap-in

Click “Add >”. The snap-in will appear on the right. Continue for all the snap-ins you’ll want to use, then click “OK”.

Save your custom MMC. I would recommend putting it somewhere where you’re not going to be hit by UAC problems – i.e. not in the root of your C: drive, not under C:\Windows, etc.

Step 4: Create a shortcut to your MMC

You can’t directly run the MMC. Don’t try. Create a shortcut. You can put this shortcut on your Desktop, or wherever you like. So, for example, right-click the Desktop and click New –> Shortcut.

You need to specify the shortcut as C:\Windows\System32\runas.exe /netonly /user:your-domain-admin-user@your-domain "mmc C:\Path\To\MMC\DomainAdmin.msc":

04_Create_shortcut

Having created your shortcut, set it always to run as Administrator. Right-click –> Properties –> Advanced:

03_Run_shortcut_elevated

Step 5: Run the shortcut

When you run the shortcut, you should now see a UAC prompt and after that a command prompt, asking you for your domain admin password:

05_Credentials_prompt

For me, it’s not instant, but eventually, the MMC loads and runs as intended:

06_MMC_running

Happy days. No more RDP. 🙂

Review: Sinjimoru Sync Stand for Apple iPhone 5 Dock, Cradle Holder

£19.99 from Amazon.

I’ve long been an Apple fan (well a fan of the core devices they produce – not of the way they extort loyal customers with ridiculous prices for add on-consumer products). So when I got my iPhone 5 on the day it was released to the UK, my plan was to hang fire for a month or two and wait to see what the world of eBay and Amazon would deliver in the way of gimmicky add-ons. In particular, I always like a second charger and a dock station so I can charge and view my phone at my desk. Months after the iPhone 5 release nothing has been officially produced by Apple and the Lightning cable is still very expensive but I found this nicely designed dock that claimed to tick all my boxes.

iPhone 5 dock

Initially I was attracted by the design and the fact it worked by integrating my existing Lightning cable. It looked to be a good bet, especially if you were to believe the Amazon reviews.

On opening the dock, I was pleasantly surprised by its quality and feel. It appears to have been machined from aluminium and then plasti-coated. It is a solid and compact little design and looks as good on my desk as it did in the pictures on Amazon. It comes with a couple of adaptors to allow either the new Lightning or the older pin charger to be threaded through the dock and mounted. In this way, the phone can (theoretically) sit on the dock and over the charging point, with the cable inserted into the phone. I’ve only tested this with my Lightning-cabled iPhone 5, and it’s here that I started to have problems.


iPhone adaptors

The connection is unreliable at best. The Lightning cable pushes through a transparent base plate and the thickness of this base plate seems to affect the quality of the connection into the phone. Don’t get me wrong, if you wiggle it about a bit it eventually, sometimes connects but that’s not really what I want from a dock on my desk. I want something solid and easy to click in, which brings me to my next point. The way the dock seats the phone means it’s almost entirely supported by the Lightning cable’s connector. When this was the older style pin that might have been ok, because it was wide and robust but with the Lightning pin: recipe for disaster.

iPhone 5 docking station

For me, this has become a (very!) expensive stand for my phone that doesn’t charge or sync my phone. I have no idea where the other reviews came from on Amazon because it just doesn’t work. I’ll give it 1/2 simply because it looks pretty!

[easyreview title=”Dummy rating” icon=”dummy” cat1title=”Ease of use” cat1detail=”Well, it only works as an expensive stand” cat1rating=”0.5″ cat2title=”Features” cat2detail=”Simply doesn’t work as described for the iPhone 5″ cat2rating=”0″ cat3title=”Value for money” cat3detail=”Mmmmmm!! Feel like I’ve been conned on this purchase” cat3rating=”0″ cat4title=”Build Quality” cat4detail=”It’s a shame it doesn’t work. It’s very nicely built” cat4rating=”4″ summary=”I’d seriously avoid this if you are after an iPhone 5 dock. It’s useless.”]

This slideshow requires JavaScript.

Review: Nook Simple Touch eReader from Barnes & Noble

UPDATE: If you’re looking for a super-cheap, colour, Android tablet, you might like to know that Amazon has recently slashed the price of the 7″ Kindle Fire to £99. Find out more here.

So then, the Nook Simple Touch eReader from US book retailer Barnes& Noble has become their loss-leading attempt at getting a toehold in the UK/European market. Geek, the tight-wad  wouldn’t shell out for a proper tablet, but when the Nook was slashed to £29, he couldn’t resist. And then I stole it off him for a play.

nook Simple Touch eReader

The first thing I notice when I take it out of its packaging is how tactile it is and how light. On the reverse, there are two parallel ridges that conform nicely to my grip and it feels comfortable to hold. It has a slightly rubberised feel to it, which also adds to that tactile feel.

It has a nice quick guide pre-installed and four buttons where your thumbs naturally locate on the front frame, which are additional navigation guides for turning pages. It took me a while to realise these were buttons and they need to be pressed hard to get them to work and as you can turn a page by swiping the screen, a bit redundant I think!

Usage wise, I quite like it, largely due to the very tactile feel. The size was just right for my style of reading although I can imagine it might be a bit on the small side for some people. I did read it on occasion under office LED lighting and found that some flat angles reflected that kind of light quite badly but I had to struggle to find such a position and overall the Nook was easily readable in all usual lighting conditions and gave me no kind of eye strain problems after long periods of reading.nook Simple Touch eReader

One issue I can foresee is the fact that it doesn’t link into the Amazon Bookstore but rather Barnes & Noble’s own store, which whilst adequate, isn’t quite as good.

A further little irritation for me was the screen transition and the way it seemed to flicker when refreshing. It wasn’t as fluid as a Kindle but then it doesn’t cost Kindle money!

Battery life appears to be everything claimed and having used the Nook for 3 or 4 days, the battery level indicator has not moved at all. The wireless connectivity has been switched on during this time although not heavily used.

The WiFi connectivity appeared faultless and it immediately connected or could see all of the wireless networks that my iPhone 5 could see.

Everything about it is just pick up and go or plug in and go. epub books can be put in the Books folder via a mini USB connector from your PC or via the MicroSD card with a simple cut & paste action. I did find the SD card slot to be poorly labelled and the compartment flap seems a bit flimsy.nook Simple Touch eReader

At £29 there’s really no excuse for not owning one. As a basic entry level eReader, especially when I line it up against a Kindle, considering the bargain price of the Nook, it has to be a solid competitor.

Now the Geek tells me it’s possible to “root” this and turn it into a whole different beast but to be honest that’s beyond me so I’ll leave him to look into that.

I’d recommended the Nook pretty highly. The market is crowded but it does what it says on the tin at less than the right price.

[easyreview title=”Dummy rating” icon=”dummy” cat1title=”Ease of use” cat1detail=”Downloading ebooks is a breeze. Basic eReading functions are intuitive.” cat1rating=”4″ cat2title=”Features” cat2detail=”It really has everything a good eReader should have and a few besides.” cat2rating=”4″ cat3title=”Value for money” cat3detail=”At the current price of £29 it is probably the best value for money eReader out there.” cat3rating=”4″ cat4title=”Build Quality” cat4detail=”I think it’s great. I love the tactile feel of it.” cat4rating=”4.5″ summary=”A very good value for money product that makes an excellent entry level to eReading if you were thinking of giving it a go.”]


How-to: Merge multiple RTF files into a single PDF

[easyreview title=”Complexity rating” icon=”geek” cat1title=”Level of experience required, to follow this how-to.” cat1detail=”Linux only. And newbies may find this tricky.” cat1rating=”3.5″ overall=”false”]

I recently needed to generate a large quantity of forms automatically (around 2,500 of them) and printing them. I was using PHP as the generator – it’s great at processing and transforming text. And my base (template) file was originally created as a Word document, converted to RTF for ease of processing.

There is no easy and free way of printing out 2,500 RTF files from Windows, not that I’ve been able to find. It didn’t make sense to pay for a £200 application for something that I do so infrequently. So here is my (free) approach.

Make Linux do the hard work

I’m using an Ubuntu virtual machine for this how-to, but you can use almost any distribution, with a little modification of the steps below. When it comes to command line or scripted activities (which this tutorial lends itself to), Linux/Unix is simply more mature than Windows. This means that someone, somewhere has probably already created a tool for whatever activity you’re thinking of and moreover, made that tool free.

Converting to PDF: Ted

Ted is a fairly full-featured text processor for Linux. We’ll just be using some of Ted’s command line wizardry today.

Installing Ted

Ted logoYou can download a Ted package here. I’m installing this on an Ubuntu 12.04.1 machine so I chose this package: ubuntu12041:ted-2.23-amd64.deb.

I keep all third party packages I install in a directory, /root/installed-packages, for future reference. So this is what I did, from a command line (SSH connection). First, I know that Ted has some dependencies, so I dealt with those:

apt-get update
apt-get install libxpm4 libtiff4 libgtk2.0-0 libpaper1
apt-get -f install

Then downloaded and install Ted:

wget http://ftp.nluug.nl/pub/editors/ted/ubuntu12041:ted-2.23-amd64.deb
dpkg -i ubuntu12041\:ted-2.23-amd64.deb

Combining files: pdfmerge

Abiding by the principle of “do one thing well”, guess what pdfmerge does?

Installing pdfmerge

If you’re using a RedHat-derived distribution, you’re in luck, there’s a pre-built package. If you’re using Ubuntu though, here goes. Download the source [iwrtooltip title=”a compressed archive of files”]tarball[/iwrtooltip] from here. Again, I’m starting in my directory /root/installed-packages.

wget http://dmaphy.github.com/pdfmerge/pdfmerge-1.0.4.tar.bz2
tar jxf pdfmerge-1.0.4.tar.bz2
cp pdfmerge-1.0.4/pdfmerge /usr/local/bin
rm -rf pdfmerge-1.0.4

Put it all together

Now the utilities are installed, you can run the following simple bash script to convert your individual RTF files into PDFs, then merge them all into a single PDF. I put the RTF files in one directory, then the PDF into the directory above it in the directory tree. We use a script that is bundled with Ted – you may need to check the precise location.

for filename in ./*.rtf
do
/usr/share/Ted/examples/rtf2pdf.sh $filename
done;
pdfmerge *.pdf ../all.pdf

Acknowledgements

Thanks to Mark de Does for Ted and to Dominic Hopf for pdfmerge.

Review: SoundWave SW100 Portable Bluetooth Speaker

As for many other people, my phone has become my go-to device for all my mobile entertainment needs. I currently have a Samsung Galaxy Note 2 (yeah, the one with the ludicrously large screen), so it’s great for anything from internet browsing to watching films in HD quality. I also use it as an MP3 player and for listening to podcasts and audiobooks.

I recently started looking around for a portable speaker that I could take on my occasional travels and, not to put too fine a point on it, use in the bathroom. Surely I’m not the only one that likes to listen to audio books while I shower?

The Note 2 isn’t, er, noted for its high quality speakers. Very few smartphone manufacturers have been able to complete with Apple on this front. But even the mighty built-in speakers of an iPhone struggle to compete with the noise of my geyser-like shower or electric shaver.

As Dummy will tell you, I’m a bit of a tightwad when it comes to my technology purchases, so I was looking for a device that could combine the impossible requirements of sound quality, power and cheapness. I wanted the convenience of connecting by Bluetooth, with the option of a 3.5mm socket for greater flexibility.

Having considered many products and read a lot of reviews, the device I settled for was this, the SoundWave SW100:

Rear view
Rear view

Here are some vital statistics:

  • Small – about three inches tall
  • Reasonably light – I haven’t put it on the scales, but it feels about the same weight as my Note 2 + case
  • Loud – I can’t find any official information on wattage, but when I turned it up to max in my small kitchen, it was louder than I could tolerate; at that point, there was some mild distortion
  • Built-in microphone – theoretically you can therefore use this device for conference calls; I have not tried this, but for the sound alone it can only be better than putting your phone into speaker mode
  • A claimed 10 hours music/talk time
  • A claimed 800 hours standby time – I’m not sure what use this figure is though; I’ll either be using it or charging it

Out of the box, the speaker was fully charged in less than an hour. It comes with a microUSB cable for this purpose. For my first trial, I took it into my company’s noisy server room. About 80% volume was sufficient to hear music clearly and without distortion, over the cacophony of fans and aircon.

It paired over Bluetooth without fuss. I have noticed the occasional blip when playing through Bluetooth, but I think this is more likely to be down to the phone (of which I demand a lot!) than to the speaker. In any event, you can use a 3.5mm audio cable (supplied) if you prefer.

SoundWave SW100 and matThe speaker has a non-slip base, great for most surfaces. The manufacturers have thoughtfully included an additional non-slip mat, making the speaker very unlikely to budge during normal usage. The non-slip mat also slightly neutralises the effect of resonance transmitted through the surface on which you place the speaker. Unless you’re an audiophile (I confess I’m not), this probably won’t mean a lot, but for some, it will be important.

For the size of the speaker, I was impressed by the bass response. In fact this was one of the reasons I bought the speaker – to improve bass experience, without having to lug around a sub woofer and without having to spend thousands on a high-end miniaturised speaker system.

Build quality is good. The case is mainly brushed aluminium, and not unattractive. It passed the spouse test; no exclamations of,”Oh how hideous! What horrendous technological monstrosity is that?!”

SoundWave SW100 mic and buttonThere are two controls. First, there’s a button labelled with a phone symbol, for answering calls and setting up the initial pairing. Secondly there’s an on-off switch. There’s an LED to indicate connection status and charging status and there’s a microphone port along with the USB charging port and 3.5mm audio socket.

I paid £20 for the speaker. Although at one time it was available for less, it is still a bargain at this price. It receives favourable reviews (wherever you look) and I can only confirm what other reviewers are saying. Well worth the money, especially when you consider you can pay four times the price for a product that may have a pretty label but is otherwise no better.

Entirely up to you, but you can pick one up from Amazon here, or from eBay,
[easyreview title=”Geek rating” icon=”geek” cat1title=”Ease of use” cat1detail=”BlueTooth synced very easily. There’s an off/off switch. Simples.” cat1rating=”5″ cat2title=”Features” cat2detail=”It has no on-board track control buttons and lacks the ability to daisy-chain other speakers. Higher-quality speakers may handle bass better, but that’s being very nitpicking.” cat2rating=”3.5″ cat3title=”Value for money” cat3detail=”It competes well with speakers three times its price.” cat3rating=”4.5″ cat4title=”Build Quality” cat4detail=”Very solid. Has survived several downward lunges!” cat4rating=”4.5″ summary=”If you want a portable speaker, on the go, don’t mind that the output is mono, and don’t expect the sound to fill a concert hall, this is the device for you. Highly recommended.”]


How-to: Rooting the Nook Simple Touch

UPDATE: If you’re looking for a super-cheap, colour, Android tablet, you might like to know that Amazon has recently slashed the price of the 7″ Kindle Fire to £99. Find out more here.

[easyreview title=”Complexity rating” icon=”geek” cat1title=”Level of experience required, to follow this how-to.” cat1detail=”The latest rooting process is fairly straightforward, if you’re patient and pay attention to all the details.” cat1rating=”1″ overall=”false”]Nook browsing webAt the time of writing, the Nook Simple Touch is still on offer with Barnes & Noble, but out of stock. Which is to say, it’s dirt cheap, but ner ner ne ner nerrr, you can’t have one…

If you were one of the lucky ones to pick up the reduced-price tablet before stocks ran out, or if you already had one of these, you might be interested to know that you can unleash some of its secret powers through a process called “rooting”. The tablet is based on the well-known operating system Android and has hidden talents that Barnes & Noble would rather you didn’t find out about (like loading a Kindle app onto the tablet for example – gasp)!

When my Nook arrived, it was running firmware version 1.2.0. The Nook has since been silently upgraded by Barnes & Noble to 1.2.1. I mention this because manufacturers tend not to like having their devices’ security bypassed (I’m looking at you, Apple). It’s entirely possible that one day B&N will release an upgrade that makes it significantly harder to root the device. Thankfully, with all versions up to 1.2.1, it’s still possible.

Before you proceed any further, there are a few points to highlight. I apologise for the extreme emphasis, but they’re such important points, I didn’t want you to overlook them.

  1. Rooting your Nook will almost certainly void your warranty. Don’t rely on the possibility that you may be able to reverse the rooting process. By the time you need to call on the warranty, your device may be in such a state that you’re not able to “unroot”. Only root your device if you’re satisfied you can afford to lose the money you just spent on the Nook.
  2. Rooting your Nook may “brick” it, that is, render it inoperable. It’s rare, but it can happen. Once this has happened, you can still use it as a rectangular frisbee, if you wish.
  3. You must, repeat must go through the Barnes & Noble registration process before you attempt to root the NST. Follow the wizards and make sure your Barnes & Noble store is working. Don’t skip this step.
  4. Nook Devs is a great site to visit if you want to know a lot more about this process.

Pre-requisites

You’ll need:

Rooting

  1. This process wipes the MicroSD card you’ll be using. I had already copied some files to my card, so I copied them back to my laptop for now. You may wish to do the same, or you can use a dedicated card for the rooting process.
  2. Download and unzip NookManager. This will leave you with a single file, NookManager.img.
  3. Download and unzip Win32DiskImager.
  4. Insert your MicroSD card and ensure it’s mounted (visible in Explorer).
  5. Run Win32DiskImager.exe. It will probably request elevated permissions. The interface might take a while to appear. Be patient. You’ll eventually see something like this:
    Win32DiskImager
  6. Use the folder icon to browse to the location of NookManager.img. Make sure the “Device” selection is pointing to your mounted MicroSD card.
  7. Make triply sure you’re writing to the correct device and click the “Write” button. Heed the warning and if you’re ready to proceed, click “Yes”. In a little less than 10 seconds, the writing process should be complete.
  8. Unmount the MicroSD card from your computer, but don’t install it in the Nook yet.
  9. Unlock your Nook, then power it down, by holding in the power button for three seconds, then tapping the “Power off” option.
  10. Insert the MicroSD into the Nook, and power it up.
  11. You should see the NookManager loading screen:
    Nook Manager Loading Screen
  12. For this procedure, it really makes little difference whether or not you start with wireless capability. It’s quicker if you don’t:
    NookManager start wireless
  13. When you arrive at the Main Menu, click the button next to “Root->”:
    NookManager root
  14. Next, click the button next to “Root my device->”:
    NookManager root my device
  15. If you’re an Olympic swimmer, you can hold your breath during the next bit:
    NookManager rooting in progress
  16. There’s no progress bar. After a while, you should see the following (note the word “Success!” at the bottom):
    NookManager rooted
  17. Click “Back” then “Exit”:
    NookManager exit
  18. Eject your MicroSD card when prompted:
    NookManager eject
  19. You can and should use NookManager to take a backup during this process. I didn’t, because I didn’t have a spare MicroSD card to dedicate to backups. I possibly need to research this area more. Backups are good. I, obviously, am a Bad Boy. I tried taking a backup (the process took about 15 minutes), but then I wiped the card for other use. Go me.
  20. When first unlocking, post-root, you’ll be presented with a slightly cryptic message: “Complete action using Home/ReLaunch”:
    Nook Complete action using
    The checkbox, when selected, means “Always” do this. Just choose whichever you want at the time and leave the checkbox unticked. “Home” takes you to the Barnes & Noble interface. “ReLaunch” takes you to an Android interface designed for the Nook. You’ll see these this choices again, whenever you press the Nook button, followed by the “home” icon.
  21. Hang onto your NookManager MicroSD card for now. You’ll need it for installing Google apps (next section).

If your first attempt at rooting didn’t work, don’t panic. You can safely repeat this process as many times as you like.

Installing Google Apps

If you still have your NookManager-prepared MicroSD card, you may wish to install some Google apps. This gives you Google Market (the earlier version of the Play Store), Gmail, Calendar and a few other bits and bobs.

  1. Download NGTAppsAttack. The version number you download should be the same as the version of NookManager you’re using.
  2. There are quite a few “gotchas” with this process. I strongly recommend you follow the instructions at the start of this thread at XDA Developers. In particular, note the comment, “Once your Nook has booted you need to follow the next steps without delay. You don’t need to rush but you need to move through them without interruption.”

Despite what I’ve read elsewhere about needing to use a Google account ending in “@gmail.com”. this worked fine with my Google Apps Domain account (which I use for my Android phones). You can now start installing apps using the Google Play web interface (from your computer), but bear in mind that many apps won’t be compatible with the Nook‘s old version of Android.

At this stage, I completely wiped the SD card, removing all existing partitions, using Parted Magic.

Apps to install

Nook with Play Store

Since the Nook is running Android 2.1 that’s a significant limitation. All apps to be installed must support 2.1. Also, the Nook has limited memory, so RAM-hungry apps won’t run at all.

I’d recommend the following apps:

  • The current version of Opera Mobile seems to be about the best web browser for the Nook (better than Opera Mini). But remember that web browsing with an e-ink display is never going to be slick.
  • For reading comics and certain magazines, Perfect Viewer is great. The last version to support Android 2.1 was 1.9.2.2. You can download that direct to your Nook, by using Opera to browse here. In case you’re hand-typing URLs, here’s a shortened URL for your convenience: http://is.gd/m6eSSk
  • If you install the Perfect Viewer PDF Plugin, you can also read PDFs, with full zoom control. The current version of the plugin (1.1.2) is compatible with the Nook, so you can install it via the web.
  • Version 2.1.0 of Aldiko Standard is compatible with the Nook and enables you to read ebooks in many formats other than epub. Download the APK here. Shortcode: http://is.gd/O4j6Wz
  • To give you access to Amazon’s catalogue, install the Android Kindle app. You can install the current version via the. Oh, and yes: ha ha ha.
  • Dropbox seems to me to be of slightly limited usefulness, except maybe for conveniently transferring the odd file to the device, but you can install the current version via the web if you’re so inclined.
  • The current version of Fora Dictionary works well. You’ll probably want to install one of the dictionary packages too.


Conclusion

There you have it. At no extra cost (except a bit of time), you’ve flung wide open the capabilities of your eReader. As long as you continue to bear in mind the limitations (and advantages) of e-ink technology, you can’t fail to be impressed by this fantastic device.

Review: Basic XL Noiseless USB Desktop Fan

£5.99 from Amazon.

Noiseless USB Desktop Fan

A simple USB powered fan that claims to be silent.

It’s cheap and it’s cheerful and barely worth a review you might think. I work in a very warm office though and have bought a number of these at varying prices; some have been very poor indeed!

I bought this one from Amazon and it was free postage so all in all a cheap little thing to buy. As you can see from the picture, it looks kinda cool and in the flesh it is a nice little compact fan that’s about 16cm high, 14cm across and 9cm deep. It has a generous USB cable and looks good on my desk.

The first thing you will notice when you take it out of the box is it’s quite flimsy. Whilst the black gloss plastic looks cool, it bends and flexes just getting it out of the box. It is very light though.

Having said that about its general quality, it has 3 foam feet to reduce any vibration and for what it does and how small it is, I don’t think it warranted being constructed of anything more robust. Although it feels a bit flimsy it does seem to be correctly formed and engineered as a product.Noiseless USB Desktop Fan

Plugging it in, it instantly kicks into life with no fuss and has a good quality on/off switch on the back of the main fan body. I wouldn’t say it’s silent but it is very quiet and not a distraction at all to have on my desk.

So then, how does it actually perform? I work in a warm office and on occasions the air con just doesn’t cut it and I need a bit of a breeze to circulate the air without blasting papers off my desk. This fan is no tornado, far from it, and I’ve found it needs to be positioned within approximately 60cm of my face for me to get any kind of effective breeze from it. But do you know what? That’s all it needs to do. It’s small, great looking, very quiet and circulates the air around me nicely if positioned relatively closely. All in all, a great buy and excellent value for money if you remember that it is just a mini USB fan.

[easyreview title=”Dummy rating” icon=”dummy” cat1title=”Ease of use” cat1detail=”Plug it in and away you go. Simple as can be.” cat1rating=”4″ cat2title=”Features” cat2detail=”Maybe would have benefited from a 2nd speed.” cat2rating=”3.5″ cat3title=”Value for money” cat3detail=”At £5.99 delivered it’s decent value.” cat3rating=”4″ cat4title=”Build Quality” cat4detail=”I guess it’s sufficient for what it is but could have been a little heavier.” cat4rating=”3.5″ summary=”A good cheap price for a an above average product that does exactly what it says on the tin.”]