Review: Car & Action Camera Mounts from VacMounts – Single Base Mount & Triple Mount

When I first started using action cameras to film 4×4 trips, I struggled for a long time trying to find a mount. My two main considerations were that the cars were bouncing around significantly and I was using expensive camera kit. A mount then had to be reliable and able to absorb some of the shock.Land Rover Action Camera

There were a number of offerings on the market but these fell into two categories. 1: made in plastic with rubbish suction clamps or 2: very professional and large but costing 3 times the value of my cameras. I bought a few of the plastic versions; some of these were quite expensive devices, but in my opinion, if it’s plastic, it’s junk. I have a drawer in the garage stuffed with broken bits of plastic clamps, suckers and brackets. I didn’t even start down the pro mount route as I run 6 cameras on some days out and quite simply that was out of my budget.

So hunting around eBay for something that might do the job, quite by chance I stumbled on VacMounts.

VacMounts Triple
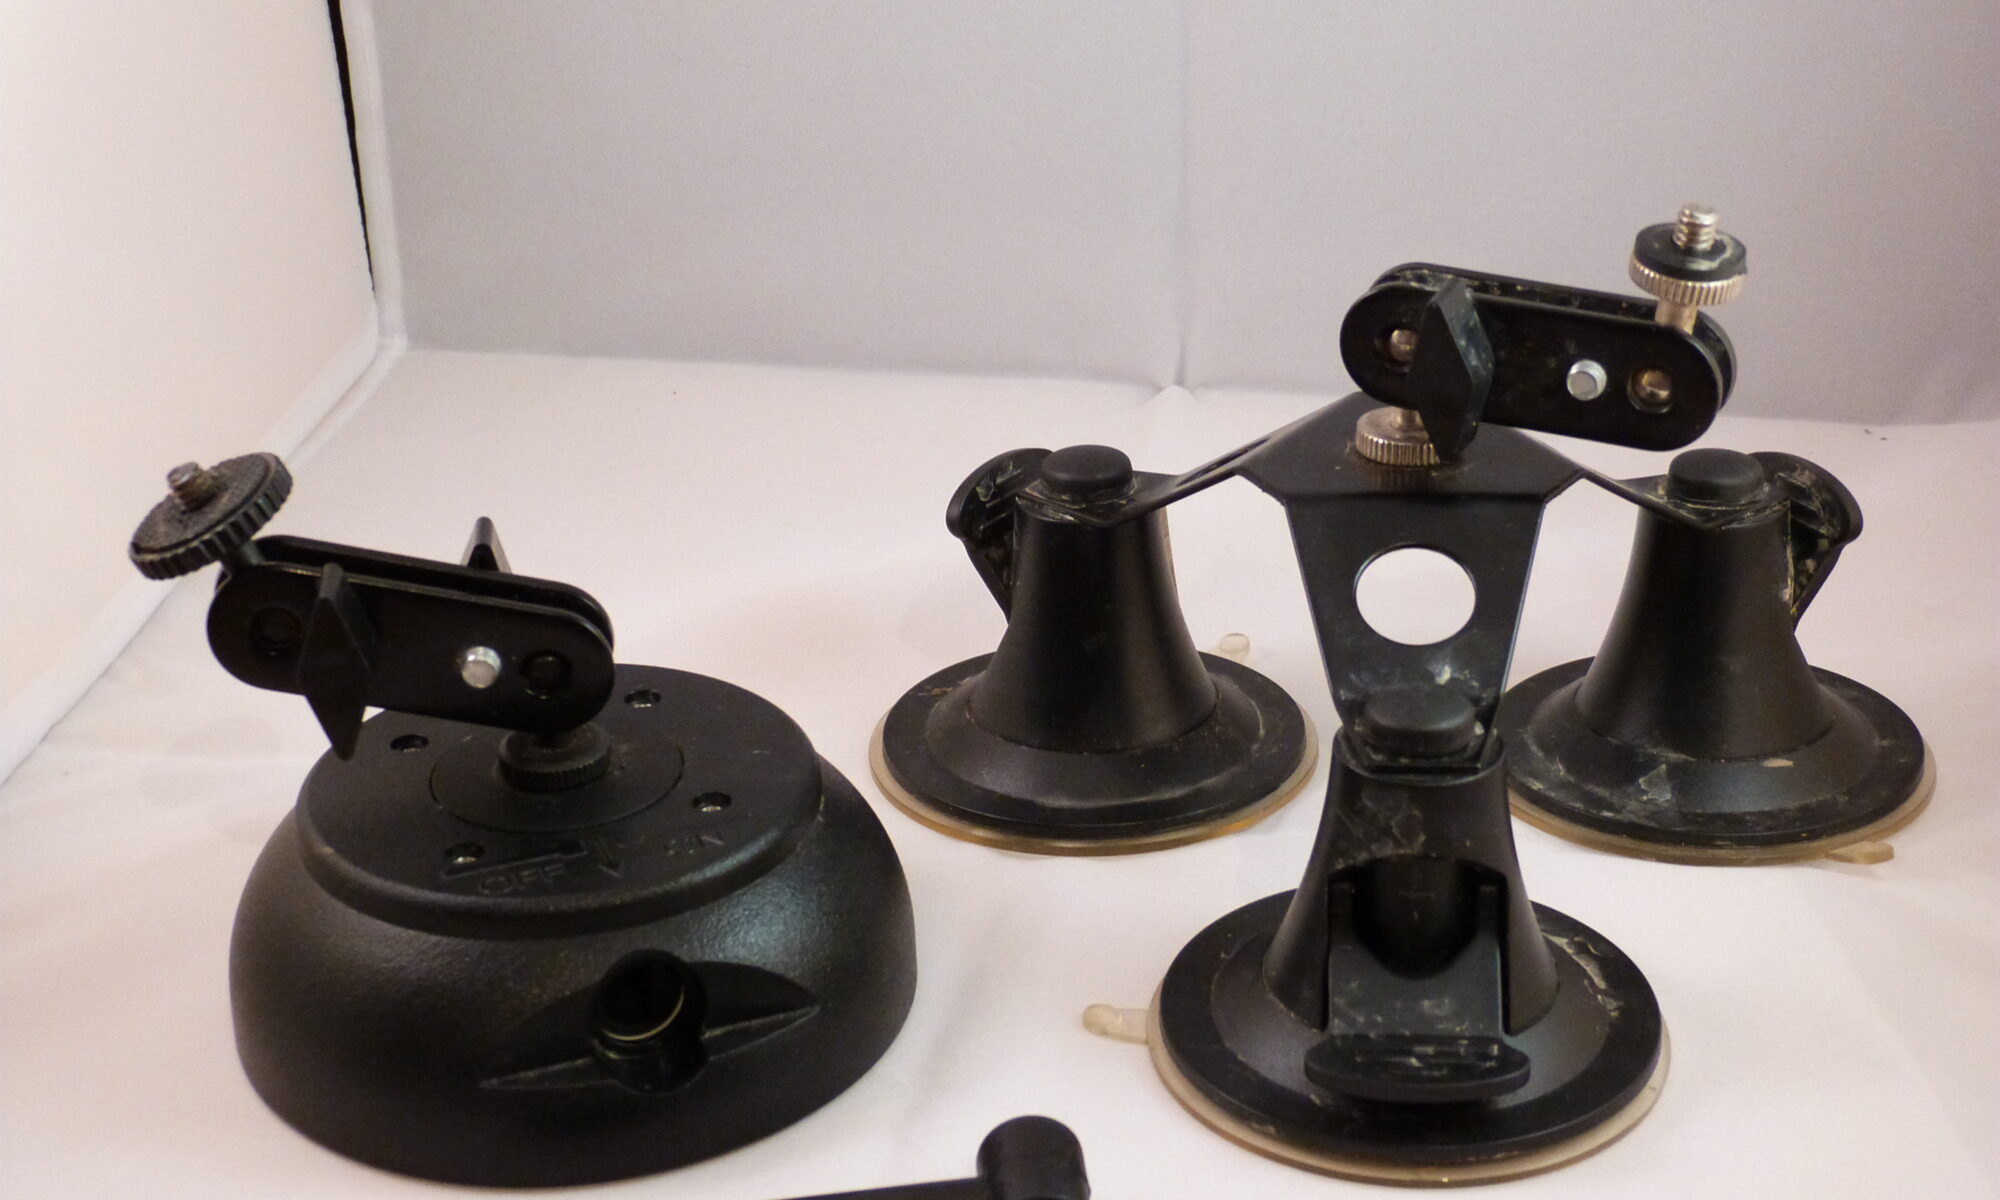
The first thing to note is that they are made of anodised aluminium and come either in a triple or a single ‘super’ suction configuration. I was immediately drawn to the triple mount because it looked like it would give a good firm base for the kind of phone style cameras I use.

The suction pads are each 8cm in diameter and operate via a simple 90° lever mechanism, which seems incredibly robust – certainly compared to the plastic offerings I have used so far.

I always try to position my cameras so you can just see part of the bonnet or bodywork because it better orientates the viewer. I tested the suction on a variety of car bonnets and windscreens with finishes ranging from perfectly polished paint to vinyl covered bonnets, right through to poorly brush-painted panels.

An interesting feature of the triple mount is that the support arms are slightly pliable. This has two effects. Firstly, it lets you alter the angle of each cup to suit the surface. Secondly and most importantly for me, they absorb vibration and shock to help keep my images smooth and stable.

VacMounts Triple SuctionJust a few small pointers to ensure this mount works faultlessly. Always keep the suction cup and the surface clean. The only failure I had with the triple suction mount was when I put it on a mud covered bonnet without giving it a quick rub first. Also, make sure you moisten the cup before applying.

At the camera connection end of the mount there is a similar quality feel. A triple jointed standard 1/4″ thread ensures you can mount the camera at any angle. With metal lock nuts and joints everything feels high quality and reliable. Certainly for the smaller action cameras I use, I feel like I’ve found the perfect mount.

VacMounts Single SuctionMoving onto the single suction mount: it’s an interesting mount and at first the fact it was a single sucker made me think it would be less reliable. This uses a chuck key and a larger sucker that is 10cm in diameter. The fact it uses a removable key rather than an attached clamp means you are unlikely to unlatch the camp inadvertently, something that has happened to me occasionally when I’ve pushed my Land Rover through dense vegetation. Also the chuck key adapter allows you to activate a 180 degree turn, providing a far increased level of suction. The 1/4″ thread with double jointed fastenings is then the same as the triple mount.

In tests I’ve found that both mounts produce nearly identical results. They both seem to grip incredibly well on any half-decent surface. The triple mount suction cups have failed me once completely on a badly painted bonnet and a number of times just a single cup has come loose. The single suction cup always seems to be locked very securely indeed and although I don’t get quite the shock absorbing properties, I have to say I feel a little more confident of it.

As a budget camera mount for vehicles, both these VacMounts are way ahead of the curve. They both offer unparalleled features with the highest level of build quality I have seen in this area. Combine that with a good action camera and you have an unbeatable combination.

The triple suction mount can be found on eBay for £29.95 and the single suction cup for £13.95. Both a bargain for what they offer.

You can also visit the VacMounts website.

Visit the VacMounts store on eBay to find out more.

[easyreview title=”Dummy rating” icon=”dummy” cat1title=”Ease of use” cat1detail=”Pretty obvious stuff once you understand the surface must be clean.” cat1rating=”4.5″ cat2title=”Features” cat2detail=”Perfect for purpose. Triple mount has let me down once. Fortunately no damage to my camera.” cat2rating=”4″ cat3title=”Value for money” cat3detail=”You will be paying considerably more anywhere else for mounts of this quality.” cat3rating=”5″ cat4title=”Build quality” cat4detail=”Infinitely better quality than anything else in its price range.” cat4rating=”5″ summary=”If you want a reliable action camera mount, seriously, I wouldn’t look any further.”]

How-to: Resolve Problems with the iOS 7 upgrade

iOS 7 UpgradeSo I assume you are like every other iPhone fanboy and girl and have been eagerly awaiting the iOS 7 update… Are you also like me and have watched and heard your friends merrily upgrading? Okay, complaining about slow downloads, having to free up memory before starting the upgrade and general niggles but on the whole, after persevering, the upgrade goes ahead?

iOS 7 No UpdateAre you? Is that you? Or are you like me and your iPhone 5 refuses to even see the upgrade let alone download it.

Okay, let’s see if we can help!

Let’s start with what I’ve tried to get past this problem. First though, before you start tinkering it’s vital that you back up your iPhone so you at least have somewhere to go back to if it all goes horribly wrong!

Back to my problem. After waiting for an hour, my phone was still not able to find the update. I made the assumption that there was some software fault in the phone so a hard reset might clear it. Hold down the home button and the lock button for 10 seconds and your iPhone will do a hard reset. When your iPhone powers back up – can you now see the update waiting to download? Nope, neither could I.

iphone Reset All SettingsSo, what do we do next? I’ve got my backup so let’s try the reset options. First Reset All Settings. In theory this should just reset your phone settings and not touch your data and media. Very straightforward; it removes all my little customisations (booo!!!) and unfortunately when I go back to the Software Update screen, still no update!

Right time to get serious, Erase All Content and Settings and then upgrade to iOS 7 before restoring my backup – can’t fail, right?

I select this option and it gives me the impression that it is doing the upgrade but then appears to ‘freeze’ when powering back up. I say “freeze”. I gave it an hour and the flamin’ thing stubbornly refused to switch back on and continually displayed the swirling symbol. I assumed it had frozen and did another hard reset and the phone came back on, obviously not having deleted the content.

Right, it’s time to consult with Geek, who after laughing at the iPhone fanboy, suggested I connect to iTunes via my PC and try the reset or direct upgrade options via iTunes. Sounds like a plan.

On connecting to my PC and clicking on the iPhone icon everything starts happening and iTunes immediately prompts me to upgrade to iOS 7. Brilliant, easy peasy……………….

So after 10 minutes of Apple jiggery-pokery my iPhone comes back to life running iOS 7 – minus all of my data, apps and everything else I loved!!! Arrgghhhh!!!!

Okay, don’t panic, I did my backup before, right? Navigate to the backup section in iTunes and hey presto………………… Oops! no sign of it. In fact a message saying I have never backed up to the cloud! Now you can imagine my panic. That’s 2 years of customization and info. Sack iOS 7 now, that was the least of my worries.

But then it occurred to me, maybe because it was still attached to my PC it wasn’t even looking at the cloud. Back to basics then. Unplug the iPhone; in Settings–>General, select the option Erase All Content and Settings then wait nervously. 7 agonizing minutes later, the iPhone powers back up and prompts me that it is a new phone and would I like restore my last saved backup from this morning? Oh thank goodness!!!!

So in a nutshell, if you are having the kind of problems I have had here you need to make a backup to iCloud, connect your iPhone to a PC to get access to it and update it but then disconnect and Erase all data before restoring from your original backup. Brilliant, thanks a lot Apple, that#s 6 hours of my life I’m never getting back!

I’m still struggling to understand exactly what the issue might have been with my iPhone 5. The only thing I can think of is that it was a specific batch from a specific provider. Mine was one of the very first to be released and was on the O2 network. Ah well, all’s well that ends well.

How-to: Raspberry Pi tutorial part 2: SD card backup/restore

[easyreview title=”Complexity rating” icon=”geek” cat1title=”Level of experience required, to follow this how-to.” cat1detail=”This is wizard-driven. Very simple. You’ll need to be able to burn a CD, nothing more taxing than that.” cat1rating=”1″ overall=”false”]

Contents

In my last Raspberry Pi tutorial (the first in this series), I mentioned that we can take a snapshot of the Raspberry Pi’s SD card at any time. This will give us a “restore point”, so we can skip a few installation steps if we want to wipe the Pi and start again. Quite a few Raspberry Pi projects will require that we start with a working installation of Raspbian so that’s the snapshot I’m going to take. You can of course take a snapshot whenever you like. If you’ve honed and polished your Rasbmc box, it would make sense to take a snapshot in case it becomes horribly corrupted at some point or melts.

There are many different ways of skinning this cat (or squashing this ‘berry), but my preferred method is the tried and tested customised Linux distribution, Clonezilla. I’ve been using CloneZilla personally and professionally for years and persuaded many colleagues of its merits (besides the obvious, that it’s free). It can be a bit intimidating with all the options it presents. If this is your first experience of CloneZilla, following this tutorial will also give you a gentle introduction to this powerful toolkit.

What you’ll need

  • A copy of Clonezilla, burned to disc.
  • A computer (desktop or laptop) configured to boot from CD.
  • An external hard drive, with enough space to store the image (you’ll only need a few gigabytes spare).
  • A USB reader for your SD card. You can buy one here.

Some of your Clonezilla kit

Take a snapshot

  1. Power down your Pi, with the command halt, shutdown or poweroff.
  2. Boot your PC from the Clonezilla disc. You will arrive at a simple menu/boot screen. It will boot automatically within 30 seconds – you can hit enter at any time, to proceed.
    Snapshot step 01
  3. You’ll be treated to rows and rows of gibberish while Clonezilla boots up.
    Snapshot step 02
  4. Choose your language and keyboard setting.
    Snapshot step 03
  5. Hit enter to start Clonezilla (yeah, you thought it had already started, didn’t you).
    Snapshot step 04
  6. Insert your Raspberry Pi’s card, in its reader.
    Snapshot step 05
  7. Choose “local_dev”.
    Snapshot step 06
  8. A screen prompt will tell you to insert your external hard drive.
    Snapshot step 07
  9. Insert the external drive and then wait for 5 seconds or so.
    Snapshot step 08
  10. A few lines will indicate that Clonezilla has registered the presence of the drive.
    Snapshot step 09
  11. Hit enter and Clonezilla will mount the various partitions now available to it.
    Snapshot step 10
  12. Select the external hard drive as the drive to which we’re copying the snapshot (in my case, the largest partition on the list).
    Snapshot step 11
  13. Hit enter. If the drive wasn’t cleanly dismounted before (oopsie), Clonezilla will check and fix as required.
    Snapshot step 12
  14. Choose a directory to store the SD card image and hit enter.
    Snapshot step 13
  15. Clonezilla will spit some more gibberish at you. Ignore it and hit enter.
    Snapshot step 14
  16. Though it makes me feel a little silly, choose Beginner mode.
    Snapshot step 15
  17. Choose “savedisk”.
    Snapshot step 16
  18. Give your disk image a meaningful name.
    Snapshot step 17
  19. Select the SD card, to save the image. You use cursor keys and the space bar here.
    Snapshot step 18
  20. Select Ok to continue.
    Snapshot step 19
  21. If you’re confident your SD card is in good shape, you can skip checking it.
    Snapshot step 20
  22. I’d recommend checking the saved image though. It doesn’t take long and gives you peace of mind that you should be able to restore from this image.
    Snapshot step 21
  23. Clonezilla will helpfully point out that you can do all this from the command line (yeah, right).
    Snapshot step 22
  24. Press Y and enter to continue.
    Snapshot step 23
  25. Shouldn’t take too long.
    Snapshot step 24
  26. When it’s all done, it’ll report progress. Press enter.
    Snapshot step 25
  27. Enter 0 to power off (or whatever you prefer) followed by enter.
    Snapshot step 26
  28. Clonezilla will eject the disc. Hit enter to carry on.
    Snapshot step 27

You should now have an image (consisting of several files) on your external hard drive, which you can later use for restoration. Job done.

Restore a snapshot

In this scenario, we’re starting with everything powered off, ready to begin.

  1. Boot your PC from the Clonezilla disc. You will arrive at a simple menu/boot screen. It will boot automatically within 30 seconds – you can hit enter at any time, to proceed.
    Restore step 01
  2. I’ve got to say, this screen full of strange foreign characters is pretty unnerving. But don’t worry. It’ll pass.
    Restore step 02
  3. Choose your language.
    Restore step 03
  4. I’ve never found I’ve had keyboard problems, even though I use a UK keyboard…
    Restore step 04
  5. Hit enter to begin.
    Restore step 05
  6. Insert the SD card/reader. Some nonsense will appear on screen. Don’t worry – just hit enter.
    Restore step 06
  7. Select “local_dev” and hit enter.
    Restore step 07
  8. Insert your external hard drive and wait 5 seconds or so for it to be recognised.
    Restore step 08
  9. It’ll detect the drive – hit enter.
    Restore step 09
  10. Next, it will mount your various partitions.
    Restore step 10
  11. You may have a few…
    Restore step 11
  12. Choose the external drive from the list then hit enter.
    Restore step 12
  13. Clonezilla will check the drive.
    Restore step 13
  14. Choose the directory where your saved image is stored and hit enter.
    Restore step 14
  15. Clonezilla will give you an overview of its file systems. You will be thrilled. Hit enter.
    Restore step 15
  16. Choose “Beginner”, no matter how patronised you may feel.
    Restore step 16
  17. Choose “restoredisk”.
    Restore step 17
  18. Select the previously saved image.
    Restore step 18
  19. Choose the SD card. Hit enter.
    Restore step 19
  20. Clonezilla reckons you really want to do this at the command line. Hit enter.
    Restore step 20
  21. This is a destructive operation and will wipe your SD card. Press Y then enter.
    Restore step 21
  22. Clonezilla doesn’t trust your judgment. Hit Y and enter again.
    Restore step 22
  23. There are two partitions to restore to this card. You’ll get a progress report for each restoration.
    Restore step 23
    Restore step 24
  24. Clonezilla will let you know once it’s done.
    Restore step 25
  25. Press enter to continue.
    Restore step 26
  26. Choose 1 to reboot (or whatever you prefer) then hit enter.
    Restore step 27
  27. Once the CD is ejected, you can also disconnect the SD card and hard drive. Hit enter.
    Restore step 28
  28. Witness the majesty of the Linux death rattle.
    Restore step 29

If all went well, you can now install this SD card back in your Pi, boot up and continue.

Review: Underwater Video Photography with the Kodak Playsport ZX3

I’ve long been a fan of the Kodak Playsport ZX3. It’s been my mainstay action camera for a few years because of its excellent balance of value, quality and durability. It’s also got one of the better external microphone systems and brilliant image stabilization.

If you’ve ever seen any of my action films you’ll know that I feature 4×4 vehicles and the reason I’d selected a waterproof camera is because they are usually required to splash through rivers or more typically survive the rain of Welsh mountains!!!

P1010497_zps129b0c4fWell, here at Geek & Dummy we have taken delivery of some very promising new action cameras (reviews to follow) that may well be ending my love affair with the Playsport. I thought it was time to see what it could do underwater. If the claims made by Kodak prove to be bunkum and this kills one of my beloved Playsports, maybe I can live with that now replacements are at hand!

Before I start the review in detail, I always feel the need to qualify the ZX3. It’s pretty much end of life and is an action camera that has been on the market for 5 years+. Before I first reviewed them they were selling

for about £45. Unfortunately they now go for £60+, which may well be my fault for shining the spotlight on them. Amazon does have the successor ZX5 listed for £156 and whilst I wouldn’t pay that because of the abuse I give them, I’d still say that offered some value.P1010498_zpsf5009d6b

What we have then is essentially quite old tech at a bargain price.

The Zx3 is ready to go straight into the water as it is without the need for a secondary case. As I’ve described in a previous review all its compartments are sealed and water tight. What you do need to do is alter the camera’s software to cope with being underwater.

Anyway, enough chatting from me. This is just one of those reviews where you need to see the results. I’ve used PowerDirector 10
to edit the clips but other than slowing a few frames down or reversing it for fun, this is unadulterated and straight from the camera.

As I have already reviewed the main camera this review is purely covering the underwater usability.


How-to: Raspberry Pi tutorial part 1: Getting started

[easyreview title=”Complexity rating” icon=”geek” cat1title=”Level of experience required, to follow this how-to.” cat1detail=”The geek factor is quite high here, but this process is not particularly taxing.” cat1rating=”2.5″ overall=”false”]

Contents

In the line of my work, I’ve recently had cause to become better acquainted with every geek’s favourite cheap computer, the Raspberry Pi. At the time of writing, you can pick up a Pi for an extremely reasonable £30, but the first thing I discovered was that this is only half the story. For a workable system, you need all the necessary cables, some storage and a case. Here’s my shopping list:

The Pi plus extra bits, in all their glory

So my total is £69.95 – over twice the price of buying just the Pi. But still pretty cheap, considering. You’ll also need a USB mouse/keyboard for initial input. I’m going to run my Pi headless (no screen or input devices needed, just a network connection), so I’m borrowing my Microsoft Natural wireless desktop for this purpose, which the Pi detected without issue.

Hardware installation

This may well be the easiest hardware installation you ever perform. The case has a couple of punch outs that you need to remove for the model B Pi. I forgot to photograph them I’m afraid, but it will be obvious – when you try and put the Pi in the case, it won’t fit without these pieces removed (e.g. for the ethernet port).

Pi and case

Put the Pi in the case.

Pi case installation

Put the case together and fasten the screws. Make sure you put the VESA mount between the screws and the case, if you’re going to monitor-mount the Pi.

Pi case and VESA mount

That’s it.

What to do, what to do…

There are lots of potential uses for your Pi. It has limited processing power and memory but apart from that, the only real limit is your imagination. I have no imagination to speak of, so I’m going to do what I do with every other gadget: put Linux on it and set it up as a home web/file server. I’ll cover the web/file server setup in a subsequent tutorial.

Here’s the plan:

  • Install Rasbian (a Pi-centric version of the venerable Debian GNU/Linux distribution).
  • Set up Webmin/Virtualmin for management of the server/web sites.
  • Install OwnCloud and create my own Dropbox replacement.
  • Experiment with using the Pi as a remote desktop client or thin/fat terminal.

In the process, I’m looking for any major issues or gotchas – things you might want to be aware of if you’re thinking of getting into Pis in a big way.

Prepare the SD card

For this step, you’ll need an SD card reader. If you don’t have a laptop/computer with a built-in reader, you can buy an external reader here. Note: my laptop’s built-in card reader was not supported by the SD Formatter program (see below) so I used an external reader.

  1. From the SD Association’s official website, download and install the SD Formatter.
  2. Format the SD card using SD Formatter:
    SD Formatter
  3. Download NOOBS (“New Out of Box Software” – chortle) from the official Raspberry Pi website. This file is currently over 1GB. I tried the direct download and it was pretty slow, so I’d recommend using the torrent if you’re so equipped. NOOBS gives us a choice of different operating systems to install on the Pi.
    NOOBS
  4. Extract the contents of the NOOBS zip file onto the newly formatted SD card.
    NOOBS files

Whack the SD card into the Pi and connect everything up (power last of all, since there’s no power switch). If at this point you don’t see any output, the chances are that your SD card has not been recognised. I’m using a Class 10, but I’ve read that some people have had problems with Class 10 cards and better results with Class 6. If your card is recognised, you should be rewarded with a few pretty lights when powered up.

Pi plumbed in

Install and configure Raspbian

At the NOOBS screen, choose Rasbian and click Install OS, then Yes. Go grab yourself a quick coffee.

Raspbian installation

The install will take a few minutes (the speed of your SD card is a factor here). Once it’s done, you’ll see a message “Image applied successfully”. Click Okay to reboot the Pi with your new OS.

Raspbian installation progress

raspi-config will launch with some initial setup options. I’ll work through them one by one.

raspi-config

  1. Expand the filesystem: You can skip this, because this option isn’t needed for NOOBS-based installations. Otherwise, this ensures you’re using the whole of the SD card.
  2. Change the password for the “pi” user. The default password is “raspberry”. Improve on that.
  3. Enable/disable boot to desktop: I’m not planning to use a desktop system with this Pi. X Windows is such a resource hog that we definitely want to set this to “No”. Of course if you want to use the Pi as a desktop system, you’ll select “Yes” here.
  4. Internationalization options: I’m in the UK, with a UK keyboard layout. It’s not a huge problem since generally I’ll be accessing the Pi via a web interface or service, but I am fussy, so I set everything up to be UK-centric. My correct locale was already selected. In these dialogue boxes, use the spacebar to select/deselect options, tab to move between fields, up and down cursors keys to navigate and enter to select.
  5. Enable camera: do this if you’ve bought the optional camera module (I haven’t).
  6. Add to Rastrack: this puts you on the Rastrack map of Pi installations. Not for me, but you might be interested.
  7. Overclock: if you need to squeeze more juice out of your Raspberry, you can force it into a more frantic mode of operation. I’m not going to do this, at this stage.
  8. Advanced options: Here, I’m going to set the hostname of the Pi and reduce the Pi’s use of GPU memory to 16MB (since we’re not running a graphical desktop). I’m also going to ensure that SSH is enabled (for later remote logon purposes).
  9. Finish and reboot to an ordinary logon prompt.
  10. For demo/proof of concept servers where security is less of a concern, I like to be able to log on as root. You can give the root user a password by logging in, then entering sudo passwd root and following the prompts.

Configure networking

I need this Pi to have a static IP address. You can use a DHCP reservation for this purpose if you like, but I prefer to create a fixed IP address on boot. Like this:

  1. Log in.
  2. If you didn’t log on as root, give yourself an elevated shell: sudo su
  3. Install your favourite console-based text editor. For me this is vim: apt-get --force-yes -y install vim
  4. Use the editor to edit the /etc/network/interfaces file. Replace the line iface eth0 inet dhcp with iface eth0 inet static
    address 192.168.1.11
    netmask 255.255.255.0
    gateway 192.168.1.1

    adjusting the values to match your network as appropriate.
  5. My DNS was already correctly configured, but you may need to check the contents of your /etc/resolv.conf file to ensure DNS is set up. If in doubt, this configuration should work:
    nameserver 8.8.8.8
  6. Save the files then back at the command prompt, enter reboot to restart the Pi with the new network configuration.
Typical Raspbian bootup messages

Once the Pi is up and running you’ll be able to connect via SSH using your favourite terminal emulation program (mine’s PuTTY).

As you’ll see from the Contents section above, I have a few ideas for things to do next. It’s a good plan to take a snapshot of the Pi in its current state, so we can hit the ground running any time we want to try something different, with a Raspbian base, so this will be the subject of my next how-to. In the meantime, if you have any questions about what we’ve done so far, or if you have any ideas for later tutorials, let us know in the comments!

Until next time. 🙂