A wonderful little app disappeared from the Play Store recently: Sweet Home WiFi Picture Backup. This app perfectly (for me) synchronised my phone’s photos with my Synology NAS (via CIFS/SMB), creating the year/month/day filing I prefer, retaining photos on the phone for a specified period – in my case, one month.
Frustratingly there seems to be no other app that does exactly this. After much research and a bit of coding, I settled on the following:
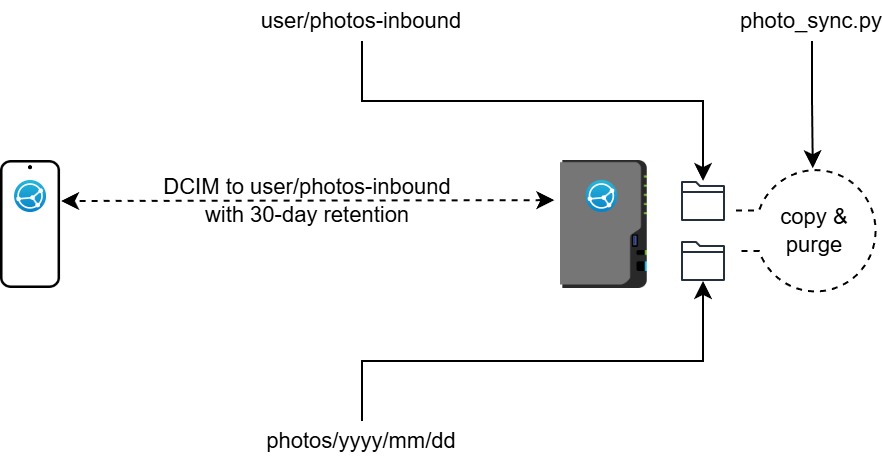
Use Syncthing to synchronise my phone’s photos/videos to an interim holding area on my NAS.
Use a Python script to copy the media from that holding area to the permanent location in the year/month/day structure I prefer.
Allow the script to delete media from the holding area more than 30 days old. Syncthing propagates the deletions back to my phone.
Have the script use checksums (SHA1) to ensure that nothing is deleted unless it has been copied to the permanent location.
Use checksums also to ensure that no media is overwritten with different media of the same same.
On the NAS, use File Station to give the sc-syncthing group access to all folders that will be synced.
One on device add the other, within Syncthing
On the phone, share the DCIM folder, within Syncthing
On the NAS, set the target directory to (e.g.) a new folder photos-inbound in your user directory
Clone the photo_sync repository to your NAS, and ensure photo_sync.sh is executable
Set up the Python environment and install the necessary modules by running the following on the NAS (in a shell, in the folder containing the scripts):
python -m venv .venv
source .venv/bin/activate
pip install -r requirements.txt
deactivate
Copy the .env.example file to .env and edit the settings to suit you
Set a scheduled task to run photo_sync.sh as often as you require (I have it set to run daily at midnight)
See the code and the README in the GitHub repo for more details. Note that the Bash script activates the Python virtual environment and runs the Python script from within that environment.
If you’re running Visual Studio Code with WSL 2, you’ll find you get the best performance if your files are within the WSL filesystem. (I’ve written about this separately.)
You might still experience VS Code grinding to a halt, attempting to access files however. One symptom at this point is that if you run df or ls /mnt within WSL, this will hang. You may not even be able to exit with Ctrl-C or kill -9.
It seems that an I/0 lockup can occur with network/remote shares. One of the easiest ways to diagnose this is to strace df. This will show you the problematic share causing the hang. E.g.:
In my case I had the Windows W: drive connected to another Linux machine via, using SSHFS-Win. I don’t ever need to access this drive in WSL, but it’s available because I’m using automount.
To keep automount enabled, but exclude one network drive, for example:
Create an empty directory, which we’ll mount as a dummy: mkdir /mnt/empty
Ensure fstab mounting is enabled. In /etc/wsl.conf, in the [automount] section, you need a line: mountFsTab=true
Then in /etc/fstab, mount the folder that would normally be linked to the Windows drive to the empty folder instead. E.g.: /mnt/emptyW /mnt/w none bind 0 0
Restart WSL at a Windows command/terminal prompt: wsl --shutdown & wsl
The directory in question, that previously would have shown the contents of the remote folder, should now be empty.
If you have more than one such folder, you may need to repeat the steps, starting with strace df. For me, this restored VS Code’s filesystem performance.
Side note: sometimes the same symptoms can be caused by VPN connections. I’ve also seen performance issues mount up over time when I’ve had persistent OpenVPN connections running, either within WSL or in the Windows host.
In my development workflow (DevOps and scripting, mainly – I’m a security practitioner, not a programmer) I frequently switch between Windows and WSL. I work a lot with Ansible, and I love the fact that with WSL, I can enable full Ansible linting support in Visual Studio Code. The problem is that there are known cross-OS filesystem performance issues with WSL 2. At the moment, Microsoft recommends that if you require “Performance across OS file systems“, you should use WSL 1. Yuck.
What I want to do is to have a folder on my Windows hard drive, C:\Repos, that contains all the repositories I use. I want that same folder to be available in WSL as the directory /repos. Network file shares are out of the question, because, performance. (Have you tried git operations on a CIFS share? Ugh.)
The old way – share from Windows to WSL
Until this week, I’d been sharing the Windows directory into WSL distros using /etc/fstab and automount options. Fstab contained this line:
But with this setup, every so often WSL filesystem operations would grind to a halt and I’d need to terminate and restart the distro. It could be minutes or days before the problem resurfaced.
The Windows Subsystem for Linux September 2023 update, currently available only for Windows Insider builds, was supposed to fix some of the issues. I tried it. The fixes broke Docker and didn’t improve filesystem performance sufficiently. Even after a Docker upgrade (the Docker folks in collaboration with the WSL team), port mapping remained broken.
The new way – share from WSL to Windows
So let’s fix this once and for all. Maybe the WSL filesystem perfomance issues will go away one day, but I need to get on with my work today, not at some unspecified point in the future. I also don’t like running insider builds, and neither did my endpoint protection software. (That’s another story.) In the meantime, we need to move the files into WSL, where the performance issues disappear. It’s cross-OS access that causes the problems.
Now I know about \\wsl.localhost, but unfortunately this confuses some of the programs I use day-to-day, including some VS Code plugins. I really need all Windows programs to believe and act like the files are on my hard drive.
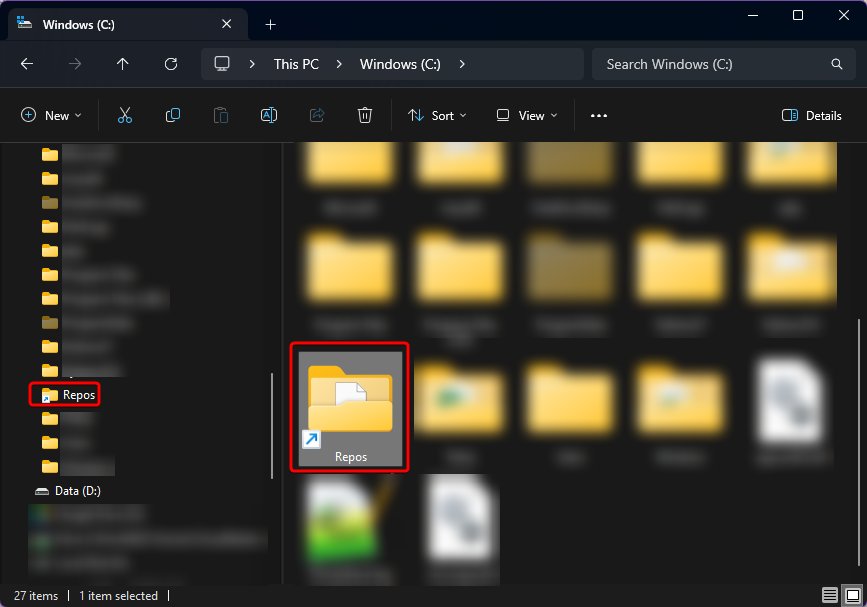
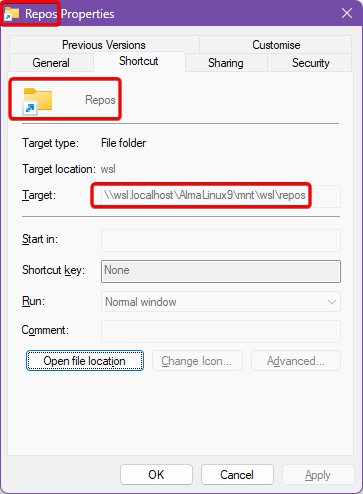
After much pulling together of information from dark, dusty corners of the internet, I discovered that, with the latest versions of Windows, you can create symbolic links to the WSL filesystem. So the files move into WSL (as /repos) and we create a symbolic link to that directory at C:\Repos. This can be as simple as uttering the following PowerShell incantation:
This should be fairly self-explanatory. In my case, I’m actually mapping to /mnt/wsl/repos, for reasons I’ll explain in the next section.
I have two VS Code workspaces – one for working directly in Windows, and the other for working in remote WSL mode. The Windows workspace points to C:\Repos and the WSL workspace points to /repos. When I restarted both workspaces after making these changes and moving the files into WSL, VS Code saw no difference. The files were still available, as before. But remote WSL operations now ran quicker.
Bonus: share folder with multiple distros
Ah, but what if you need the same folder to be available in more than one distribution? The same /repos folder in AlmaLinux, Oracle Linux and Ubuntu? Not network mapped? Is that even possible?
Absolutely it is. It’s possible through the expedient of mounting an additional virtual hard disk, which becomes available to all distros. This freaks me out slightly, because – what about file system locking? Deadlocks? Race conditions? Okay, calm down Rob, just exercise the discipline of only opening files within one distro at a time. You got this.
Create yourself a new VHDX file. I store mine in roughly the same place WSL stores all its VHDX files:
This gives you a raw, unformatted virtual hard drive at C:\Users\rob\AppData\Local\wsl\Repos.vhdx. Mount it within WSL. From the PowerShell session used above:
wsl --mount --vhd $DiskPath --bare
Now inside one of your distros, you’ll have a new drive, ready to be formatted to ext4. Easy enough to work out which device is the new drive – sort by timestamp:
ls -1t /dev/sd* | head -n 1
You’ll get something like /dev/sdd. Initialise this disk in WSL:
sudo mkfs -t ext4 /dev/sdd
(Do check you’re working with the correct drive – don’t just copy and paste!)
Back in the PowerShell session, we unmount the bare drive and remount it. WSL will automatically detect that the disk now contains a single ext4 partition and will mount that under /mnt/wsl – in all distros, mind you.
(shopt here ensures the move includes any hidden files with names begining ‘.‘.)
When sharing this directory into Windows, you need to use the full path /mnt/wsl/repos, not the symlink /repos. But otherwise it works the same as before.
This mount will not persist across reboots, so create a scheduled task to do this, that will run on log on.
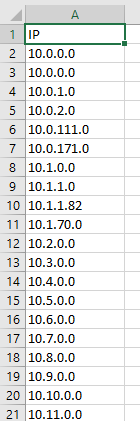
This post is probably for pedants only, who care passionately about correctly sorting IP addresses in an Excel spreadsheet. This approach uses pure functions – no VBA. I prefer it to some other approaches because, frankly, they sail right over my head.
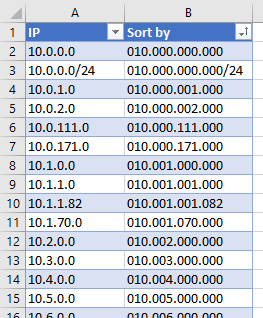
Let’s start with a column of IP addresses – like this one:
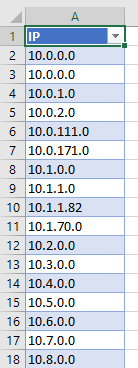
Excel tables are lovely, for working with data like this. If you convert your data to a table, you get to use named column references, which we’ll see in a moment. Go to Insert > Table and you get something like this:
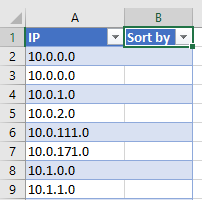
You can’t sort this column meaningfully, as-is. We need an additional column, which we’ll use to transform the contents of the IP column.
And then in any of the rows in that column, we enter this formula:
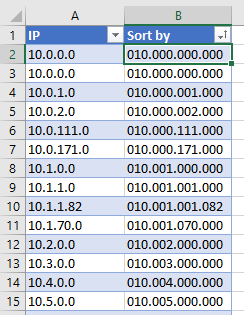
You end up with this, on which you can now perform an alphabetical (A-Z) sort:
If you like, you can hide that column, so you don’t need to look at its hideousness. Then whenever you need to resort, go to Data > Sort.
Some things to mention about this formula:
[@IP] is the named column reference I referred to previously.
I edited this formula in a code editor (Notepad++), so I could nicely indent and keep track of opened and closed parenthesis. This makes life much easier, when writing long formulae! There’s one gotcha – Notepad++ by default uses tabs rather than spaces, which breaks Excel. Make sure there are no tab characters in your indentation.
The IF(0,"##### THIRD OCTET #####","") stuff is a hack, which allows you to insert a comment into a text-based formula. The 0 evaluates to FALSE, so it returns the function’s third parameter – an empty string. The second parameter is where I place my comment. Handy!
Excel doesn’t have a function to find the position of the nth occurrence of a string. So there’s a nifty two-step hack for this, which is not my original idea. First, we use the SUBSTITUTE() function, which can substitute a character for the nth occurrence of some text. We search for the nth occurrence of the full stop (“.”) and replace it with CHAR(134) – the dagger symbol (†). Then we find the position of that CHAR(134), to feed into the LEFT()/MID()/RIGHT() functions.
Many people run free versions of ESXi, particularly in lab environments. Unfortunately with the free version of ESXi, the VMware API is read-only. This limits (or complicates) automation.
I was looking for a way to clone guest VMs with the minimum of effort. This script, which took inspiration from many sources on the internet, is the result. It takes advantage of the fact that although the API is limited, there are plenty of actions you can take via SSH, including calls to vim-cmd.
<#

.SYNOPSIS
    Clones a VM,

.DESCRIPTION
    This script:

    - Retrieves a list of VMs attached to the host
    - Enables the user to choose which VM to clone
    - Clones the VM

    It must be run on a Windows machine that can connect to the virtual host.

    This depends on the Posh-SSH and PowerCLI modules, so from an elevated
    PowerShell prompt, run:

        Install-Module PoSH-SSH
        Install-Module VMware.PowerCLI

    For free ESXi, the VMware API is read-only. That limits what we can do with
    PowerCLI. Instead, we run certain commands through SSH. You will therefore
	need to enable SSH on the ESXi host before running this script.

	The script only handles simple hosts with datastores under /vmfs. And it
	clones to the same datastore as the donor VM. Your setup and requirements
	may be more complex. Adjust the script to suit.

.EXAMPLE
    From a PowerShell prompt:

      .\New-GuestClone.ps1 -ESXiHost 192.168.101.100

.COMPONENT
    VMware scripts

.NOTES
    This release:

        Version: 1.0
        Date:    8 July 2021
        Author:  Rob Pomeroy

    Version history:

        1.0 - 8 July 2021 - first release

#>
param
(
    [Parameter(Mandatory = $true, Position = 0)][String]$ESXiHost
)

####################
## INITIALISATION ##
####################

# Load necessary modules
Write-Host Loading PowerShell modules...
Import-Module PoSH-SSH
Import-Module VMware.PowerCLI

# Change to the directory where this script is running
Push-Location -Path ([System.IO.Path]::GetDirectoryName($PSCommandPath))


#################
## CREDENTIALS ##
#################

# Check for the creds directory; create it if it doesn't exist
If(-not (Test-Path -Path '.\creds' -PathType Container)) {
    New-Item -Path '.\creds' -ItemType Directory | Out-Null
}

# Looks for credentials file for the VMware host. Passwords are stored encrypted
# and will only work for the user and machine on which they're stored.
$credsFile = ('.\creds\' + $ESXiHost + '.creds')
If(-not (Test-Path -Path $credsFile)) {
    # Request credentials
    $creds = Get-Credential -Message "Enter root password for VMware host $ESXiHost" -User root
    $creds.Password | ConvertFrom-SecureString | Set-Content $credsFile
}
$ESXICredential = New-Object System.Management.Automation.PSCredential( `
    "root", `
    (Get-Content $credsFile | ConvertTo-SecureString)
)


#########################
## List VMs (PowerCLI) ##
#########################
#
# Disable HTTPS certificate check (not strictly needed if you use -Force) in
# later calls.
Set-PowerCLIConfiguration -InvalidCertificateAction Ignore -Confirm:$false | Out-Null

# Connect to the ESXi server
Connect-VIServer -Server $ESXiHost -Protocol https -Credential $ESXICredential -Force | Out-Null
If(-not $?) {
    Throw "Connection to ESXi failed. If password issue, delete $credsFile and try again."
}

# Get all VMs, sorted by name
$guests = (Get-VM -Server $ESXiHost | Sort-Object)

# Work out how much we need to left-pad the array index, when outputting
$padWidth = ([string]($guests.Count - 1)).Length

# Output the list of VMs, with array index padded so it lines up nicely
Write-Host ("Existing VMs (" + $guests.Count + "), sorted by name:")
for ( $i = 0; $i -lt $guests.count; $i++)
{
    If($guests[$i].PowerState -eq "PoweredOn") {
        Write-Host -ForegroundColor Red ("[" + "$i".PadLeft($padWidth, ' ') + "](ON) : " + $guests[$i].Name)
    } Else {
        Write-Host ("[" + "$i".PadLeft($padWidth, ' ') + "](off): " + $guests[$i].Name)
    }
}
Write-Host


##########################
## Choose a VM to clone ##
##########################

$chosenVM = 0
do {
    $inputValid = [int]::TryParse((Read-Host 'Enter the [number] of the VM to clone (the donor)'), [ref]$chosenVM)
    if($chosenVM -lt 0 -or $chosenVM -ge $guests.Count) {
        $inputValid = $false
    }
    if (-not $inputValid) {
        Write-Host ("Must be a number in the range 0 to " + ($guests.Count - 1).ToString() + ". Try again.")
    }
} while (-not $inputValid)

# Check the VM is powered off
if($guests[$chosenVM].PowerState -ne "PoweredOff") {
    Throw "ERROR: VM must be powered off before cloning"
}

# Get VM's datastore, directory and VMX; we assume this is at /vmfs/volumes
If(-not ($guests[$chosenVM].ExtensionData.Config.Files.VmPathName -match '\[(.*)\] ([^\/]*)\/(.*)')) {
    Throw "ERROR: Could not calculate the datastore"
}
$VMdatastore = $Matches[1]
$VMdirectory = $Matches[2]
$VMXlocation = ("/vmfs/volumes/" + $VMdatastore + "/" + $VMdirectory + "/" + $Matches[3])
$VMdisks     = $guests[$chosenVM] | Get-HardDisk


###############################
## File test (PoSH-SSH SFTP) ##
###############################

# Clear any open SFTP sessions
Get-SFTPSession | Remove-SFTPSession | Out-Null

# Start a new SFTP session
(New-SFTPSession -Computername $ESXiHost -Credential $ESXICredential -Acceptkey -Force -WarningAction SilentlyContinue) | Out-Null

# Test that we can locate the VMX file
If(-not (Test-SFTPPath -SessionId 0 -Path $VMXlocation)) {
    Throw "ERROR: Cannot find donor VM's VMX file"
}


#################
## New VM name ##
#################

$validInput = $false
While(-not $validInput) {
    $newVMname = Read-Host "Enter the name of the new VM"
    $newVMdirectory = ("/vmfs/volumes/" + $VMdatastore + "/" + $newVMname)

    # Check if the directory already exists
    If(Test-SFTPPath -SessionId 0 -Path $newVMdirectory) {
        $ynTest = $false
        While(-not $ynTest) {
            $yn = (Read-Host "A directory already exists with that name. Continue? [Y/N]").ToUpper()
            if (($yn -ne 'Y') -and ($yn -ne 'N')) {
                Write-Host "ERROR: enter Y or N"
            } else {
                $ynTest = $true
            }
        }
        if($yn -eq 'Y') {
            $validInput = $true
        } else {
            Write-Host "You will need to choose a different VM name."
        }
    } else {
        If($newVMdirectory.Length -lt 1) {
            Write-Host "ERROR: enter a name"
        } else {
            $validInput = $true

            # Create the directory
            New-SFTPItem -SessionId 0 -Path $newVMdirectory -ItemType Directory | Out-Null
        }
    }
}


###################################
## Copy & transform the VMX file ##
###################################

# Clear all previous SSH sessions
Get-SSHSession | Remove-SSHSession | Out-Null

# Connect via SSH to the VMware host
(New-SSHSession -Computername $ESXiHost -Credential $ESXICredential -Acceptkey -Force -WarningAction SilentlyContinue) | Out-Null

# Replace VM name in new VMX file
Write-Host "Cloning the VMX file..."
$newVMXlocation = $newVMdirectory + '/' + $newVMname + '.vmx'
$command = ('sed -e "s/' + $VMdirectory + '/' + $newVMname + '/g" "' + $VMXlocation + '" > "' + $newVMXlocation + '"')
($commandResult = Invoke-SSHCommand -Index 0 -Command $command) | Out-Null

# Set the display name correctly (might be wrong if donor VM name didn't match directory name)
$find    = 'displayName \= ".*"'
$replace = 'displayName = "' + $newVMname + '"'
$command = ("sed -i 's/$find/$replace/' '$newVMXlocation'")
($commandResult = Invoke-SSHCommand -Index 0 -Command $command) | Out-Null

# Blank the MAC address for adapter 1
$find    = 'ethernet0.generatedAddress \= ".*"'
$replace = 'ethernet0.generatedAddress = ""'
$command = ("sed -i 's/$find/$replace/' '$newVMXlocation'")
($commandResult = Invoke-SSHCommand -Index 0 -Command $command) | Out-Null


#####################
## Clone the VMDKs ##
#####################

Write-Host "Please be patient while cloning disks. This can take some time!"
foreach($VMdisk in $VMdisks) {
    # Extract the filename
    $VMdisk.Filename -match "([^/]*\.vmdk)" | Out-Null
    $oldDisk = ("/vmfs/volumes/" + $VMdatastore + "/" + $VMdirectory + "/" + $Matches[1])
    $newDisk = ($newVMdirectory + "/" + ($Matches[1] -replace $VMdirectory, $newVMname))

    # Clone the disk
    $command = ('/bin/vmkfstools -i "' + $oldDisk + '" -d thin "' + $newDisk + '"')
    Write-Host "Cloning disk $oldDisk to $newDisk with command:"
    Write-Host $command
    # Set a timeout of 10 minutes/600 seconds for the disk to clone
    ($commandResult = Invoke-SSHCommand -Index 0 -Command $command -TimeOut 600) | Out-Null
    #Write-Host $commandResult.Output

}


########################
## Register the clone ##
########################

Write-Host "Registering the clone..."
$command = ('vim-cmd solo/register "' + $newVMXlocation + '"')
($commandResult = Invoke-SSHCommand -Index 0 -Command $command) | Out-Null
#Write-Host $commandResult.Output


##########
## TIDY ##
##########

# Close all connections to the ESXi host
Disconnect-VIServer -Server $ESXiHost -Force -Confirm:$false
Get-SSHSession | Remove-SSHSession | Out-Null
Get-SFTPSession | Remove-SFTPSession | Out-Null

# Return to previous directory
Pop-Location
I’m sure this is a very niche article. Which means if you’ve arrived here, you’ve almost certainly been as frustrated as I have with the documentation for DB2 ODBC connections.
Background: I’m trying to connect to a DB2 instance, running on a Windows machine. I imagine that this procedure will work just as well for instances running on other architectures. And I’m trying to connect from another Windows machine, to pass data into a Microsoft SQL-powered data warehouse.
Copy the entire extracted folder to the root of a data drive (e.g. to D:\DB2, E:\DB2 as the case may be).
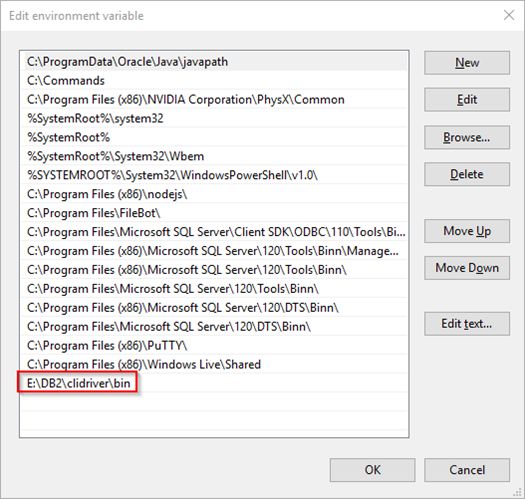
Add the bin folder to the computer’s PATH environment variable (DB2\clidriver\bin).
Launch an elevated command prompt.
Navigate to the DB2 bin folder. E.g.: e:
cd e:\DB2\clidriver\bin
Install the ODBC driver: db2oreg1.exe -i
On Windows Server 2012 R2, also run: db2oreg1 -setup
The driver will now appear in the 32-bit ODBC driver list:
To connect:
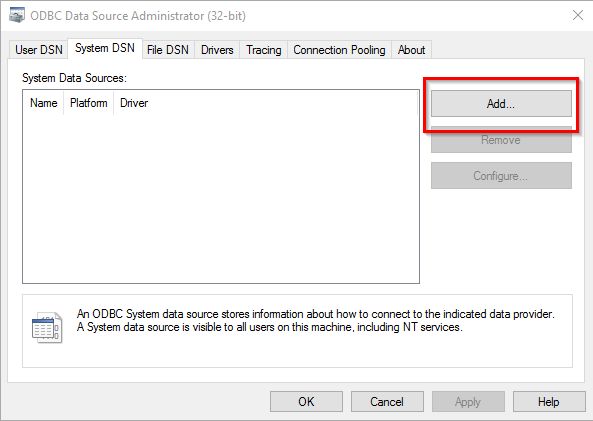
Launch the 32-bit ODBC data source administration applet.
On the User DSN or System DSN tab, click Add.
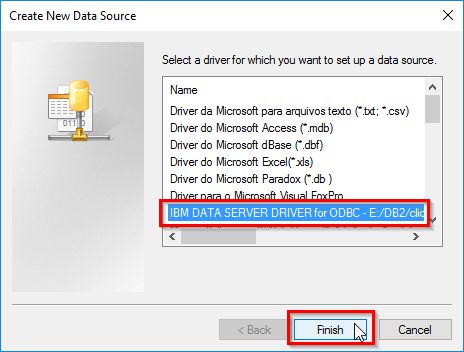
Select the ODBC driver and click Finish.
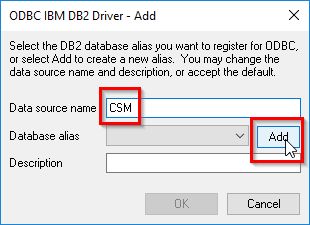
Name the data source (e.g. “CSM”, in my case) and then click “Add”, next to the Database alias dropdown.
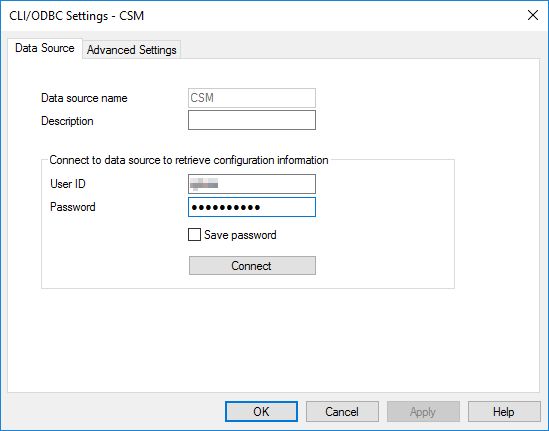
Enter User ID and password.
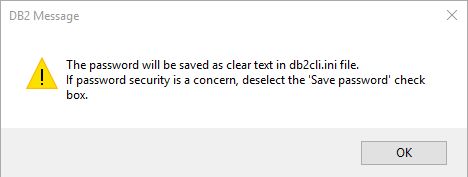
Check the “Save password” box. Note the warning and click OK.
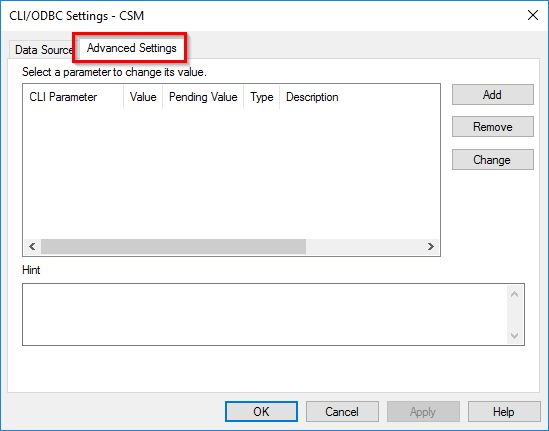
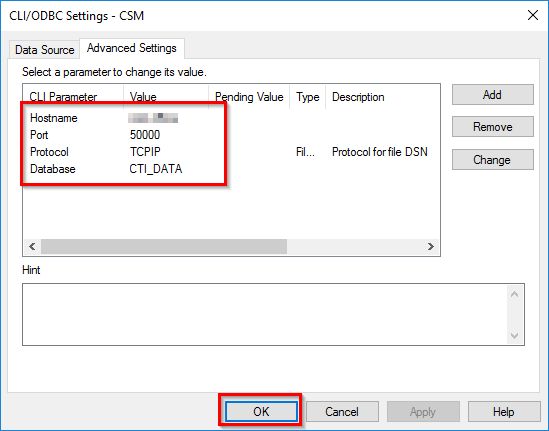
Switch to the Advanced Settings tab.
Use the “Add” button, to enter the following values.
Hostname: [host DNS name or IP address]
Port:     50000
Protocol: TCP/IP
Database: [DB name, e.g. CTI_DATA]
Review the settings and click OK:
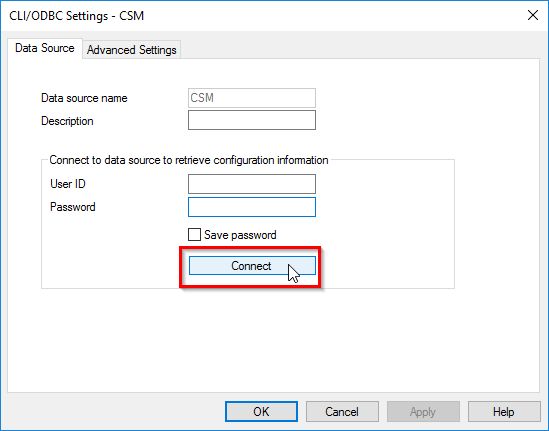
To test the connection, first click the “Configure” button.
The credentials are stored in the ini file, so you do not need to enter them here. Simply click “Connect”.
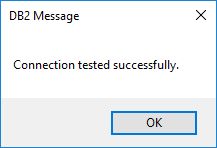
You should see a success message.
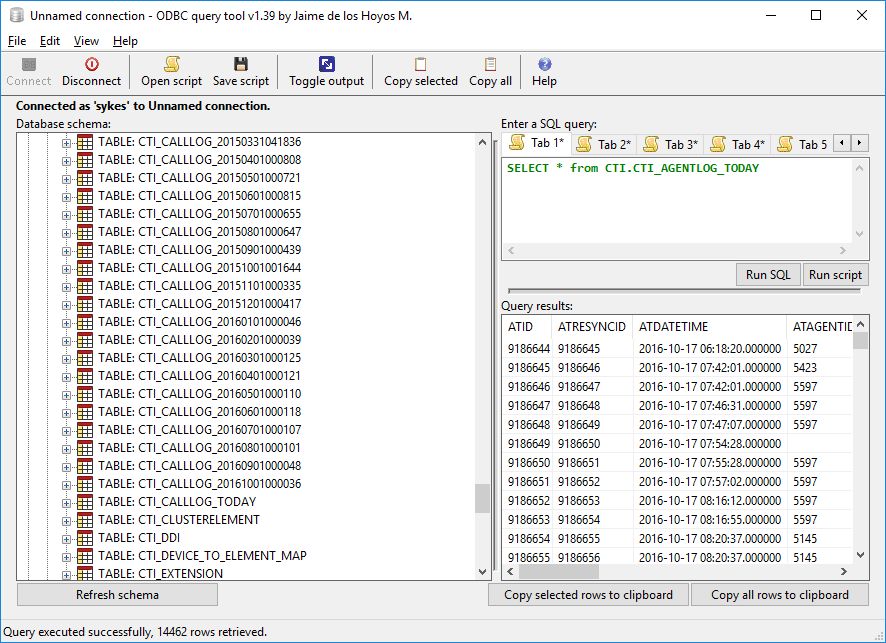
If you’re looking for a free, Windows-based ODBC interrogation program, there are a few out there. All the ones I tried had quirks in their interfaces. I’ve had most success with ODBC query tool though. Here it is, running under Windows 10:
If that doesn’t work for you, you can try the almost identically named ODBC QueryTool.
Connecting to Windows/Microsoft SQL from Linux/CodeIgniter remains challenging. As PHP progresses, various old methods of connecting to MS SQL are being deprecated in favour of (e.g.) PDO. Unfortunately, reliable MS SQL server PDO drivers are hard to come by under Linux.
As I’ve written previously, the most successful method I’ve found of connecting from CodeIgniter to MS SQL is using a combination of unixODBC and FreeTDS. So here’s an updated guide for CodeIgniter 3 on Ubuntu 14/PHP 5 or Ubuntu 16/PHP 7.
On the server where your web application runs, install the following packages: unixodbc freetds freetds-dev tdsodbc php5-odbc. For Ubuntu 14:
Add the details of your MS SQL server to the FreeTDS config file (at /etc/freetds/freetds.conf), e.g.:
[my-server]

        host = my-server.domain.local

        port = 1433

        tds version = 7.4
Note: that the TDS version shown above is for SQL Server 2012 (version 11). For more information about the TDS protocol version numbers (which don’t follow the Microsoft SQL version numbers), read the official documentation.
Add to /etc/odbcinst.ini (you may need to check the precise location of these .so files):
Add details of your MS SQL server to /etc/odbc.ini:
[my-server]

Driver = TDS

Description = My Server

ServerName = my-server

Database = MyDatabase
The ServerName above here corresponds to the name of your server in the FreeTDS configuration file. In the CodeIgniter database configuration file, add something like this:
Then your models should begin something like this:
class WidgetModel extends CI_Model

{

    public function __construct()

    {

        parent::__construct();

        // Load MS SQL connection

        $this -> widgetdb = $this->load->database('mssql', true);

    }
You can get some strange results using this driver. Mainly you’ll have to resort to explicit SQL queries. And certain things won’t work as expected – e.g. using “AS” to rename columns only works on calculated columns.
It’s been quite a while since we’ve posted anything about Laravel. We’re strictly hobbyist developers here and in web development it’s almost impossible to keep up with the rate of change unless you’re a full time developer (and even then, it’s not easy). This pace of change of course means trouble not only for small-time developers like us, but also for enterprise users who favour stability over bleeding-edge features.
So the recent announcement is timely, that Laravel 5.1 is the first version to offer long term support (LTS). LTS in this case means two years of bug fixes and three years of security updates (as opposed to six months and one year respectively for other releases). And for us, this means that although our version 4 tutorials quickly became obsolete, our version 5 tutorials should have a chance of remaining relevant for the next three years. So we hope this new series will be useful for you, our readers.
Without further ado, let’s dive in.
Prerequisites
These days there’s a phenomenal number of ways to get up and running with a server – Vagrant, Puppet, Chef, Ansible and so on. For the purposes of this tutorial I’m going to assume the most basic requirements:
Apache web server (other web servers will work, but we won’t explicitly deal with them)
Shell access to the server (preferably SSH)
Root access to install Composer globally (not essential)
Git must be installed in your environment.
PHP >= 5.5.9
OpenSSL PHP Extension (probably compiled in to your PHP installation – check with phpinfo();)
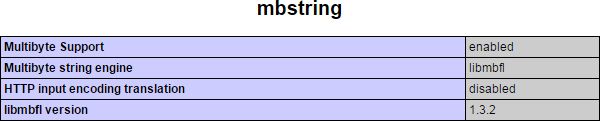
Mbstring PHP Extension
Tokenizer PHP Extension
Install Composer
Composer is an integral part of Laravel these days. It’s used for managing dependencies – external libraries and the like, used by projects. It is also used to install Laravel. While logged in as root, to make Composer available globally, do:
The official Composer documentation suggests using mv composer.phar composer, but if you use a symbolic link instead, upgrading Composer is as simple as running curl -sS https://getcomposer.org/installer | php -- --install-dir=/usr/local/bin again.
Install Laravel
There are different ways of approaching this, but the approach I prefer (for its simplicity) is as follows. To install Laravel in the directory that will house your web project (e.g. if that’s under /var/www), enter:
There will be a lot of activity in the console as all Laravel’s various components are installed. The new website directory contains a folder “public” and it’s to this you need to direct your web server. So for example, with Apache, create a new configuration file /etc/apache2/sites-available/new.website.name.conf:
<VirtualHost *:80>

ServerName new.website.name

DocumentRoot "/var/www/new.website.name/public"

<Directory "/var/www/new.website.name/public">

allow from all

Options +Indexes

</Directory>

</VirtualHost>
Again, for Apache, enable the new website (e.g.):
a2ensite new.website.name
If you’re using a control panel (CPanel, Plesk, VirtualMin, etc.) your steps will vary. When you then browse to your new site, you should see something like this:
Configuration
There’s lots you can configure, but here are some basics.
Make sure the storage and the bootstrap/cache directories are writeable by the web server. E.g.: chown -R www-data:www-data /var/www/new.website.name/storage
chown -R www-data:www-data /var/www/new.website.name/bootstrap/cache
find /var/www/new.website.name/storage -type f -exec chmod ug+rw {} \;
find /var/www/new.website.name/storage -type d -exec chmod ug+rwx {} \;
find /var/www/new.website.name/bootstrap/cache -type f -exec chmod ug+rw {} \;
find /var/www/new.website.name/bootstrap/cache -type d -exec chmod ug+rwx {} \;
In config/app.php set your time zone (e.g.): 'timezone' => 'Europe/London',
I don’t think this can be that uncommon a scenario: a Windows Server 2008 R2 domain, with mainly HP printers. New domain controller added (at new site), this time running Windows Server 2012 R2; HP printers there too.
This was the position I found myself in earlier this year. On paper, there’s nothing unusual about this set-up. Adding new 2012 DCs and standard HP workgroup printers shouldn’t be a problem. That’s what we all thought.
Until the domain controller started becoming non-responsive.
Cue many, many hours on TechNet and various other similar sites, chasing down what I became increasingly sure must be some latent fundamental corruption in Active Directory (horrors!), revealed only by the introduction of the newer o/s. There were many intermediate hypotheses. At one point, we thought maybe it was because we were running a single DC (and it was lonely). Or that the DC was not powerful enough for its file serving and DFS replication duties. So I provisioned a second DC. Ultimately I failed all services over to that because the first DC was needing increasingly frequent reboots.
And then the second domain controller developed the same symptom.
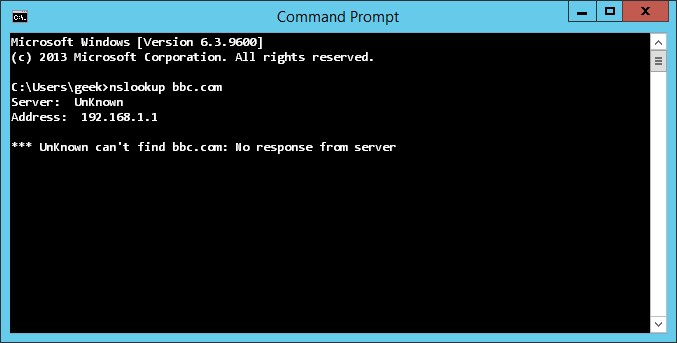
Apart from the intermittent loss of replication and certain other domain duties, the most obvious symptom was that the domain controller could no longer initiate DNS queries from a command prompt. Regardless of which DNS server you queried. Observe:
*** UnKnown can't find bbc.com: No response from server
Bonkers, right? Half the time, restarting AD services (which in turn restarts file replication, Kerberos KDC, intersite messaging and DNS) brought things back to life. Half the time it didn’t, and a reboot was needed. Even more bonkers, querying the DNS server on the failing domain controller worked, from any other machine. DNS server was working, but the resolver wasn’t (so it seemed).
I couldn’t figure it out. Fed up, I turned to a different gremlin – something I’d coincidentally noticed in the System event log a couple of weeks back.
Event ID 4266, with the ominous message “A request to allocate an ephemeral port number from the global UDP port space has failed due to all such ports being in use.”
What the blazes is an ephemeral port? I’m just a lowly Enterprise Architect. Don’t come at me with your networking mumbo jumbo.
Oh wait, hang on a minute. Out of UDP ports? DNS, that’s UDP, right?
With the penny slowly dropping, I turned back to the command line. netstat -anob lists all current TCP/IP connections, including the name of the executable (if any) associated to the connection. When I dumped this to a file I quickly noticed literally hundreds of lines like this:
As it happened, this bit of research coincided with the domain controller being in its crippled state. So I restarted the Print Spooler service, experimentally. Lo and behold, the problem goes away. Now we’re getting somewhere.
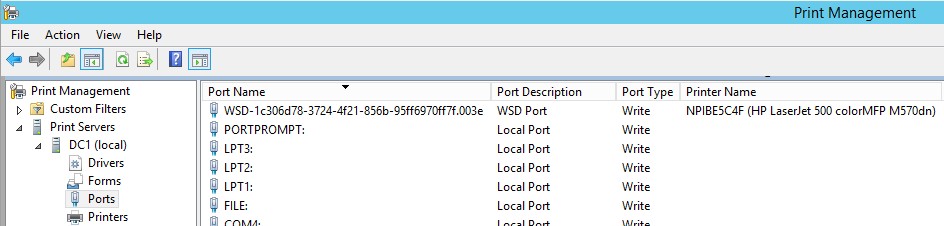
Clearly something in the printer subsystem is grabbing lots of ports. Another bell rang – I recalled when installing printers on these new domain controllers that instead of TCP/IP ports, I ended up with WSD ports.
What on earth is a WSD port?! (Etc.)
So these WSD ports are a bit like the Bonjour service, enabling computers to discover services advertised on the network. Not at all relevant to a typical Active Directory managed workspace, where printers are deployed through Group Policy. WSD ports (technically monitors, not ports) are however the default for many new printer installations, in Windows 8 and Server 2012. And as far as I can tell, they have no place in an enterprise environment.
Anyway, to cut a long story short (no, I didn’t did I, this is still a long story, sorry!), I changed all the WSD ports to TCP/IP ports. The problem has gone away. Just like that.
I spent countless hours trying to fix these domain controllers. I’m now off to brick the windows* at Microsoft and HP corporate headquarters.
Hope this saves someone somewhere the same pain I experienced.
As you may know from other articles here, I have a Synology DS214Play NAS, and I’m a big fan. It can do so much for so little money. Well, today I’m going to show you a new trick – it will work for most Synology models.
There are a few different ways of remotely connecting to and controlling computers on your home network. LogMeIn used to be a big favourite, until they discontinued the free version. TeamViewer is really the next best thing, but I find it pretty slow and erratic in operation. It’s also not free for commercial use, whereas the system I describe here is completely free.
Many people extol the virtues of VNC, but it does have a big drawback in terms of security, with various parts of the communication being transmitted unencrypted over the network. That’s obviously a bit of a no-no.
The solution is to set up a secure SSH tunnel first. Don’t worry if you don’t know what that means. Just think about this metaphor: imagine you had your own private tunnel, from your home to your office, with locked gates at either end. There are no other exits from this tunnel. So no one can peek into it to see what traffic (cars) is coming and going. An SSH tunnel is quite like that. You pass your VNC “traffic” (data) through this tunnel and it is then inaccessible to any prying eyes.
Assumptions
This guide assumes the following things:
You have a Synology NAS, with users and file storage already configured.
You have at home a Windows computer that is left switched on and connected to your home network while you’re off-site.
Your home PC has a static IP address (or a DHCP reservation).
You have some means of knowing your home’s IP address. In my case, my ISP has given me a static IP address, but you can use something like noip.com if you’re on a dynamic address. (Full instructions are available at that link.)
You can redirect ports on your home router and ideally add firewall rules.
You are able to use vi/vim. Sorry, but that knowledge is really beyond the scope of this tutorial, and you do need to use vi to edit config files on your NAS.
You have a public/private key pair. If you’re not sure what that means, read this.
Install VNC
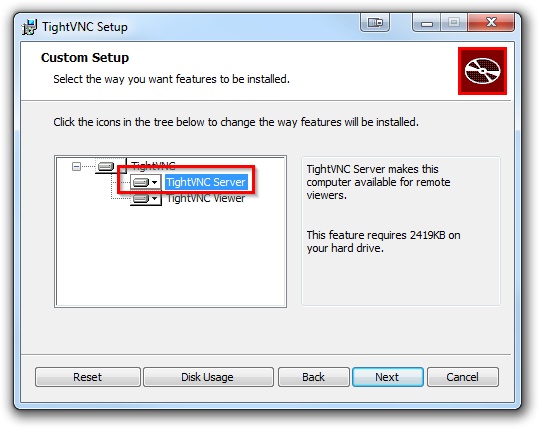
There are a few different implementations of VNC. I prefer TightVNC for various reasons – in particular it has a built-in file transfer module.
When installing TightVNC on your home PC, make sure you enable at least the “TightVNC Server” option.
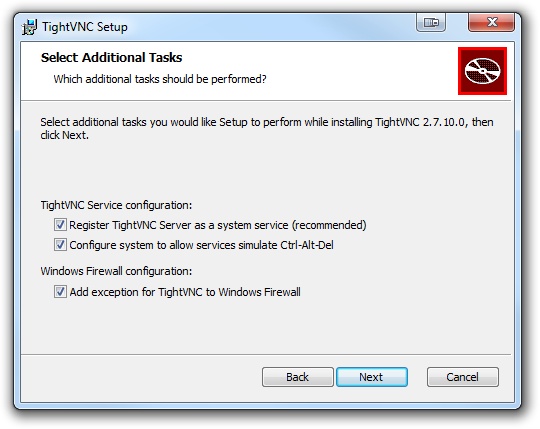
Check all the boxes in the “Select Additional Tasks” window.
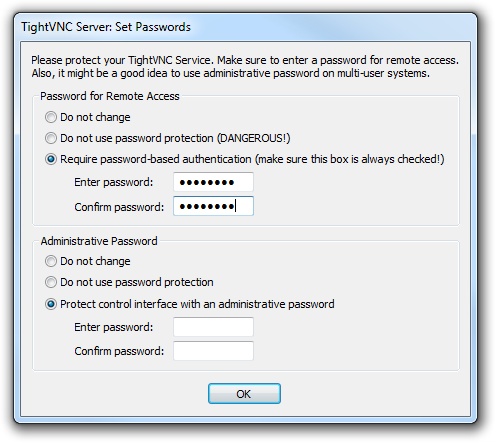
You will be prompted to create “Remote Access” and “Administrative” passwords. You should definitely set the remote access password, otherwise anyone with access to your home network (e.g. someone who might have cracked your wireless password) could easily gain access to your PC.
At work, you’ll just need to install the viewer component.
Configure Synology SSH server
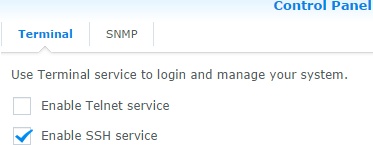
Within Synology DiskStation Manager, enable the SSH server. In DSM 5, this option is found at Control Panel > System > Terminal & SNMP > Terminal.
I urge you not to enable Telnet, unless you really understand the risks.
Next, login to your NAS as root, using SSH. Normally I would use PuTTY for this purpose.
You’ll be creating an SSH tunnel using your normal day-to-day Synology user. (You don’t normally connect using admin do you? Do you?!) Use vi to edit /etc/passwd. Find the line with your user name and change /sbin/nologin to /bin/sh. E.g.:
As part of this process, we are going to make it impossible for root to log in. This is a security advantage. Instead if you need root permissions, you’ll log in as an ordinary user and use “su” to escalate privileges. su doesn’t work by default. You need to add setuid to the busybox binary. If you don’t know what that means, don’t worry. If you do know what this means and it causes you concern, let me just say that according to my tests, busybox has been built in a way that does not allow users to bypass security via the setuid flag. So, run this command:
chmod 4755 /bin/busybox
Please don’t proceed until you’ve done this bit, otherwise you can lock root out of your NAS.
Next, we need to edit the configuration of SSH. We have to uncomment some lines (that normally being with #) and change the default values. So use vi to edit /etc/ssh/sshd_config. The values you need to change should end up looking like this, with no # at the start of the lines:
In brief these changes do the following, line by line:
Allow using SSH to go from the SSH server (the NAS box) to another machine (e.g. your home PC)
If you foul up your login password loads of times, restrict further attempts for 5 minutes.
Give you 6 attempts before forcing you to wait to retry your logon.
Allow authentication using a public/private key pair (which can enable password-less logons).
Point the SSH daemon to the location of the list of authorized keys – this is relative to an individual user’s home directory.
Having saved these changes, you can force SSH to load the new configuration by uttering the following somewhat convoluted and slightly OCD incantation (OCD, because I hate leaving empty nohup.out files all over the place). We use nohup, because nine times out of ten this stops your SSH connection from dropping while the SSH daemon reloads:
You need to have a public/private SSH key pair. I’ve written about creating these elsewhere. Make sure you keep your private key safely protected. This is particularly important if, like me, you use an empty key phrase, enabling you to log on without a password.
In your home directory on the Synology server, create (if it doesn’t already exist) a directory, “.ssh”. You may need to enable the display of hidden files/folders, if you’re doing this from Windows.
Within the .ssh directory, create a new file “authorized_keys”, and paste in your public key. The file will then normally have contents similar to this:
This is all on a single line. For RSA keys, the line must begin ssh-rsa.
SSH is very fussy about file permissions. Log in to the NAS as root and then su to your normal user (e.g. su rob). Make sure permissions for these files are set correctly with the following commands:
If you encounter any errors at this point, make sure you fix them before proceeding. Now test your SSH login. If it works and you can also su to root, you can now safely set the final two settings in sshd_config:
PermitRootLogin no

PasswordAuthentication no
The effect of these:
Disallow direct logging in by root.
Disallow ordinary password-based logging in.
Reload SSH with nohup kill -HUP `cat /var/run/sshd.pid`; rm nohup.out & as before.
Setting up your router
There are so many routers out there that I can’t really help you out with this one. You will need to port forward a port number of your choosing to port 22 on your Synology NAS. If you’re not sure where to start, Port Forward is probably the most helpful resource on the Internet.
I used a high-numbered port on the outer edge of my router. I.e. I forwarded port 53268 to port 22 (SSH). This is only very mild protection, but it does reduce the number of script kiddie attacks. To put that in context, while I was testing this process I just forwarded the normal port 22 to port 22. Within 2 minutes, my NAS was emailing me about failed login attempts. Using a high-numbered port makes most of this noise go away.
To go one better however, I also used my router’s firewall to prevent unknown IP addresses from connecting to SSH. Since I’m only ever doing this from work, I can safely limit this to the IP range of my work’s leased line. This means it’s highly unlikely anyone will ever be able to brute force their way into my SSH connection, if I ever carelessly leave password-based logins enabled.
Create a PuTTY configuration
I recommend creating a PuTTY configuration using PuTTY’s interface. This is the easiest way of setting all the options that will later be used by plink in my batch script. plink is the stripped down command-line interface for PuTTY.
Within this configuration, you need to set:
Connection type: SSH
Hostname and port: your home external IP address (or DNS name) and the port you’ve forwarded through your router, preferably a non-standard port number.
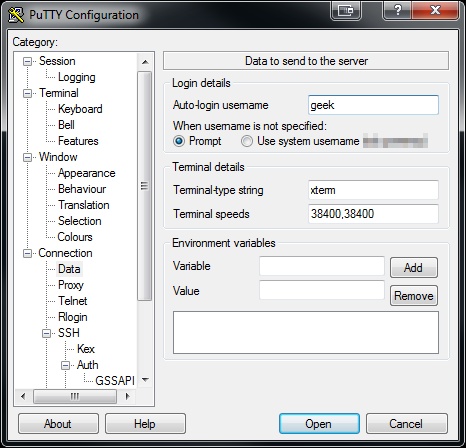
Connection > Data > Auto-login username: Put your Synology user name here.
Connection > SSH > Auth > Private key file for identification: here put the path to the location of your private key on your work machine, from where you’ll be initiating the connection back to home.
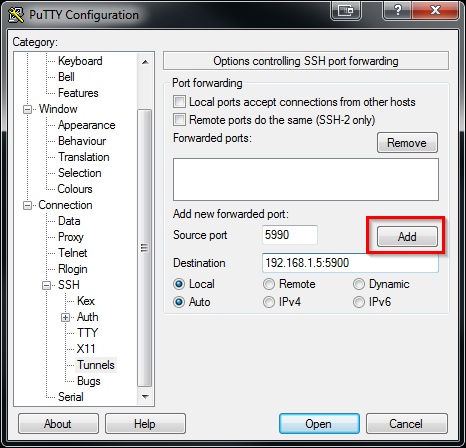
Connection > SSH > Tunnels: This bears some explanation. When you run VNC viewer on your work machine, you’ll connect to a port on your work machine. PuTTY forwards this then through the SSH tunnel. So here you need to choose a random “source port” (not the normal VNC port, if you’re also running VNC server on your work machine). This is the port that’s opened on your work machine. Then in the destination, put the LAN address of your home PC and add the normal VNC port. Like this:
Make sure you click Add.
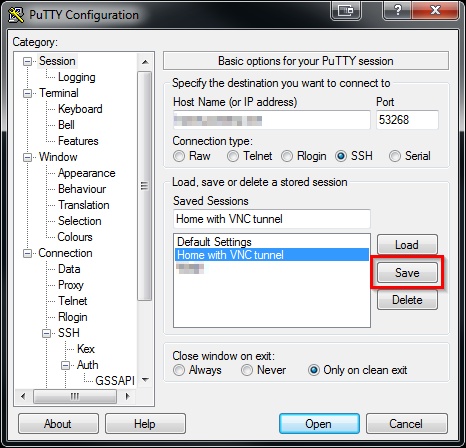
Finally, go back to Session, type a name in the “Saved Session” field and click “Save”. You will then be able to use this configuration with plink for a fully-automatic login and creation of the SSH tunnel.
Now would be a good time to fire up this connection and check that you can login okay, without any password prompts or errors.
Using username "rob".

Authenticating with public key "Rob's SSH key"
BusyBox v1.16.1 (2014-05-29 11:29:12 CST) built-in shell (ash)
Enter ‘help’ for a list of built-in commands.
RobNAS1>
Making VNC connection
I would suggest keeping your PuTTY session open while you’re setting up and testing your VNC connection through the tunnel. This is really the easy bit, but there a couple of heffalump pits, which I’ll now warn you about. So, assuming your VNC server is running on your home PC and your SSH tunnel is up, let’s now configure the VNC viewer at the work end. Those heffalump pits:
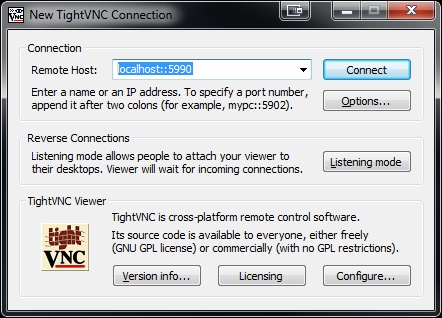
When you’re entering the “Remote Host”, you need to specify “localhost” or “127.0.0.1”. You’re connecting to the port on your work machine. Don’t enter your work machine’s LAN ip address – PuTTY is not listening on the LAN interface, just on the local loopback interface.
You need to specify the random port you chose when configuring tunnel forwarding (5990 in my case) and you need to separate that from “localhost” with double colons. A single colon is used for a different purpose, so don’t get tripped up by this subtle semantic difference.
If you have a working VNC session at this point, congratulations! That’s the hard work out of the way.
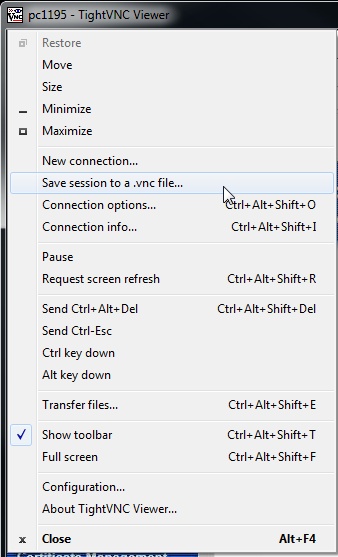
It would be nice to automate the whole connection process. While you have your VNC session established, it is worth saving a VNC configuration file, so you can use this in a batch script. Click the VNC logo in the top left of the VNC session, then “Save session to a .vnc file”. You have the option to store the VNC password in this file, which I’ve chosen to do.
Before saving the session, you might want to tweak some optimization settings. This will really vary depending on your preferences and the speed of your connection. On this subject, this page is worth a read. I found I had the best results when using Tight encoding, with best compression (9), JPEG quality 4 and Allow CopyRect.
One batch script to rule them all
To automate the entire process, bringing up the tunnel and connecting via VNC, you might like to amend the following batch script to fit your own environment:
@echo off
start /min "SSH tunnel home" "C:\Program Files (x86)\PuTTY\plink.exe" -N -batch -load "Home with VNC tunnel"
REM Use ping to pause for 2 seconds while connection establishes
ping -n 2 localhost > NUL
"C:\Batch scripts\HomePC.vnc"
I suggest creating a shortcut to this batch file in your Start menu and setting its properties such that it starts minimised. While your SSH tunnel is up, you will have a PuTTY icon on your task bar. Don’t forget to close this after you close VNC, to terminate the tunnel link. An alternative approach is to use the free tool MyEnTunnel to ensure your SSH tunnel is always running in the background if that’s what you want. I’ll leave that up to you.
DSM Upgrades
After a DSM upgrade, you may find that your SSH config resets and you can no longer use VNC remotely. In that eventuality, log into your NAS via your LAN (as admin) and change the config back as above. You’ll also probably need to chmod busybox again.
root locked out of SSH?
For the first time in my experience, during May 2015, a DSM upgrade reset the suid bit on Busybox (meaning no more su), but didn’t reset the PermitRootLogin setting. That meant that root could not log in via SSH. Nor could you change to root (using su). If you find yourself in this position, follow these remedial steps:
Go to Control Panel > Terminal & SNMP
Check the “Enable Telnet service” box.
Click “Apply”.
Log in as root, using Telnet. You can either use PuTTY (selecting Telnet/port 23 instead of SSH/port 22) or a built-in Telnet client.
At the prompt, enter chmod 4755 /bin/busybox.
Go to Control Panel > Terminal & SNMP
Uncheck the “Enable Telnet service” box.
Click “Apply”.
Do make sure you complete the whole process; leaving Telnet enabled is a security risk, partly because passwords are sent in plain text, which is a Very Bad Thing.
Conclusion
So, what do you think? Better than LogMeIn/TeamViewer? Personally I prefer it, because I’m no longer tied to a third party service. There are obvious drawbacks (it’s harder to set up for a start! and if you firewall your incoming SSH connection, you can’t use this from absolutely anywhere on the Internet) but I like it for its benefits, including what I consider to be superior security.
Anyway, I hope you find this useful. Until next time.
This website uses cookies to improve your experience. I will assume you're ok with this, but you can opt-out if you wish.AcceptRejectRead More
Privacy & Cookies Policy
Privacy Overview
This website uses cookies to improve your experience while you navigate through the website. Out of these, the cookies that are categorized as necessary are stored on your browser as they are essential for the working of basic functionalities of the website. We also use third-party cookies that help us analyze and understand how you use this website. These cookies will be stored in your browser only with your consent. You also have the option to opt-out of these cookies. But opting out of some of these cookies may affect your browsing experience.
Necessary cookies are absolutely essential for the website to function properly. This category only includes cookies that ensures basic functionalities and security features of the website. These cookies do not store any personal information.
Any cookies that may not be particularly necessary for the website to function and is used specifically to collect user personal data via analytics, ads, other embedded contents are termed as non-necessary cookies. It is mandatory to procure user consent prior to running these cookies on your website.