How-to: Laravel 4 tutorial; part 4 – database management through migrations

[easyreview title=”Complexity rating” icon=”geek” cat1title=”Level of experience required, to follow this how-to.” cat1detail=”There are some difficult concepts here, but you’ll find this is pretty easy in practice.” cat1rating=”3″ overall=”false”]

Laravel Tutorials

AVZ Database

For almost all my previous web design, I’ve used phpMyAdmin to administer the databases. I speak SQL, so that has never been a big deal. But Laravel comes with some excellent tools for administering your databases more intelligently and (most importantly!) with less effort. Migrations offer version control for your application’s database. For each version change, you create a “migration” which provides details on the changes to make and how to roll back those changes. Once you’ve got the hang of it, I reckon you’ll barely touch phpMyAdmin (or other DB admin tools) again.

Background

If you’ve been following this tutorial series, you may have noticed that I keep referring to a web-scraping application I’m going to develop. Now would be a good time to tell you a bit more about that, so you can understand what I’m aiming to achieve. That said, you can safely skip the next two paragraphs and pick up again at “Configure” if you’re itching to get to the code.

Still with me? Cool. My church uses an off-the-shelf content management system to run its website. It creates an RSS feed for podcasts, but unfortunately that feed doesn’t comply with the exacting requirements of the iTunes podcast catalogue. I thought it would be an interesting exercise to produce a compliant feed, based on data scraped from the web site.

We’re assuming here that I don’t have admin access to the web site and I have no other means of picking up the data. Also, the RSS feed, which contains links to each Sunday’s podcast lacks some other features, like accompanying text or images. So I’m going to parse the pages associated to each podcast one by one, pulling out all the interesting bits. Oh, and to make things really interesting, when you look at the code for the web site’s pages, you’ll see that it’s a whole load of nested tables, which will make the scraping really interesting. 😀

Configure

So I’m creating a web application that will produce a podcast feed. When I created the virtual host for this application (the container for the web site), Virtualmin also created my “ngp” (for NorthGate Podcasts) database. I’m going to create a MySQL user with the same name, with full permission to access the new database. Here’s how I do that from a root SSH login:

echo "GRANT ALL ON ngp.* TO 'npg'@localhost IDENTIFIED BY 'newpassword';" | mysql -p

This prompts me for the MySQL root password, then creates a new MySQL user, “ngp” and gives it all privileges associated to the database in question. Next we need to tell Laravel about these credentials. The important lines in the file app/config/database.php are:

 'mysql',

	'connections' => array(

//...

		'mysql' => array(
			'driver'   => 'mysql',
			'host'     => '127.0.0.1',
			'database' => 'ngp',
			'username' => 'ngp',
			'password' => 'newpassword',
			'charset'  => 'utf8',
			'prefix'   => '',
		),

//...

	),

//...

);

Our application will now be able to access the tables and data we create.

Initialise Migrations

The migration environment (essentially the table that contains information about all the changes to your application’s other tables) must be initialised for this application. We do this using Laravel’s command line interface, Artisan. From an SSH login, in the root directory of your Laravel application (the directory that contains the “artisan” script):

php artisan migrate:install

If all is well, you’ll see the response:

Migration table created successfully.

This creates a new table, migrations, which will be used to track changes to your application’s database schema (i.e. structure), going forwards.

First migration

Sometimes the Laravel terminology trips me up a bit. Even though it may seem there’s nothing really to migrate from yet, it’s technically a migration – a migration from ground zero. Migration in this sense means the steps required to get from the “base state” to the “target state”. So our first migration will take us from the base state of a completely empty database (well empty except for the migrations table) to the target state of containing a new table, nodes.

My web-scraping application will have a single table to start with, called “nodes” [Note: it is significant that we’re using a plural word here; I recommend you follow suit.] This table does not yet exist; we will create it using a migration. To kick this off, use the following Artisan command:

php artisan migrate:make create_nodes_table

Artisan should respond along the following lines:

Created Migration: 2013_07_14_154116_create_nodes_table
Generating optimized class loader
Compiling common classes

This script has created a new file 2013_07_14_154116_create_nodes_table.php. under ./app/database/migrations. If, like me, you’re developing remotely, you’ll need to pull this new file into your development environment. In NetBeans, for example, right-click the migrations folder, click “download” and follow the wizard.

You can deduce from the naming of the file that migrations are effectively time-stamped. This is where the life of your application’s database begins. The new migrations file looks like this:


As you can probably guess, in the "up" function, you enter the code necessary to create the new table (to move "up" a migration) and in the "down" function, you do the reverse (to move "down" or to roll back a migration).

Create first table

Your first migration will probably be to create a table (unless you have already created or imported tables via some other method). Naturally, Laravel has a class for this purpose, the Schema class. Here's how you can use it, in your newly-created migrations php file:

	public function up()
	{
		Schema::create('nodes', function($table) {
				$table->increments('id'); // auto-incrementing primary key
				$table->string('public_url', 255)->nullable(); // VARCHAR(255), can be NULL
				$table->text('blurb')->nullable();             // TEXT
				$table->string('image', 255)->nullable();
				$table->string('speaker', 255)->nullable();
				$table->string('title', 255)->nullable();
				$table->string('mp3', 255)->nullable();
				$table->integer('downloads')->nullable();     // INT
				$table->date('date')->nullable();             //DATE
				$table->integer('length')->nullable();
				$table->timestamps(); // special created_at and updated_at timestamp fields
		});
	}

	/**
	 * Revert the changes to the database.
	 *
	 * @return void
	 */
	public function down()
	{
		Schema::drop('nodes');
	}

To run the migration (i.e. to create the table), do the following at your SSH login:

php artisan migrate

This should elicit a response:

Migrated: 2013_07_14_154116_create_nodes_table

If you're feeling nervous, you may wish to use your DB admin program to check the migration has performed as expected:
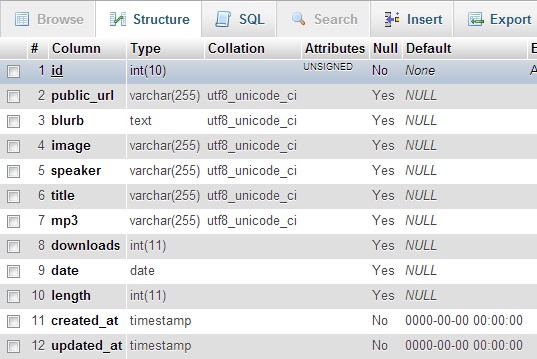
ngp nodes db

If you want to roll back the migration, performing the actions in the down() function:

php artisan migrate:rollback

Result:

Rolled back: 2013_07_14_154116_create_nodes_table

Take a look at the Schema class documentation, to see how to use future migrations to add or remove fields, create indexes, etc. Next up: how to use databases in your applications.

AVZ Database image copyright © adesigna, licensed under Creative Commons. Used with permission.

How-to: Laravel 4 tutorial; part 3 – using external libraries

[easyreview title=”Complexity rating” icon=”geek” cat1title=”Level of experience required, to follow this how-to.” cat1detail=”With Composer, installing libraries in Laravel 4 is easy peasy.” cat1rating=”1″ overall=”false”]

Laravel Tutorials

Library

I’m in the process of moving from CodeIgniter to Laravel. I still use CodeIgniter if I need to do something in a hurry. I was very pleased when the Sparks project came on the CodeIgniter scene, offering a relatively easy way to integrate third-party libraries/classes into your project. When I first looked at Laravel, I saw that it offered something similar, in “Bundles”.

Laravel 4 has matured. It is now using Composer for package management. Composer is itself an external library of sorts. It is not framework dependent. You can use Composer virtually anywhere you can use PHP. Which is great, because that means not only can you use Composer to install Laravel, you can use it to pull in other libraries too and track dependencies. With a bit of luck, the third-party library you require has already been made available at Packagist making installation of that library a doddle.

As I mentioned earlier, I’m going to be creating a web-scraping application during this tutorial. We’ve already seen how we can use Composer to make jQuery and Twitter’s Bootstrap available. Let’s now use it to add Goutte, a straightforward web scraping library for PHP. Goutte itself depends on several other libraries. The beauty of Composer is that it will make all those additional libraries available automatically.

Open up an SSH shell connection to your web server and navigate to the laravel directory. Utter the following incantation:

composer require "fabpot/goutte":"*"

Installation will take a while as it hauls in all the various related libraries. But who cares – this is a cinch! Make yourself a coffee or something. I saw the following output:

composer.json has been updated
Loading composer repositories with package information
Updating dependencies (including require-dev)
- Installing guzzle/common (v3.6.0)
Downloading: 100%

- Installing guzzle/stream (v3.6.0)
Downloading: 100%

- Installing guzzle/parser (v3.6.0)
Downloading: 100%

- Installing guzzle/http (v3.6.0)
Downloading: 100%

- Installing fabpot/goutte (dev-master 2f51047)
Cloning 2f5104765152d51b501de452a83153ac0b1492df

Writing lock file
Generating autoload files
Compiling component files
Generating optimized class loader
Compiling common classes

All very impressive and difficult-sounding.

Okay, so that’s great – I’ve got the library here somewhere; how do I load and use it? Loading the class is ridiculously easy. Composer and Laravel make use of PHP’s autoload function. You don’t even have to think about where the files ended up. Just do:

$client = new Goutte\Client();

To put that in context, here’s a new function for our ScrapeController class:

	public function getPages() {
		$client = new Goutte\Client();
		$crawler = $client->request('GET', 'https://pomeroy.me/');
		var_dump($crawler);
	}

If I visit the /scrape/pages URL, I see this:


object(Symfony\Component\DomCrawler\Crawler)#171 (2) { ["uri":protected]=> string(24) "https://pomeroy.me/" ["storage":"SplObjectStorage":private]=> array(1) { ["00000000061dd4ed000000000c2f13de"]=> array(2) { ["obj"]=> object(DOMElement)#173 (0) { } ["inf"]=> NULL } } }

I reckon even Dummy could do this! There are lots more sophisticated things you can do. I keep reading about the “IoC Container” but to be honest I’m finding the official documentation somewhat impenetrable. Once I’ve worked it out, I may post an update. Before that, I’m going to work on the next post in this series – managing databases.

Library image copyright © Janne Moren, licensed under Creative Commons. Used with permission.

How-to: Laravel 4 tutorial; part 2 – orientation

[easyreview title=”Complexity rating” icon=”geek” cat1title=”Level of experience required, to follow this how-to.” cat1detail=”This series really is for web programmers only, though not a great deal of prior experience is required.” cat1rating=”3.5″ overall=”false”]

Laravel Tutorials

Signpost at North Point, Barbados, Feb.1998

I’ve used CodeIgniter for many years, but I have always, I confess, proceeded knowing just enough to get by. So forgive me if my approach seems a little clunky. I have never, for example, used CodeIgniter’s routes. I like my web application files nicely categorised into Model, View, Controller, Library and, if absolutely necessary, Helper. (Google an MVC primer if you’re not familar with these terms. These are concepts that will really aid your web development.)

Controllers

So for now, I want to carry on using Controllers, if that’s okay with you. Controllers are stored under app/controllers. To anyone coming from CodeIgniter, that’s probably going to sound familiar!

As I go through the editions of this tutorial, I will be creating a small application that scrapes data from another website and represents it. More on that anon. Bearing that in mind, here’s a sample controller:

In CodeIgniter, that’s all you would have needed to do, due to automatic routing. In Laravel, you need also to add the following to app/routes.php:

Route::controller('scrape', 'ScrapeController');

To view these pages, you just visit yourdomain/scrape (/index is implied) and yourdomain/scrape/node/x (where x will probably refer to a specific node, possibly by database id).

This all bears explanation; the controllers page in the Laravel documentation does not currently expand on this. The names of the functions in the controller are significant. The first part of the camelCase style name is the HTTP verb that will be used to access the page. This may be an unfamiliar concept, but it’s great once you get used to it.

Most web pages will be accessed by the browser using the HTTP method “GET”. This is just the default. If you’re sending form data (you’ve clicked on a submit button), the chances are we’re dealing with the HTTP method “POST”. This makes it very easy to respond appropriately based on how the URL was reached.

Note: this is scratching the surface of RESTful web development. You may have heard the term bandied about. Wikipedia‘s not a bad place to start if you want to learn more about this.

We’ll reach the getIndex() function if we simply browse to /scrape. Following the age-old convention, “Index” is the default. If we browse to /scrape/node, the getNode() function comes into play. That function is expecting a single parameter, which would be passed along with the URL: /scrape/node/1.

You only reach the pages though through the magic of routing. In the Route::controller('scrape', 'ScrapeController');, we’re telling Laravel that calls to the URL /scrape need to be handed to the ScrapeController class.

Views

Views are pretty straightforward and similar to CodeIgniter. Place them in app/views. Extending the example above, our controller could now look like this:

 $node);
		return View::make('node', $data);
	}

}
?>

The second paramater in View::make is the data (typically a multi-dimensional array) sent to that view. Note that data can also be passed through to a view like this:

	public function getNode($node) {
		return View::make('node', $data)
		    ->with('node' => $node);
	}

And then your view (app/views/node.php) could be like this:

Node

This is node .

Obviously your real views will be more syntactically complete. You can see that the array is flattened one level so that $data('node'); in the controller is accessed a $node in the view.

Models

Models are created under app/models. Unlike CodeIgniter, Laravel comes with its own object relational mapper. In case you’ve not encountered the concept before, an ORM gives you a convenient way of dealing with database tables as objects, rather than merely thinking in terms of SQL queries. CodeIgniter has plenty of ORMs, by the way, it just doesn’t ship with one as standard.

Laravel’s built-in ORM is called “Eloquent”. If you choose to use it (there are others available), when creating a model, you extend the Eloquent class. Eloquent makes some assumptions:

  • Each table contains a primary key called id.
  • Each Eloquent model is named in the singular, while the corresponding table is named in the plural. E.g. table name “nodes”; Eloquent model name “node”.

You can override this behaviour if you like, it just makes things a bit more convenient in many cases.

Example model app/models/node.php:


(You can omit the closing ?> tag.)

Because the Eloquent class already contains a lot of methods, you do not necessarily need to do more than this. In your controllers, you could for example now do this:

$nodes = Node::all();

foreach ($nodes as $node) {
  // Do stuff here
}

This is a whistle-stop tour preparatory to building a real application. Head on over to the official Laravel documentation for much more on all this.

Signposts image copyright © Andrea_44, licensed under Creative Commons. Used with permission.

How-to: Laravel 4 tutorial; part 1 – installation

[easyreview title=”Complexity rating” icon=”geek” cat1title=”Level of experience required, to follow this how-to.” cat1detail=”A good level of familiarity with web hosting will come in handy here, especially if your hosting environment is different from mine. It will also help if you’re comfortable at the command line.” cat1rating=”4″ overall=”false”]

Laravel Tutorials

Introduction

If, like me, you spend much time coding for the web – for pleasure or profit – sooner or later you’re going to find that you benefit from using a development framework. A framework is a collection of scripts that help you create an application much more quickly. Frameworks typically include a lot of the “nuts and bolts” components – scripts that assist with database connections for example, plus components that impose some structure on your programming.

For a long time, my framework of choice was CodeIgniter. CodeIgniter has stagnated of late and concerns have arisen over licensing. Partly as a consequence, many PHP developers like me have searched for an alternative. In the search, I came across a framework that many programmers are turning to: Laravel. My early experiences with Laravel have been extremely positive and I have found many things I prefer about it. In this series of tutorials, I’ll show you how to get up and running with Laravel and begin creating an application. The application will involve some web-scraping, so you may wish to stay tuned for that reason alone.

Before we dive in though, one word of caution: Laravel is a young open source project. Like many such projects, its documentation is less complete than you might wish, particularly when compared to CodeIgniter. In fact CodeIgniter’s great documentation was one of the reasons why I initially chose it as a development framework. Documentation is a core commitment of the Laravel team, but at the time of writing, with the recent release of Laravel 4, I’m finding the documentation is not quite up to scratch. Possibly you’ve found that too, which is why you’ve made it here to this tutorial. In fact one of the worst parts of the documentation at the time of writing is the installation procedure! With that caveat in place, let’s move on – it’s still well worthwhile.

Prerequisites

All my web coding is done within a Linux environment, usually CentOS or Ubuntu Server. For the easiest experience following these tutorials, you may wish to create a similar environment. (I’ve written about that elsewhere.) Alternatively, you should be able to follow the tutorials with some tweaking – but you’re on your own there. At the very least, I recommend you have in place:

  • Apache web server
  • Shell access to the server (preferably SSH)
  • Root access to install Composer globally (not essential)
  • Git must be installed in your environment.

Installing Composer

With the latest release (4) Laravel has taken a leap forward in several areas. One such area is the management of third party libraries and packages. Laravel previously made use of an external project called “Composer“, to install dependent packages. With Laravel 4, you now use Composer to install Laravel itself. To install Composer, from a root login shell, do the following:

cd /usr/local/bin
curl -sS https://getcomposer.org/installer | php
mv composer.phar composer

Provided /usr/local/bin is in your $PATH environment variable, you will now be able to call Composer with “composer [options] command [arguments]“.

Installing Laravel


The beauty of Composer is the simplicity it brings to library/application installation. There is an overwhelming range of tutorials on how to install Laravel with Composer. Please bear in mind that many of these were written while Laravel 4 was in beta or even alpha. Now it has been released, the installation is quite straightforward. Having prepared a new environment for a web site (a virtual host or whatever), navigate to the directory above the default web root directory. Then install using Composer. Eg:

cd /home/geek/domains/test.geekanddummy.com/
composer create-project laravel/laravel

You should see a fair bit of output indicating that Composer is creating a directory “laravel” and pulling in all the dependencies for a basic installation. The laravel directory contains a folder entitled “public“, intended to be your web root. Your easiest way to complete the configuration is to point your web site at that directory. For example, using Virtualmin, you would go to Server Configuration –> Website Options and change “Website documents sub-directory” from “public_html” to “laravel/public”.

Having done that, when I browse to my test web site, I see:

Laravel landing page

Installing other frameworks

Now would be a good time put to put Twitter’s Bootstrap and jQuery in place, if you’re planning to use them. Naturally, we’ll use Composer for this. You might use other frameworks in your web applications – check out Packagist to see if anyone has made a Composer package available.

Composer demands a tutorial all of its own, but I’ll keep it simple here. I’m going to make my new Laravel application depend on the latest compatible branches of Bootstrap and jQuery. This will potentially allow us to upgrade these two frameworks with a simple Composer command at a later date.

In the root of your Laravel application you’ll find the main Composer configuration file, composer.json. You don’t need to get your hands dirty editing the file, just from a shell in that root directory, issue the following commands:

composer require "components/jquery":"*"
composer require "twitter/bootstrap":"*"

This updates the composer.json file to include these dependencies and goes ahead and downloads them. It can take a while – be patient.

You’ll end up with jQuery files under ./components/jquery and Bootstrap files under ./vendor/twitter/bootstrap. These are locations not visible to your web server (the root is at ./public, you’ll recall). This is a particular problem in the case of Bootstrap. For now, here’s a quick-and-dirty way of accessing these files. I’m on the lookout for a more elegant solution, but this will get you up and running rapidly. Navigate to the “public” folder in a login shell and issue the following commands:

mkdir -p assets/css
mkdir assets/img
mkdir assets/js
ln -s ../../../vendor/twitter/bootstrap/img/glyphicons-halflings.png ./assets/img
ln -s ../../../vendor/twitter/bootstrap/docs/assets/css/bootstrap.css ./assets/css
ln -s ../../../vendor/twitter/bootstrap/docs/assets/css/bootstrap-responsive.css ./assets/css
ln -s ../../../components/jquery/jquery.min.js ./assets/js

And so on, for whichever bits you’ll use. This will only work if your web server allows following symbolic links. The .htaccess directive “Options +SymLinksIfOwnerMatch” may help here, but that’s outside the scope of this tutorial.

Configure your development environment

I use NetBeans for development. If you don’t already have a preferred IDE (integrated development environment), I recommend you check it out. Another favourite is Eclipse. You could use an ordinary text editor, but then you’d be missing out on a lot of things that can make your coding more comfortable and efficient.

Having installed Laravel and the other frameworks on my web server, next I use NetBeans to pull the code across to my development environment. In the NetBeans “New Project” wizard, select the option “PHP Application from Remote Server”. In the remote configuration, ensure that you choose as your “upload directory”, the laravel. From there, you’ll want to download the app and public directories.

Conclusion

That’s it for today’s tutorial. Next time, we’ll look at orientating ourself within the framework (“what goes where?”).