
[easyreview title=”Complexity rating” icon=”geek” cat1title=”Level of experience required, to follow this how-to.” cat1detail=”There are some difficult concepts here, but you’ll find this is pretty easy in practice.” cat1rating=”3″ overall=”false”]
Laravel Tutorials
- Part 1: Installation
- Part 2: Orientation
- Part 3: Using External Libraries
- Part 4: Database Management Through Migrations
- Part 5: Using Databases
- Part 6: Virtualised development environment – Laravel Homestead
For almost all my previous web design, I’ve used phpMyAdmin to administer the databases. I speak SQL, so that has never been a big deal. But Laravel comes with some excellent tools for administering your databases more intelligently and (most importantly!) with less effort. Migrations offer version control for your application’s database. For each version change, you create a “migration” which provides details on the changes to make and how to roll back those changes. Once you’ve got the hang of it, I reckon you’ll barely touch phpMyAdmin (or other DB admin tools) again.
Background
If you’ve been following this tutorial series, you may have noticed that I keep referring to a web-scraping application I’m going to develop. Now would be a good time to tell you a bit more about that, so you can understand what I’m aiming to achieve. That said, you can safely skip the next two paragraphs and pick up again at “Configure” if you’re itching to get to the code.
Still with me? Cool. My church uses an off-the-shelf content management system to run its website. It creates an RSS feed for podcasts, but unfortunately that feed doesn’t comply with the exacting requirements of the iTunes podcast catalogue. I thought it would be an interesting exercise to produce a compliant feed, based on data scraped from the web site.
We’re assuming here that I don’t have admin access to the web site and I have no other means of picking up the data. Also, the RSS feed, which contains links to each Sunday’s podcast lacks some other features, like accompanying text or images. So I’m going to parse the pages associated to each podcast one by one, pulling out all the interesting bits. Oh, and to make things really interesting, when you look at the code for the web site’s pages, you’ll see that it’s a whole load of nested tables, which will make the scraping really interesting. 😀
Configure
So I’m creating a web application that will produce a podcast feed. When I created the virtual host for this application (the container for the web site), Virtualmin also created my “ngp” (for NorthGate Podcasts) database. I’m going to create a MySQL user with the same name, with full permission to access the new database. Here’s how I do that from a root SSH login:
echo "GRANT ALL ON ngp.* TO 'npg'@localhost IDENTIFIED BY 'newpassword';" | mysql -p
This prompts me for the MySQL root password, then creates a new MySQL user, “ngp” and gives it all privileges associated to the database in question. Next we need to tell Laravel about these credentials. The important lines in the file app/config/database.php are:
 'mysql',

	'connections' => array(

//...

		'mysql' => array(
			'driver'   => 'mysql',
			'host'     => '127.0.0.1',
			'database' => 'ngp',
			'username' => 'ngp',
			'password' => 'newpassword',
			'charset'  => 'utf8',
			'prefix'   => '',
		),

//...

	),

//...

);
Our application will now be able to access the tables and data we create.
Initialise Migrations
The migration environment (essentially the table that contains information about all the changes to your application’s other tables) must be initialised for this application. We do this using Laravel’s command line interface, Artisan. From an SSH login, in the root directory of your Laravel application (the directory that contains the “artisan” script):
php artisan migrate:install
If all is well, you’ll see the response:
Migration table created successfully.
This creates a new table, migrations, which will be used to track changes to your application’s database schema (i.e. structure), going forwards.
First migration
Sometimes the Laravel terminology trips me up a bit. Even though it may seem there’s nothing really to migrate from yet, it’s technically a migration – a migration from ground zero. Migration in this sense means the steps required to get from the “base state” to the “target state”. So our first migration will take us from the base state of a completely empty database (well empty except for the migrations table) to the target state of containing a new table, nodes.
My web-scraping application will have a single table to start with, called “nodes” [Note: it is significant that we’re using a plural word here; I recommend you follow suit.] This table does not yet exist; we will create it using a migration. To kick this off, use the following Artisan command:
php artisan migrate:make create_nodes_table
Artisan should respond along the following lines:
Created Migration: 2013_07_14_154116_create_nodes_table

Generating optimized class loader

Compiling common classes
This script has created a new file 2013_07_14_154116_create_nodes_table.php. under ./app/database/migrations. If, like me, you’re developing remotely, you’ll need to pull this new file into your development environment. In NetBeans, for example, right-click the migrations folder, click “download” and follow the wizard.
You can deduce from the naming of the file that migrations are effectively time-stamped. This is where the life of your application’s database begins. The new migrations file looks like this:
As you can probably guess, in the "up" function, you enter the code necessary to create the new table (to move "up" a migration) and in the "down" function, you do the reverse (to move "down" or to roll back a migration).
Create first table
Your first migration will probably be to create a table (unless you have already created or imported tables via some other method). Naturally, Laravel has a class for this purpose, the Schema class. Here's how you can use it, in your newly-created migrations php file:
public function up()
{
Schema::create('nodes', function($table) {
$table->increments('id'); // auto-incrementing primary key
$table->string('public_url', 255)->nullable(); // VARCHAR(255), can be NULL
$table->text('blurb')->nullable(); // TEXT
$table->string('image', 255)->nullable();
$table->string('speaker', 255)->nullable();
$table->string('title', 255)->nullable();
$table->string('mp3', 255)->nullable();
$table->integer('downloads')->nullable(); // INT
$table->date('date')->nullable(); //DATE
$table->integer('length')->nullable();
$table->timestamps(); // special created_at and updated_at timestamp fields
});
}
/**
* Revert the changes to the database.
*
* @return void
*/
public function down()
{
Schema::drop('nodes');
}
To run the migration (i.e. to create the table), do the following at your SSH login:
php artisan migrate
This should elicit a response:
Migrated: 2013_07_14_154116_create_nodes_table
If you're feeling nervous, you may wish to use your DB admin program to check the migration has performed as expected:
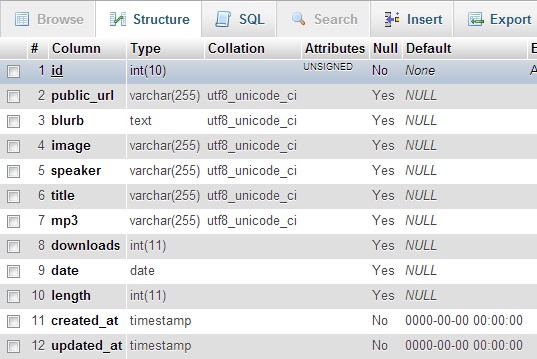
If you want to roll back the migration, performing the actions in the down() function:
php artisan migrate:rollback
Result:
Rolled back: 2013_07_14_154116_create_nodes_table
Take a look at the Schema class documentation, to see how to use future migrations to add or remove fields, create indexes, etc. Next up: how to use databases in your applications.
AVZ Database image copyright © adesigna, licensed under Creative Commons. Used with permission.
Share this:

Thank you very much for these posts. You have helped me a lot because I was just messing around Laravel website 🙂
Great – glad to have been of some help!