

You may have arrived at this page thinking, “Okay, this is a clickbait article, but I’ll bite.” Clickbaity, because you’d say there’s no such thing as a perfect employee. And I confess, I’d half agree with you. That said, when hiring new people for a role, we’re usually looking not simply for someone who can just do the work but who also will be a good fit. When you get someone with both attributes, that’s pretty close to perfect, I’d say.
Interview processes are artificial. If like me you don’t have lots of time to spare for recruiting and you don’t have a department dedicated to taking new recruits through a fortnight-long getting-to-know-you exercise, you’ll appreciate some effective time-savers.
Most interviews I’ve conducted have been on the telephone or face-to-face in the office – and relatively short. These are not ideal scenarios for really getting to know someone. And for me, it is vitally important to know who the candidate is, not just what the candidate can do.
Will candidates fit in well with the team? Will they share our values? Will they bring toxicity and poor attitudes? Some people pride themselves on being a good judge of character. If this is you, I’m really, genuinely happy for you. The rest of us though, we need some tools to help us. Some tools that take us closer to understanding the core of someone’s being, within the time constraints of an hour-long interview.
Virtues toolkit
If you want to know what someone is like, one approach is to ask them to comment on their own character. Many people find that difficult enough when there’s no pressure, never mind in an interview situation, not least because they’re second-guessing, wondering what might be the ‘right answer’.
Of course there is no right answer. You will always and only be you. Even if you’re a good actor and can play the part of someone with a different personality, in time, under stress, the real you will emerge. And in the meantime, you’ll waste a lot of emotional energy.
So with our candidates, to get to the real person we need to draw out the values that are important to them. To what characteristics would they say they aspire? Chances are, they are already innately keyed into those characteristics and are striving to improve. Maybe they’re passionate about justice, or desperate to be more professionally dispassionate (to become a better negotiator). None of these characteristics or values are good or bad, per se. But some will be more pertinent to your business and in interactions within the team.
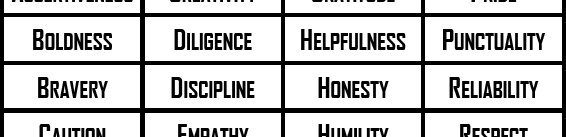
My virtues toolkit is really simple. Without judgement, I created a diverse list of characteristics that might be considered to be virtues. I printed them, laminated them and cut them up into individual pieces. Then within interviews I gave candidates the pile of virtues and asked them to select the five to which they most aspired or which they most admired.
Can candidates ‘game’ this system? Well yes, of course. But that’s why we have probationary periods! If you discover your candidates do not in any way reflect the values they claimed to espouse, you can be sure you have an issue of integrity, which may make them unsuitable to work in your business. Or possibly, if the gap is not too wide, it identifies areas for improvement during the probationary period or beyond.
Here are the templates. Feel free to use as they are or customise them according to your own tastes and requirements. At the very least I have no doubt you can make them look better. My design skills are feeble at best!
Categorisation exercise

This one’s a bit more specialised. It may or may not be of use to you, but if nothing else, I hope it might inspire other creative methods of conducting candidate assessments.
When I was recruiting for a Security Analyst position recently, I spent some time thinking about the qualities that might be advantageous for such a role. How might an analyst think?
In many different analyst roles, not only within information security, it is fundamentally important to be able to sift through data. To see the wood for the trees. To identify different characteristics in the information presented. To spot those factors that are relevant. To think like an analyst, you probably need to be pretty good at classification, categorisation, developing or utilising taxonomies.
As I said before, finding the right person for the role is important – possibly more important than finding someone with the right experience. If you recruit someone who has all the right tendencies and the ability to learn quickly, a lack of experience is of less importance in many roles. (Leaving aside for the moment those roles where prestige and documented credibility or political power are key.)
So I developed a categorisation exercise. I produced a sheet of 48 different items of clothing, all different from each other in various ways. Again, I laminated them and cut them up into individual cards. I gave these to the candidates and invited them to make notes on the various different ways in which you might categorise the cards – and whether a particular method stood out as most useful or appropriate.
While the candidates completed the task, I observed and made notes on how readily they adapted to this and how quickly they were able to work. A logical analytical mind makes light work of this sort of task, even if the person has no previous experience of a game like this. (Let’s face it. It’s definitely a game, albeit not a very fun game.)
I made it clear to the candidates that this was not a colour perception test. The results were illuminating and as far as I can tell, their interaction with this test correlated strongly with what I knew about them or later came to know.
The original template for this exercise is in SVG format. You can edit this using the free (and very competent) graphics program Inkscape.
Conclusion
With a bit of innovation and some lateral thinking, there are definitely some strategies you can use to get closer to understanding the people you interview. Clearly there’s no substitute for putting your candidates at their ease, giving them time and space and getting to know them. But for a busy hiring manager, these tips and resources might get you a shade closer to perfect – and if not these exact resources, whatever new resources you are now inspired to create.
I’d love to hear if this post has helped you or if you have any other ideas about how we can improve the interview process for recruiter and candidate. Let me know your thoughts in the comments below. If you have great resources of your own, get in touch and perhaps I can provide links to them here.


