OCS Inventory NG authentication with Active Directory

OCS Inventory NG forms an essential part of my DevOps/Security strategy. OCS gives me visibility of the hardware and software inventory of all compute nodes in my network.

My primary user directory is AD, so I try and ensure that wherever possible, systems authenticate against AD. This is perfect when disabling accounts, when someone leaves. Less worrying about all the other places that person may have credentials.

I’ve found that the instructions for authenticating OCS against LDAP simply don’t work for Active Directory. That’s up to and including the most recent version at the time of writing – version 2.4.

It’s necessary to make a code change, for AD authentication to work. In an ideal world, I’d raise a pull request with the OCS team to fix this, but I’m not really a developer. I’ve chosen instead the line of least resistance: hack the code to make it work. Sometimes you just have to be pragmatic.

The fix isn’t documented as far as I can tell. I’m indebted to Bruno Lessa for discovering and/or writing up the code changes that are necessary to enable authentication with Active Directory.

So, here are the code changes you need to make, after installing OCS Inventory. Some of the files may be in a slightly different location, in your installation, depending on your operating system. My installation was on Ubuntu 16.04 – I imagine the location is pretty similar on other OSes too.

File Find line containing Change to
/usr/share/ocsinventory-reports/ocsreports/backend/AUTH/auth.php $list_methode = array(0 => “local.php”); $list_methode = array(0 => “ldap.php”, 1 => “local.php”);
/usr/share/ocsinventory-reports/ocsreports/backend/identity/identity.php $list_methode = array(0 => “local.php”); $list_methode = array(0 => “ldap.php”, 1 => “local.php”);?

Having made those code changes, you configure LDAP in the web interface (Config > Config > LDAP configuration). Values similar to those below:

Setting Example value
CONEX_LDAP_SERVEUR PROD-DOMC-01.mydomain.com
CONEX_ROOT CN=ldapreadonlyuser,OU=Accounts,DC=yourdomain,DC=com
CONEX_ROOT_PW ldapreadonlypassword
CONEX_LDAP_PORT 389
CONEX_DN_BASE_LDAP OU=Accounts,DC=yourdomain,DC=com
CONEX_LOGIN_FIELD samaccountname
CONEX_LDAP_PROTOCOL_VERSION 3
CONEX_LDAP_CHECK_FIELD1_NAME memberof
CONEX_LDAP_CHECK_FIELD1_VALUE CN=SysOps Admins,OU=SysOps,OU=Groups,DC=yourdomain,DC=com
CONEX_LDAP_CHECK_FIELD1_ROLE Super administrators
CONEX_LDAP_CHECK_FIELD2_NAME memberof
CONEX_LDAP_CHECK_FIELD2_VALUE CN=SysOps Operators,OU=SysOps,OU=Groups,DC=yourdomain,DC=com
CONEX_LDAP_CHECK_FIELD2_ROLE RO
CONEX_LDAP_CHECK_DEFAULT_ROLE [blank]

Use CCleaner? Read this.

CCleaner is a popular program for cleaning up computers. Amongst the host of similar programs out there, CCleaner is the only one I’ve used and trusted, for many years. This week, that trust has been undermined fundamentally.

A version of CCleaner was released during August that contained malicious code, presumably without the developers’ knowledge – though it could well have been an inside job. Anyone installing CCleaner during August/early September may have installed the compromised version of CCleaner – version 5.33.

This is serious. CCleaner is powerful software. The injected code would run with at least the same power of CCleaner, which means it could potentially:

  • Watch your browsing activity
  • Capture passwords
  • Steal your files
  • Compromise your online banking credentials
  • Delete arbitrary data
  • Encrypt files

And so on.

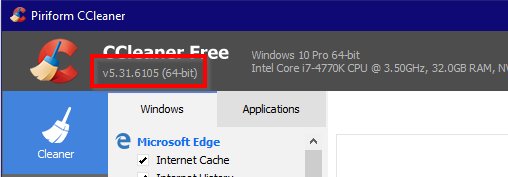
You can see if you’re at risk by running CCleaner and checking the version number:

If you have version 5.33 version installed, I strongly recommend taking the following steps:

  • Uninstall CCleaner immediately
  • Change all passwords you use with the affected computer – including online passwords, banking passwords, etc.
  • Review bank account and credit card statements for unusual activity

In many cases, you can add an extra layer of protection to your passwords by using “two factor authentication” (Google calls it 2-step verification). When logging into certain services, you will be prompted to enter a code from a text message or app. Even if your password has been compromised, two-factor authentication makes it that bit harder for others to gain access to your accounts.

For more information on two factor authentication (“2FA”):

CNET: Two factor authentication what you need to know
PCMag: Two factor authentication – who has it and how to set it up

For a list of services known to support 2FA:

TwoFactorAuth.org

Cisco’s security research team Talos advises that the ultimate target seems to be prominent tech companies. There’s evidence to suggest that a Chinese group has used this injected malware to launch further targeted attacks on companies like Sony, Intel, Samsung, Microsoft and several others. The most likely objective here is to steal intellectual property.

Should that make us any less concerned? Probably not. Such a serious compromise in a widespread, popular program undermines trust in software supply chains generally. There isn’t an awful lot we can do to defend against this sort of approach, other than to proceed with caution when installing any software. Best to stay away from the latest, bleeding-edge releases, perhaps.

Avast, the popular antivirus manufacturer owns CCleaner. If this can happen to a leading software security company, it can happen to anyone.

Run for the hills!!! πŸ˜€

Integrating OCS Inventory with Rundeck

I’ve been on a DevOps journey for a while now. If you’re in a similar place – am I just a dullard, or is it slow going?!

I work mainly at the Ops side of the equation, in an environment that strongly favours open source solutions. Most recently I’ve been focusing on automating asset management/inventory. For this, OCS Inventory NG fits the bill well. The interface isn’t that slick, and I couldn’t for the life of me get the Active Directory integration working [UPDATE: now working; read this post], but for collecting software and hardware inventory, it’s the bomb.

In a mixed estate (Windows/Linux/Mac), I can use Group Policy, Rudder and Meraki respectively to force the OCS agent onto endpoints. Which means I can just sit back and let my CMDB populate itself. Awesome. (Because who’s got time to keep these things updated themselves, right?)

This inventory automation was a prerequisite for Rundeck. Since you’re here, you probably already know, but just in case you don’t: Rundeck is a fantastic tool for wrapping policies around any task you can dream of. You can use it for centralised job scheduling, you can use it to allow your developers to reboot servers without giving them SSH access, and you have ACLs and a full audit trail for everything.

For Rundeck to be any use, it needs a list of servers to control, which brings me back to OCS Inventory. OCS knows about my servers, so let’s just get Rundeck talking to OCS. Then Rundeck will have an always-up-to-date list of server endpoints, with no human input required. Marvellous.

My weapon of choice here is PHP, because I know it and because all the required components for this script are already installed on the OCS Inventory server. The simple prerequisites:

  1. Ensure all servers are tagged on their way into OCS Inventory. I use the installation switch /TAG="SERVER" with the OCS agent.
  2. On the OCS Inventory server, create a read-only MySQL user for the script. I created the user “rundeck@localhost” (so its purpose was clear) and gave it the minimum permissions – SELECT on the accountinfo and hardware OCS tables.

I created a PHP script in the OCS Inventory web root. For me that’s at /usr/share/ocsinventory-reports/ocsreports. I called the script rundeck-xml.php. And here’s the code:

<?php
// OCS inventory integration into Rundeck.
$host = "127.0.0.1";
$db = "ocsweb";
$user = "rundeck";
$pwd = "PASSWORD GOES HERE";

$link = mysqli_connect($host, $user, $pwd, $db);

if (mysqli_connect_errno()) {
    printf("Connect failed: %s\n", mysqli_connect_error());
    exit();
}


// Select all devices tagged as "SERVER" in the OCS database
$query = "
    SELECT `NAME`, `WORKGROUP`, `OSNAME`, `OSVERSION`, `OSCOMMENTS`, `IPADDR`, `DESCRIPTION`, `ARCH` FROM hardware
    LEFT JOIN accountinfo ON hardware.`ID` = accountinfo.`HARDWARE_ID`
    WHERE accountinfo.`TAG` LIKE '%SERVER%'
    ORDER BY `NAME`
";


if($result = mysqli_query($link, $query)) {
    // Start XML
    header('Content-type: text/xml');
    echo "<project>\n";

    while($row = mysqli_fetch_object($result))
    {
        echo "    <node name=\"{$row->NAME}\" type=\"node\"\n";
        echo "        hostname=\"{$row->NAME}.{$row->WORKGROUP}\"\n";
        echo "        osName=\"{$row->OSNAME}\"\n";
        echo "        osVersion=\"{$row->OSVERSION}\"\n";
        // Architecture is either in the DESCRIPTION field (for Ubuntu) or ARCH field (for Windows)
        $arch = (isset($row->ARCH) ? $row->ARCH : $row->DESCRIPTION);
        echo "        osArch=\"$arch\"\n";
        echo "    />\n";
    }
    mysqli_free_result($result);

    echo "</project>\n";
}
?>

Possibly not the most elegant code, but it gets the job done. Further security is left as an exercise for the reader. πŸ˜‰

Referring to the database and the RESOURCE-XML Rundeck schema, you can extend this script to suit your needs. Add this to your Rundeck project configuration as an external resource model, with the URL of the above script. E.g. http://ocsserver.domain.com/ocsreports/rundeck-xml.php. All being well, every server from OCS Inventory will now appear as a node in Rundeck.

GDPR: what is a small UK business to do?

Although it’s nearly upon us, it seems like many businesses remain unaware of the impending data protection doom of the General Data Protection Regulations. Small businesses in particular. It’s easy to think that (a) there’s no way you’d have time to prepare your business and (b) it won’t apply to you in any event.

The trouble is, that’s a risky position to take. When it comes into force on 25 May 2018, GDPR will usher in fines of up to €20m (and beyond). On top of that, consumers will be increasingly ready and willing to sue companies over data protection issues. Every business needs to take GDPR seriously, then.

Under the current regime, governed by the Data Protection Act, the maximum fine for a data breach is £500k. Under GDPR, at present Euro exchange rates, it’s 34 times that amount. Our data protection enforcement body, the Information Commissioner’s Office (ICO), is about to have a major weapons upgrade.

In June 2017, the ICO fined Morrisons £10,500 for a marketing faux pas. In July, the company under the cosh was MoneySuperMarket and the fine, £80,000. Scaling those fines up 34 times and you’re looking at £357k and £2.7m respectively.

Now it might not work that way in practice, but we’re still looking at huge potential exposure – the kind of exposure that could put a company out of business. Realistically a smaller company is likely to face a smaller fine (smaller customer databases, smaller likely impact from any breach). But also, a smaller company, with less resources to apply to security and cyber risk insurance, is more likely to fall foul of the regulations and be fined. Again and again and again.

Does this sound alarmist? Possibly. It all comes down to risk really. If you’re happy to play fast and loose with your customers’ data in full knowledge of the consequences, read no further. But if all this is giving you pause for thought, stick with me.

But Brexit?

Sorry; we’ll be following GDPR regardless of Brexit.

250 is the magic number

The regulations impose differing obligations on companies, depending on number of employees. The legislation will be less onerous for companies with fewer than 250 members of staff. But still onerous.

If you’re under the 250 mark, but you process or store much personal data (customers, suppliers, employees), GDPR will apply to you in full. So if you’re running a greengrocer’s you’re probably okay. If you’re running a small accountancy firm, well you’ve got a lot of work to do. And we can’t afford to ignore this, right?

New stuff

We’re already covered by the Data Protection Act in the UK. GDPR significantly enhances personal data protection and privacy by imposing:

  • Significant changes when it comes to consent. You may not market to anyone who has not consented. And consent has to consist of an act on the part of the person. Pre-ticking consent boxes on website won’t fly any more.
  • Clarity and ease. It must be easy for consumers to understand what it is they’re consenting to, and easy for them to withdraw consent. Consent must be defined by channel (e.g. email/telephone/SMS) and duration (how long the consent will last).
  • Data portability. If someone asks for a copy of the data you hold on them, you must supply it within 30 days, in a common electronic format (Word document, Excel spreadsheet, PDF file, etc.).
  • Accuracy. You are obliged to correct any incorrect data – including, if you’ve shared that data with a third party, making them correct it too.
  • A right to be forgotten. If someone asks you to remove their data, and you have no other legitimate reason to keep it, you have to remove it.
  • Mandatory data breach processes. If you become aware of a breach that affects personal privacy, you will need to tell the ICO within 72 hours of discovering the breach. Essentially means you need a bullet-proof data breach policy in place.
  • Privacy by design. If you’re designing a new system or business process, you must consider privacy at the outset (and you must document the fact).
  • Data Protection Impact Assessments. If a piece of work is likely to represent a high risk when it comes to personal data, you must conduct a DPIA. The GDPR does not specify the detailed process, but it’s essentially based on risk analysis. If after your analysis, you conclude there is a high risk to privacy, you must consult the ICO before commencing work.
  • Data Protection Officer. If your business is over the 250 mark, or under it and you process personal data, you must appoint a Data Protection Officer. And that DPO needs to have some idea of the responsibilities of the role. Reading this blog post should help!
  • A broad definition of “personal data”. This now includes IP addresses, for example. It’s essentially any data that identifies a person or that could be used with other data to identify a person.
  • Security. The legislation requires you to take reasonable steps to protect personal data. Think encryption, robust passwords for access, principle of least privilege, need to know, etc.

What do I need to do?

If you’re reading all this for the first time, you’ve probably already started to identify areas of your business that you’ll need to review. Here’s a general plan of attack that I would recommend:

  1. Appoint a Data Protection Officer.
  2. Review all your data, thoroughly. If you have more than one employee, you’ll probably need to involve others in this process. If you don’t know where your data is or what data you’re holding, you will be oblivious to your compliance obligations. And obliviousness is no defence I’m afraid, when it comes to penalties.
  3. If you undertake any marketing activity at all, use the remaining time you have between now and May to seek consent from your existing customer base. If you don’t have their consent post-May 2018, and you market to them, you’re liable to be fined and/or sued.
    For companies with large marketing operations, this will be quite a sizeable undertaking. Make sure when you’re collecting consent, you note when consent was granted, which channels it covers and how long it will last. In future, you’ll need a process to renew consent before expiry, or to expunge expired data.
  4. Ensure that in any automated process you use to collect consent, you don’t use pre-ticked boxes or similar. Also, don’t do this anymore: “If you don’t reply to this email, we’ll assume you want to hear from us…”
  5. Update any privacy notices, particularly taking account of the obligation to be clear. Pretend you’re writing it to be read by a 12 year old.
  6. Put in place processes to amend or delete data when required to do so.
  7. Develop a process to provide a copy of all data to a consumer, when asked.
  8. If there’s a chance you will process the data of anyone under the age of 13, you’ll need a process for obtaining parental consent.
  9. Write a data breach response plan. This doesn’t need to be a 100 page document. Just simple steps to follow in case of a breach – which include notifying the ICO and the affected consumers as appropriate.
  10. If in doubt, seek professional help.

Disclaimer

I’m writing this as a Certified Information Systems Security Practitioner and a non-practising solicitor. These guidelines do not constitute legal advice, but I hope they will point you in the right direction. The truth is that these regulations aren’t in force yet, so nobody really knows quite what impact they will have on the data protection landscape. It will be a big shake-up though, that’s for sure.

Featured photo used with permission.

Free, unlimited Dropbox alternative: BitTorrent Sync

BitTorrent SyncUnless you’ve been living in a cave for the last five years, you’ll have heard of cloud sync poster child Dropbox. Dropbox has many flaws, but its great strength is how simple it is to use (my most inept users can manage it).
When you read elsewhere about the weaknesses of Dropbox, privacy seems to be the big one. Your files are stored “in the cloud”. This doesn’t particularly trouble me. Yes, Dropbox has my stuff, but the chances are that Dropbox’s security measures are better than my own. Between my laptop being hacked/stolen and Dropbox being hacked(/stolen?!), my money’s on my laptop. (I use TrueCrypt to encrypt my laptop’s hard drive, as you should by the way, but that’s a different story.) Anyway, any squeamishness we have about cloud storage is likely to die away in the near future, when it’s no longer quite so new and scary.

Of course there are lots of companies on the cloud storage bandwagon, big names and small. There are Google Drive, Microsoft SkyDrive, CrashPlan, Mozy and so on. Typical features include:

  • Mobile apps
  • Entry-level free option
  • File version revision/undelete

This is different. From the company that brings you the controversial peer-to-peer file sharing system and the popular BitTorrent client, Β΅Torrent, comes a new “cloud-less” file sync technology, BitTorrent Sync. The principle of BitTorrent sync is that you use the efficient BitTorrent protocol to distribute your own files privately amongst approved devices.

This year, BT Sync has been in private “alpha” (software in heavy testing, likely to contain bugs, which may be serious). Last week, the public alpha was released. It’s currently available for Windows, Mac and Linux.

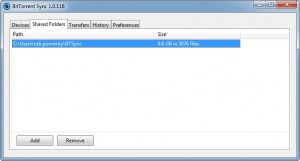
The Windows interface is pretty minimal at the moment:

BT Sync Windows

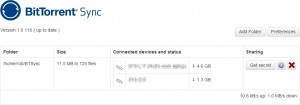
The web interface for the Linux version is more polished:

BitTorrent Sync Linux

During the private alpha stage, I tried syncing between a Windows 7 laptop and a Linux server. Shortly after this, the server suffered a catastrophic disk failure. Coincidence? Not entirely, I suspect. There may be some low-level disk calls that overtaxed drives that were already heading towards the end of their life. Nevertheless, it’s a reminder: this is alpha (experimental) software; be careful.

BT Sync has quite a few limitations:

  • It’s still in alpha state, which means it is liable to eat your data, your hard drive and your children’s pet rabbit.
  • There are no mobile applications yet.
  • No progress indicators within Windows, just an irritating balloon tip.
  • Since there is no central cloud, the devices must be online simultaneously, to perform sync.
  • For the same reason, you can’t download files via the web.
  • Other than creating a folder specifically for the purpose, there’s no option to “share” a single file.
  • No versioning – no backup or undelete facility outside any provided by your operating system.

Despite all this, there are some pretty compelling reasons for using it:

  • There are absolutely no limits. Unlimited file size, unlimited storage, unlimited bandwidth, etc. Of course you will still be limited by other factors – the size of your hard drive and the amount of monthly bandwidth you’re allocated by your ISP.
  • Efficiency. This is not the place to discuss BitTorrent generally, but the more people sharing the files, the better. All connected devices, while online, can participate in the synchronisation process.
  • Privacy. No third party holds your data. Central systems facilitate the peer-to-peer connection, but do not take their own copies of files.
  • Security. The data is encrypted before transmission and only accessible using a “shared secret”.

BitTorrent Sync has an ace up its sleeve. It can be installed on several different NAS boxes, from the likes of Synology, QNAP, Iomega, etc. This is where I can see BT Sync excelling. Want an entirely private, shared data store for remote office workers, but don’t want to invest in high-end storage systems? Give them all a NAS box with BT Sync installed. Want to set up off-site backup for your files at home? Enter into a reciprocal arrangement with a friend, using NAS boxes, where you host each other’s backup files. Want to set up a sprawling hydra-like network of anarchic file storage for your clandestine underground organisation? You get the idea…

Download

So, having read all my caveats above, you still want to give this a whirl? Go ahead, don your crash helmet and download the sucker.

Easy Password-less SSH logins on Linux

ssh-copy-idI’m storing this as an aide memoire, really, but it may help you too.
Let’s say we have two systems, System_From and System_To. And two users, User_From and User_To. The objective is: log on to System_To as User_To, from System_From as User_From.

The steps

1. One-time key generation for User_From

On System_From, while logged on as User_From, proceed as follows:

User_From@System_From:~$ ssh-keygen
Generating public/private rsa key pair.
Enter file in which to save the key (/home/User_From/.ssh/id_rsa):[hit enter]
Enter passphrase (empty for no passphrase):[hit enter]
Enter same passphrase again:[hit enter]
Your identification has been saved in /home/User_From/.ssh/id_rsa.
Your public key has been saved in /home/User_From/.ssh/id_rsa.pub.
The key fingerprint is:
be:e8:98:4a:26:1e:9b:ed:78:a7:e7:fe:d8:9d:3c:6d User_From@System_From
The key's randomart image is:
+--[ RSA 2048]----+
|                 |
|  E              |
|                 |
|               Q |
|        S        |
|       .         |
|oo      o     o  |
|+.Bo8ooo.E       |
| BOB++o++        |
+-----------------+

Note: if you use anything other than an empty passphrase, you will need to enter the passphrase each time you log on, which sort of defeats the object of this exercise!

This creates two files: id_rsa and id_rsa.pub. The private key, id_rsa, must always be kept secret. Your system should have marked it read/write for the owner only. The public key, id_rsa.pub is safe to copy to destination systems (see next section).

2. Copy the public key to System_To

OpenSSH comes with a handy script for copying the public key to the remote host (System_To, in this instance): ssh-copy-id. Use it like this, at the system you’re connecting from:

User_From@System_from:~$ ssh-copy-id -i ~/.ssh/id_rsa.pub User_To@System_To
User_To@System_To's password:[type User_To's password and hit enter]
Now try logging into the machine, with "ssh 'User_To@System_To'", and check in:

  ~/.ssh/authorized_keys

to make sure we haven't added extra keys that you weren't expecting.

If you’re connecting to SSH on a custom port, the command is thus:

ssh-copy-id -i ~/.ssh/id_rsa.pub "User_To@System_To -p custom#"

Repeat this step for all remote hosts to which you intend to connect.

3. Log in to System_To

Now, when you issue the command ssh System_To, you will be logged in straight away, with no password prompt.

SOLVED: “Access is denied, unable to remove” when deleting printer

It’s amazing to see that many years after I first wrote this post, visitors are still finding it useful!

If you really want to understand what’s going on under the hood, the Windows Internals books are the place to start. In the interests of transparency: this is an affiliate link. See my affiliate disclosure page for an explanation.

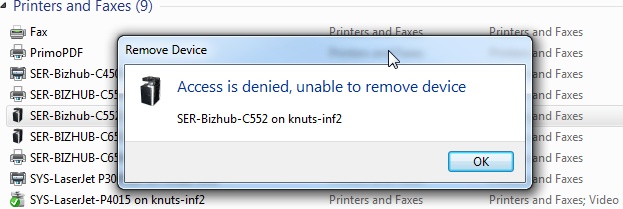
Many organisations push out printer installations via Active Directory. If you want to tidy up those printers (removing ones you don’t use) you may find Windows 7 doesn’t let you delete them, even though you may be a local administrator and even if you use an elevated Explorer session:

Access denied error

Use the following steps to resolve this annoyance.

From an elevated command prompt:

C:\Windows\system32>net stop spooler
The Print Spooler service is stopping.
The Print Spooler service was stopped successfully.

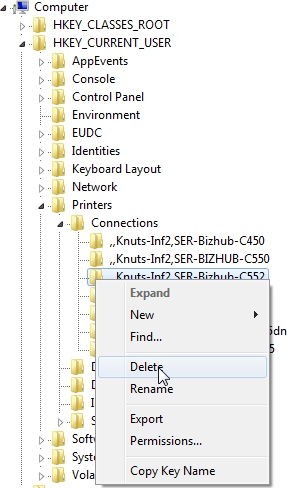
Then fire up regedit. Navigate to Computer\HKEY_CURRENT_USER\Printers\Connections and delete the offending printer:

printers regedit

Finally, restart the print spooler:

C:\Windows\system32>net start spooler
The Print Spooler service is starting.
The Print Spooler service was started successfully.

From CodeIgniter to Laravel | part 4: managing databases

UPDATE: I have re-written this article for the new Laravel 4. You’ll find the updated article over at Geek & Dummy.

Contents


AVZ DatabaseFor almost all my previous web design, I’ve used phpMyAdmin to administer the databases. I speak SQL, so that has never been a big deal. But Laravel comes with some excellent tools for administering your databases more intelligently and (most importantly!) with less effort. Migrations offer version control for your application’s database. For each version change, you create a “migration” which provides details on the changes to make and how to roll back those changes. Once you’ve got the hang of it, I reckon you’ll barely touch phpMyAdmin again.

Configuration

So let’s assume that I’m creating a new website about ducks. When I created the virtual host, Virtualmin also created my “ducks” database. I’m going to create a MySQL user with the same name, with full permission to access the new database. Here’s how I do that from a root SSH login:

echo "GRANT ALL ON ducks.* TO 'ducks'@localhost IDENTIFIED BY 'newpassword';" | mysql -p
Enter password:[root MySQL password]

This creates a new MySQL user, “ducks” and gives it all privileges associated to the database in question. Next we need to tell Laravel about these credentials. The important lines in the file application/config/database.php are:

<?php
return array(

//...

	'default' => 'mysql',

	'connections' => array(

//...

		'mysql' => array(
			'driver'   => 'mysql',
			'host'     => '127.0.0.1',
			'database' => 'ducks',
			'username' => 'ducks',
			'password' => 'newpassword',
			'charset'  => 'utf8',
			'prefix'   => '',
		),

//...

	),

//...

);

Initialise Migrations

The migration environment must be initialised for this application. We do this using Laravel’s command line interface, Artisan. From an SSH login:

php artisan migrate:install
Migration table created successfully.

This creates a new table, laravel_migrations, which will be used to track changes to your database schema (i.e. structure), going forwards.

My ducks application will have a single table to start with, called “ducks” [Note: it is significant that we’re using a plural word here; I recommend you follow suit]. This table does not yet exist; we will create it using a migration. To kick this off, use the following Artisan command:

php artisan migrate:make create_ducks_table
Great! New migration created!

This will create a new file named something like “2013_04_15_085356_create_ducks_table.php”. If, like me, you’re developing remotely, you’ll need to pull this new file into your development environment. In NetBeans, for example, right-click the migrations folder, click “download” and follow the wizard.

You can deduce from the naming of the file that migrations are effectively time-stamped. This is where the life of your applications database begins. The migrations file will look a bit like this:

<?php

class Create_Ducks_Table {

	/**
	 * Make changes to the database.
	 *
	 * @return void
	 */
	public function up()
	{
		//
	}

	/**
	 * Revert the changes to the database.
	 *
	 * @return void
	 */
	public function down()
	{
		//
	}

}&#91;/php&#93;

As you can probably guess, in the "up" function, you enter the code necessary to create the new table (to move "up" a migration) and in the "down" function, you do the reverse (to move "down" or to roll back a migration).

<h1>Create first table</h1>

Your first migration will probably be to create a table (unless you have already created or imported tables via some other method).  Naturally, Laravel has a class for this purpose, the <a href="http://laravel.com/docs/database/schema" target="_blank">Schema class</a>.  Here's how you can use it, in your newly-created migrations php file:

[php]<?php

class Create_Ducks_Table {

	/**
	 * Make changes to the database.
	 *
	 * @return void
	 */
	public function up()
	{
		Schema::create('ducks', function($table) {
				$table->increments('id');              // auto-incrementing primary key
				$table->string('name', 255);           // varchar field; length 255 characters
				$table->date('birthdate')->nullable(); // can be empty
				$table->boolean('can_fly')->default(TRUE);
				$table->integer('children')->unsigned();
				$table->text('biography');
				$table->timestamps(); // special created_at and updated_at timestamp fields
		});	
	}

	/**
	 * Revert the changes to the database.
	 *
	 * @return void
	 */
	public function down()
	{
		Schema::drop('ducks');
	}

}

To run the migration (i.e. to create the table), do the following at your SSH login:

php artisan migrate
Migrated: application/2013_04_15_085356_create_ducks_table

That creates the table, as described. And if you need to roll back:

php artisan migrate:rollback
Rolled back: application/2013_04_15_085356_create_ducks_table

This removes the table.

By examining the Schema class documentation, you’ll see how you can use future migrations to add or remove fields, create indexes, etc. In my next tutorial, I’ll have a look at using databases in your application.

AVZ Database image copyright © adesigna, licensed under Creative Commons. Used with permission.

From CodeIgniter to Laravel | part 3: installing external libraries

UPDATE: I have re-written this article for the new Laravel 4. You’ll find the updated article over at Geek & Dummy.

Contents


LibraryAs a fan of CodeIgniter, I was very pleased when the Sparks project came on the scene, offering a relatively easy way to integrate third-party libraries/classes into your project. Laravel has a similar and arguably more feature-rich analog in Bundles. With a bit of luck, the third-party library you require has already been converted to a Laravel bundle, making installation a snip.

Let’s say, for example, we’re going to build a web-scraping application. The first two libraries I’d consider adding to the project would be the Requests HTTP library and the PHP Simple HTML DOM Parser.

From an SSH login, at the root of your project, issue the following command:

php artisan bundle:install requests phpsimplehtmldom

You should be greeted with the following results:

Fetching [requests]...done! Bundle installed.
Fetching [phpsimplehtmldom]...done! Bundle installed.

The file application/bundles.php will probably contain code along the following lines:

<?php

/*
 &#91;...various comments...&#93;
*/

return array(

	'docs' => array('handles' => 'docs'),

);

Register the new libraries like this:

return array(

	'docs' => array('handles' => 'docs'),
	'requests' => array('auto' => TRUE),
	'phpsimplehtmldom' => array('auto' => TRUE),

);

And use like this:

		$HDM = IoC::resolve('HtmlDomParser'); // Give us a hook into the library; Requests doesn't need this

		// Request the HTML page
		//$headers = array('Accept' => 'application/html');
		$headers = array();
		//$options = array('auth' => array('user', 'pass'));
		$options = array();
		$request = Requests::get('http://some.domain/some/page', $headers, $options);
		if($request->status_code != 200) {
			// Handle error retrieving page
		}

		$dom = $HDM::str_get_html($request->body);

		// Options
		$options = $dom->find('#somediv option');
		foreach($options as $option) {
			echo $option->value.' | '.$option->innertext."<br />";
		}

There’s a lot more to this IoC thing than meets the eye. To be frank, it’s above my head. I’m also not convinced I fully understand registering bundles. But, like CodeIgniter, learning is a process of immersion in the framework. I’m pretty sure than in a couple of years I’ll laugh at the code above. So all I ask is please be gentle in the comments. πŸ˜‰

Library image copyright © Janne Moren, licensed under Creative Commons. Used with permission.

From CodeIgniter to Laravel | part 2: orientation

UPDATE: I have re-written this article for the new Laravel 4. You’ll find the updated article over at Geek & Dummy.

Contents


Signpost at North Point, Barbados, Feb.1998I’ve used CodeIgniter for many years, but I have always, I confess, proceeded knowing just enough to get by. So forgive me if my approach seems a little clunky. I have never, for example, used CodeIgniter’s routes. I like my web application files nicely categorised into Model, View, Controller, Library and, if absolutely necessary, Helper.

Controllers

So for now, I want to carry on using Controllers, if that’s okay with you. Controllers are stored under application/controllers. Sound familiar?

Here’s a sample controller:

<?php

// application/controllers/news.php
class News_Controller extends Base_Controller {

	public function action_index() {
		echo "News index page.";
	}

	public function action_item($item) {
		echo "News item $item.";
	}

}
?>

In CodeIgniter, that’s all you would have needed to do, due to automatic routing. In Laravel, you need also to add the following to application/routes.php:

Route::controller('news');

To view these pages, you just visit yourdomain/news (/index is implied) and yourdomain/news/item/x (where x will probably refer to a specific news item, possibly by data id).

Note the naming of the functions – action_item, etc. The part after the underscore represents a “method” or page of your web site. Laravel’s routing magic makes sure you get the correct function. If you’re creating a RESTful API, you can use additional function names beginning get_, post_, etc. Check the Laravel documentation for more.

Views

Views are pretty straightforward and similar to CodeIgniter. Place them in application/views. Extending the example above, our controller could now look like this:

<?php

// application/controllers/new.php
class News_Controller extends Base_Controller {

	public function action_index() {
		echo "News index page.";
	}

	public function action_item($id) {
		$data = array('id' => $id);
		return View::make('results', $data);
	}

}

?>

Note that data can also be passed through to a view like this:

	public function action_item($id) {
		return View::make('item', $data)
		    ->with('id' => $id);
	}

And then your view (application/views/item.php) could be like this:

<h1>News flash</h1>
<p>This is news item <?php echo $id; ?>.</p>

Obviously your real views will be more syntactically complete.

Models

Models are created under application/models. Unlike CodeIgniter, Laravel comes with its own object relational mapper. In case you’ve not encountered the concept before, an ORM gives you a convenient way of dealing with database tables as objects, rather than merely thinking in terms of SQL queries. CodeIgniter has plenty of ORMs, by the way, it just doesn’t ship with one as standard.

Laravel’s built-in ORM is called “Eloquent”. If you choose to use it (there are others available), when creating a model, you extend the Eloquent class. Eloquent makes some assumptions:

  • Each table contains a primary key called id.
  • Each Eloquent model is named in the singular, while the corresponding table is named in the plural. E.g. table name “newsItems”; Eloquent model name “newsItem”.

You can override this behaviour if you like, it just makes things a bit more convenient in many cases.

Example model application/models/newsItem.php:

<?php
class NewsItem extends Eloquent {

}

(You can omit the closing ?> tag.)

Because the Eloquent class already contains a lot of methods, you do not necessarily need to do more than this. In your controllers, you could for example now do this:

$items = NewsItem::all();

foreach ($items as $item) {
  // Do stuff here
}

This is barely scratching the surface. Head on over to the official Laravel documentation for much more on all this.

Signposts image copyright © Andrea_44, licensed under Creative Commons. Used with permission.