SOLVED: Windows 10 forbidden port bind

Angry budgie - Photo by Егор Камелев on Unsplash

Ever have this problem, launching a Docker container (in this case, Nginx on port 8000)?

Error: Unable to start container: Error response from daemon: Ports are not available: listen tcp 0.0.0.0:8000: bind: An attempt was made to access a socket in a way forbidden by its access permissions.

or maybe this problem, trying to run PHP’s built-in webserver?

php -S localhost:8080
[Fri Sep 11 09:00:09 2020] Failed to listen on localhost:8080 (reason: An attempt was made to access a socket in a way forbidden by its access permissions.)

Who to trust?

Like me, you may already have read many “solutions”, on a whole bunch of spammy websites. The “fixes” are often no more than workarounds – and in some cases, pretty bad workarounds, at that. Such as:

  • Disable VPN
  • Disable Internet Connection Sharing
  • Disable third party firewall
  • Disable antivirus (for goodness’ sake!)

More sensibly, use (e.g.) netstat to find out if something has already bound to the port.

None of these helped in my case. (Well I didn’t try disabling my antivirus or firewall, because c’mon!) Nothing was bound to the ports in question. I couldn’t disable ICS because I’m using its capabilities to provide NAT routing for Hyper-V networks.

The cause

It turns out the problem is down to Docker and Hyper-V reserving a shed load of ports. You can verify if this is the case for you by running the following command (which despite advice elsewhere on the internet does not need to be in an elevated PowerShell prompt; plain old no-privileges cmd will do):

netsh interface ipv4 show excludedportrange protocol=tcp

In my case, I could see that a lot of ports were reserved, between 1128 and 55437:

Start Port End Port
---------- --------
1128 1227
1228 1327
1328 1427
1428 1527
1528 1627
1628 1727
1728 1827
1828 1927
1928 2027
[snip]
50000 50059 *
53610 53709
53710 53809
54210 54309
54610 54709
54710 54809
54910 55009
55113 55212
55214 55313
55338 55437

* - Administered port exclusions.

I confirmed that this is the issue by picking a port that hadn’t been reserved:

php -S localhost:50080
[Fri Sep 11 09:12:21 2020] PHP 7.4.8 Development Server (http://localhost:50080) started

(For me, the PHP web server would also start quite happily on port 80, incidentally. But you probably shouldn’t do that!)

People who have identified this issue tend to recommend disabling Hyper-V, excluding whatever ports you need and re-enabling Hyper-V. I’m nervous of that approach however, having spent a lot of time configuring Hyper-V networking and having seen this approach nuke networking in the past.

If you’re happy taking that approach, I suggest reading and understanding this Microsoft article. Personally, I prefer to approach this as follows.

Find gaps in port reservations

Hyper-V and Docker between them seem to reserve different sets of ports on each reboot. Helpful. You can look for gaps in the port reservations using the following method, but note that these gaps will not persist, without other measures. Here’s how to find the gaps:

  1. Run the netsh command above.
  2. Copy and paste the output into Notepad++ and use search and replace (in regular expression mode) to turn all the spaces into tabs – replace ( +) with \t.
  3. Copy and paste the result into Excel (which will now put all the ports nicely into cells.
  4. Use an Excel formula to identify gaps in the reserved ranges: =IF(A4=(B3+1), "continuous", "## " & TEXT(A4-B3-1, "0") & " PORT GAP ##")
    List of reserved port ranges, showing any gaps
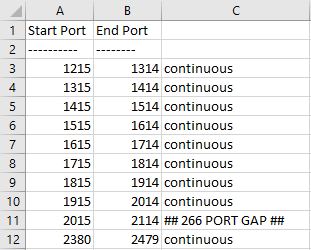
  5. Where “PORT GAP” appears, there is a gap between the end port on that line and the start port on the next (this would be 2115-2379 in the example above, which is 265 ports, inclusive).

As you can see, this approach does find you an available port (unless something else has bound to it):

php -S localhost:2115
[Fri Sep 11 09:36:58 2020] PHP 7.4.8 Development Server (http://localhost:2115) started

The fix: reserve your own ports

Well, two can play that game. Once you’ve found a gap, you can permanently reserve it for your own use. I found the largest gap between 12970 and 49670, so decided to reserve a memorable slice of ports: 20000- 21000. The appropriate incantation follows, which does need to be elevated this time. Swap port numbers and range to suit your environment and requirements:

netsh int ipv4 add excludedportrange protocol=tcp startport=20000 numberofports=1000 store=persistent

You will see that the range is now showing as administratively reserved (indicated by the asterisk):

netsh interface ipv4 show excludedportrange protocol=tcp

Protocol tcp Port Exclusion Ranges
Start Port End Port
---------- --------
1215 1314
…
20000 20999 *
…
51490 51589
- Administered port exclusions.

And once again, I can use a port within my preferred range:

php -S localhost:20080
[Fri Sep 11 10:37:23 2020] PHP 7.4.8 Development Server (http://localhost:20080) started

This exclusion persists between reboots and protects your range from being stolen by Hyper-V or anything else.

Angry budgie featured photo by Егор Камелев on Unsplash

Easily host your own web sites | part 3: networking

Contents


network cablesSo far in this series, we’ve set up our server hardware and installed and configured the operating system and web hosting application. In today’s article, we’ll look at how you enable people to browse content on your server (wherever they and it may be).

Port forwarding

Most SOHO routers are configured to prevent unsolicited inbound traffic. If you want people to be able to view web sites on your server therefore, you need to create a conduit through which web traffic can pass. This is usually called “port forwarding”. Broadly speaking, ports segregate different types of network traffic. Web traffic comes in on port 80 (TCP), SSH traffic on port 22 (TCP), encrypted web traffic (HTTPS) on port 443 (TCP) and so on. So you need to configure your router to forward port 80 traffic to the static IP address you configured for your server (see part 2). You may also wish to forward port 10000 (Webmin) and port 22 (SSH) so you can administer your server remotely, but be warned that as soon as you do, so-called “script kiddies” will start trying to break into your server. So proceed with caution, and read up on the risks. You’re pretty safe forwarding port 80, provided your web sites are well designed.

To find out how to set up port forwarding on your router, read the manual, or check out the references at portforward.com. Once you’ve done that, check that the port is forwarded by browsing to your network’s external IP address. How do you find that out? From within the network, browse to icanhazip.com.

If you’ve forwarded the port correctly, and if you’re not caught by the hairpin NAT gotcha (see below), you should see the default web page from your new web server. On my new server, the page looks like this:

It works!

This is the default web page for this server.

The web server software is running but no content has been added, yet.

Dynamic vs. Static IP addresses

If you are going to be hosting any kind of internet service (like a web server), it is easiest to have a static IP address. DNS (the Domain Name System) converts “human-friendly” web addresses such as “pomeroy.me” into “computer-friendly” IP addresses such as “178.248.39.218”. This is great if your network’s external IP address never changes, but for many customers on cable, broadband or dial-up connections, their IP address is “dynamic”, meaning that it might be different each time the modem or router reboots. There is a workaround for dynamic IP addresses (see the section on Dynamic DNS, below), but in the long run, it might be easiest simply to ask your ISP for a static IP address. In many cases that costs little or no more than a dynamic address.

Dynamic DNS

With Dynamic DNS (DDNS), your router or server contacts a DDNS service provider on the internet and reports its current external IP address. The DDNS server then transmits this information through the internet via the DNS system. Changes can take a while to take effect, but it’s better than nothing. My current DDNS provider of choice is changeip.com. ChangeIP.com has a free service, where you use a sub-domain from one of several domains they have available (e.g. fredbloggs.changeip.org).

Many routers can speak DDNS, meaning that as soon as the router reboots, it can check in with the DDNS provider and let it know if the IP address has changed. See your router’s manual for more information. If your router doesn’t directly support this, you can install software on your server that will periodically update the DDNS service. Read ChangeIP.com’s page on DDNS clients. You’ll need to install one of the scripts on your server, and set up a cron job to run the script as often as you like (providing you don’t breach the DDNS provider’s terms of service). You can of course use Webmin to set up your cron job.

Regular DNS

If you have your own domain registered, like me, and you’re using a static IP address, all you need to do is point your domain to your external IP address. Log into your domain host and add “A records” as needed.

Note: Did you know that the customary “www.” prefix on many websites is an unnecessary hangover from earlier in the internet’s history? You can use www.mydomain.com if you like, or simply mydomain.com. Note however that when you set up a “mydomain.com” web site using Virtualmin, Virtualmin automatically makes a “www.mydomain.com” alias, so that either will resolve to the same web site code. If you want DNS to work with both, you’ll need to add two A records: one for “@” and one for “www”.

Hairpin NAT

For most people, that’s it. You should now be able to create web sites on your server, use DNS or DDNS to broadcast those web sites to the outside world, and receive visitors from all around the world. But there’s a very significant “gotcha” with some routers, when you’re attempting to browse your web site from your LAN. If you’re on the same physical network as your web server, when you enter the web address in your browser, it should attempt to browse to your network’s external IP address. In other words, your web query goes out and attempts to come back in again. This out-and-back-again behaviour is known as “hairpin NAT” and not all routers can handle it.

If you’re one of the unlucky ones and you don’t want to swap your router for a better one, you have two main options. Technically, the best option is to run your own private DNS server (which you can do on the same server), but that is complicated and a bit of a hassle. If you’re only browsing from a single PC, the quick-and-dirty solution is to edit your hosts file. This file is located somewhere like “C:\Windows\System32\drivers\etc\hosts”. There are a lot of resources on the internet that will explain to you more about this file, but let me help you over one little hurdle: if you’re using Windows Vista or later, you need to edit this file as an Administrator. To do that, right-click Notepad and choose “Run as Administrator”. Then open the hosts file from within Notepad. You’ll need to change the files filter to “*.* (All files)”.

The default hosts file contains details about the format of entries. Suffice it to say that you’ll put here the DNS name of your web site and the internal LAN IP address of your web server. Your web browser, when looking up an IP address, should check the hosts file first, so in this scenario, you won’t be going out and back again. If you then take that computer somewhere else (e.g. it’s a laptop and you’ve taken it to work), you’ll need to remove the relevant hosts file entries, in order to browse to the external IP address of your network.


Networking is a complicated area and I have only scratched the surface here, in an effort to get most people up and running quickly. By all means if you’re stuck at a particular point, post a comment and, time permitting, I’ll try to point you in the right direction. In the meantime, stay tuned for part 4 of this series in which I will provide some initial pointers on building your own web site.

Cables image copyright © Pascal Charest, licensed under Creative Commons. Used with permission.