SOLVED: “Failed to initialize connection subsystem” in Cisco AnyConnect

AnyConnect logoTalk about obscure.

One of my end users was greeted by this informative error message recently. He was connecting to the internet using a 3G dongle and then to our network via Cisco AnyConnect VPN. “Software reinstall!” thought I. “Wrong!” said Google.

Although this is probably due to faulty programming on Cisco’s part, the culprit is Internet Explorer. (How I love to blame that historically stinky pile of poodoo.)

To resolve: load up IE. If you can’t see the [ File | Edit | View… ] menus, press Alt, to bring it up. On the File menu, “Work Offline” is almost certainly checked. Uncheck it. Connect again. Job done. Who knew.

If you’re using Internet Explorer 11, bad news: Microsoft removed the “Work offline” option from the File menu. Gone. So there’s no GUI interface to the relevant setting. In fact it’s a registry key called “GlobalUserOffline”, found at HKEY_CURRENT_USER\Software\Microsoft\Windows\CurrentVersion\Internet Settings. You need to set it to 0, disable “Work offline”. This registry file should do the trick: DisableWorkOffline.reg.

Tutorial: Merge multiple RTF files into a single PDF

A recent task of mine involved generating a large quantity of forms (around 2,500) and printing them. I was using PHP as the generator – it’s great at processing and transforming text. And my base (template) file was originally created as a Word document, converted to RTF for ease of processing.

There is no easy and free way of printing out 2,500 RTF files from Windows, not that I’ve been able to find. It didn’t make sense to pay for a £200 application for something that I do so infrequently. So here is my (free) approach.

Make Linux do the hard work

If you’ve followed my “Easily host your own web sites” series, you’ll now have a Linux server at your disposal that you can bend to your will. When it comes to command line or scripted activities (which this tutorial lends itself to), Linux/Unix is simply more mature than Windows. This means that someone, somewhere has probably already created a tool for whatever activity you’re thinking of and moreover, made that tool free.

Converting to PDF: Ted

Ted is a fairly full-featured text processor for Linux. We’ll just be using some of Ted’s command line wizardry today.

Installing Ted

Ted logoYou can download a Ted package here. I’m installing this on an Ubuntu 12.04.1 machine so I chose this package: ubuntu12041:ted-2.23-amd64.deb.

I keep all third party packages I install in a directory, /root/installed-packages, for future reference. So this is what I did, from a command line (SSH connection). First, I know that Ted has some dependencies, so I dealt with those:

apt-get update
apt-get install libxpm4 libtiff4 libgtk2.0-0 libpaper1
apt-get -f install

Then downloaded and install Ted:

wget http://ftp.nluug.nl/pub/editors/ted/ubuntu12041:ted-2.23-amd64.deb
dpkg -i ubuntu12041\:ted-2.23-amd64.deb

Combining files: pdfmerge

Abiding by the principle of “do one thing well”, guess what pdfmerge does?

Installing pdfmerge

If you’re using a RedHat-derived distribution, you’re in luck, there’s a pre-built package. If you’re using Ubuntu though, here goes. Download the source [iwrtooltip title=”a compressed archive of files”]tarball[/iwrtooltip] from here. Again, I’m starting in my directory /root/installed-packages.

wget http://dmaphy.github.com/pdfmerge/pdfmerge-1.0.4.tar.bz2
tar jxf pdfmerge-1.0.4.tar.bz2
cp pdfmerge-1.0.4/pdfmerge /usr/local/bin
rm -rf pdfmerge-1.0.4

Put it all together

Now the utilities are installed, you can run the following simple bash script to convert your individual RTF files into PDFs, then merge them all into a single PDF. I put the RTF files in one directory, then the PDF into the directory above it in the directory tree. We use a script that is bundled with Ted – you may need to check the precise location.

for filename in ./*.rtf
do
/usr/share/Ted/examples/rtf2pdf.sh $filename
done;
pdfmerge *.pdf ../all.pdf

Acknowledgements

Thanks to Mark de Does for Ted and to Dominic Hopf for pdfmerge.

Self-hosted alternative to Google Reader: selfoss

No no no! Google has just announced it is shutting down Reader on 1 July 2013.

Personally, I can’t really understand this. It is a good product, with surely plenty of advertising and marketing opportunities. Nevertheless, there’s no point railing against the decision. It was “free”. It was good while it lasted. I shouldn’t complain.

Like many people, this leaves me scrabbling around for an alternative. There are one or two similar web-based services out there, but having been burnt once by the whim of a content publisher, I would rather take my destiny into my own hands going forwards. In short, this means setting up a web-based RSS reader on my own server.

There are a few features I’ve come to regard as indispensable in a news reader:

  • Keyboard shortcuts
  • Desktop- and mobile-friendly interfaces
  • No limits on number of subscriptions
  • Responsive (uses Ajax)

selfoss logoIt didn’t take too much searching to find a solution that looked ideal: selfoss. The author describes selfoss as:

The new multipurpose rss reader, live stream, mashup, aggregation web application

The features of selfoss that stood out most to me were:

  • web based
  • open source
  • mobile support (Android, iOS, iPad)
  • lightweight PHP application
  • supports MySQL

There are one or two similar projects out there, but selfoss most closely fits my requirements and seems to be in a good state of development. Interestingly, within 36 hours of Google’s announcement it was retiring Reader, a selfoss user called Michael Moore had written code for selfoss to import OPML files – which is the format we’ll be exporting from Google.

Preparing your web server

If you’ve followed my guide to DIY web hosting, you’ll be able to do what I did:

  • Create a new virtual server in Virtualmin (e.g. myfeeds.fredbloggs.com)
  • Configure my external DNS host to point to this new website (I host my main domains with GoDaddy and manage this through its DNS control panel)
  • Configure my local DNS server similarly (I run an internal DNS server, to avoid the problem of hairpin NAT)
  • Set up a dedicated MySQL user for the new database Virtualmin created

Installing selfoss

Update: In a very short space of time since writing this article, selfoss went through several updates and feature improvements. The current version is 2.6 and better than ever. You can download that straight from the official website.

Really quite simple:

  • Download the latest zip file from GitHub to the root directory of your new virtual web site: eg wget https://github.com/SSilence/selfoss/archive/master.zip. At the time of writing, version 2.2, which is the version that includes OPML import, is only available on GitHub, not on the main selfoss website.
  • Unzip: unzip master.zip
  • Move files into place: mv selfoss-master/* .; mv selfoss-master/.* .
  • Tidy up: rm -r master.zip selfoss-master
  • Set permissions as described on the selfoss website: chmod a+w data/cache data/favicons data/logs data/thumbnails data/sqlite public/
  • Edit config.ini. You’ll probably want to change db_type to mysql, and set db_database, db_username and db_password. You may also want to set username and password. You actually enter a hash of the password here, rather than the password in plain text. To generate this hash, browse to selfoss/password (e.g. http://myfeeds.fredbloggs.com/password)
  • You’ll most likely update feeds using a cron job. Every 30 minutes is enough for me, so I made an entry in /etc/crontab like this: 10,40 * * * * fredbloggs wget -O - -q -t 1 http://myfeeds.fredbloggs.com/update

Migrating from Google Reader

The first step is to export your existing RSS subscriptions from Google Reader. Proceed as follows:

  • Log into Google Takeout, Google’s data export service.
  • Ensure “Reader” is displayed and click “Create archive”
  • Click “Download”
  • You should receive a zip file that contains (amongst other things) your RSS subscriptions in an XML file called “subscriptions.xml”. Extract that file.
  • In version 2.2, at least, there’s no direct link to selfoss’s new OPML import page, so type /opml in your browser (e.g. http://myfeeds.fredbloggs.com/opml)
  • Upload the subscriptions.xml file
  • Click the “Update” link to force selfoss to commence loading your feeds.
  • Start whizzing through your RSS feed using the keyboard shortcuts >t< ("throw" - i.e. mark this item as read and open next item) and >r< (reload current view)

Be sure to add my RSS feed to selfoss for more great articles! http://pomeroy.me/feed/.

selfoss code and logo copyright © Tobias Zeising. All rights acknowledged.

Product Review: SoundWave SW100 Portable Bluetooth Speaker

As for many other people, my phone has become my go-to device for all my mobile entertainment needs. I currently have a Samsung Galaxy Note 2 (yeah, the one with the ludicrously large screen), so it’s great for anything from internet browsing to watching films in HD quality. I also use it as an MP3 player and for listening to podcasts and audiobooks.

I recently started looking around for a portable speaker that I could take on my occasional travels and, not to put too fine a point on it, use in the bathroom. Surely I’m not the only one that likes to listen to audio books while I shower?

The Note 2 isn’t, er, noted for its high quality speakers. Very few smartphone manufacturers have been able to complete with Apple on this front. But even the mighty built-in speakers of an iPhone struggle to compete with the noise of my geyser-like shower or electric shaver.

I’ll be honest, I’m a bit of a tightwad when it comes to my technology purchases, so I was looking for a device that could combine the impossible qualities of sound quality, power and cheapness. I wanted the convenience of connecting by Bluetooth, with the option of a 3.5mm socket for greater flexibility.

Having considered many products and read a lot of reviews, the device I settled for was this, the SoundWave SW100:

SoundWave SW100 Front

Here are some vital statistics:

  • Small – about three inches tall
  • Reasonably light – I haven’t put it on the scales, but it feels about the same weight as my Note 2 + case
  • Loud – I can’t find any official information on wattage, but when I turned it up to max in my small kitchen, it was louder than I could tolerate; at that point, there was some mild distortion
  • Built-in microphone – theoretically you can therefore use this device for conference calls; I have not tried this, but for the sound alone it can only be better than putting your phone into speaker mode
  • A claimed 10 hours music/talk time
  • A claimed 800 hours standby time – I’m not sure what use this figure is though; I’ll either be using it or charging it

Out of the box, the speaker was fully charged in less than an hour. It comes with a microUSB cable for this purpose. For my first trial, I took it into my company’s noisy server room. About 80% volume was sufficient to hear music clearly and without distortion, over the cacophony of fans and aircon.

It paired over Bluetooth without fuss. I have noticed the occasional blip when playing through Bluetooth, but I think this is more likely to be down to the phone (of which I demand a lot!) than to the speaker. In any event, you can use a 3.5mm audio cable (supplied) if you prefer.

The speaker has a non-slip base, great for most surfaces. The manufacturers have thoughtfully included an additional non-slip mat, making the speaker very unlikely to budge during normal usage. The non-slip mat also slightly neutralises the effect of resonance transmitted through the surface on which you place the speaker. Unless you’re an audiophile (I confess I’m not), this probably won’t mean a lot, but for some, it will be important.

SoundWave SW100 Back

For the size of the speaker, I was impressed by the bass response. In fact this was one of the reasons I bought the speaker – to improve bass experience, without having to lug around a sub woofer and without having to spend thousands on a high-end miniaturised speaker system.

Build quality is good. The case is mainly brushed aluminium, and not unattractive. It passed the spouse test; no exclamations of,”Oh how hideous! What horrendous technological monstrosity is that?!”

I paid £20 for the speaker. Although at one time it was available for less, it is still a bargain at this price. It receives favourable reviews (wherever you look) and I can only confirm what other reviewers are saying. Well worth the money, especially when you can consider you can pay four times the price for a product that may have a pretty label but is otherwise no better.

Conclusion

If you want a portable speaker, on the go, don’t mind that the output is mono, and don’t expect the sound to fill a concert hall, this is the device for you. Highly recommended.

Gmail + Google Apps on the BlackBerry Z10

Google Apps logoA few days ago I posted an article about Gmail’s 2-step authentication and getting it working on the BlackBerry Z10. Judging by the incoming traffic from search engines, folks are experiencing a variety of other problems with Gmail on the new BlackBerry OS 10. So let’s take a step back and look at this beast from the start.

Two options

Google used to provide a dedicated Gmail app for the BlackBerry OS. This became end-of-life on 22 November 2011, however. This leaves you two methods of configuring Gmail/Google Apps on your new Z10 (and this will apply equally to the forthcoming Q10):

  • IMAP, CalDAV and CardDAV; or
  • Exchange ActiveSync

Contrary to advice I’ve seen elsewhere on the internet, using IMAP doesn’t prevent you from synchronising your calendar and contacts – that’s what the separate CalDAV and CardDAV protocols are for. So which should you choose? In some cases, the decision is made for you. Google has announced that it is phasing out support for ActiveSync, certainly for free email accounts. At the moment, it appears that there’s a stay of execution until the end of June 2013, but the writing is on the wall.

If you’re using Google Apps, it’s likely you’ll continue to benefit from ActiveSync, certainly if you’re a paying customer. ActiveSync is licensed from Microsoft and your fees will go towards paying for that. All the same, knowing from experience the way that Google tends to force change upon its users (even enterprise customers are stuck with the constant upgrade/”evergreen” effect), it might be prudent to choose IMAP/CalDAV/CardDAV from the beginning. It looks like this is where Google is focusing its efforts, so this is where we’re most likely to see bug fixes and improvements.

IMAP/CalDAV/CardDAV

Automatic setup

Go to System Settings -> Accounts -> Add Account -> Email, Calendar and Contacts. After I entered my email address and password (I’m a Google Apps user), I discovered that the app was intelligent enough to pick up settings for all three protocols. I was taken to a screen giving me the option to switch on sync for Email, Contacts and Calendar:

BB settings

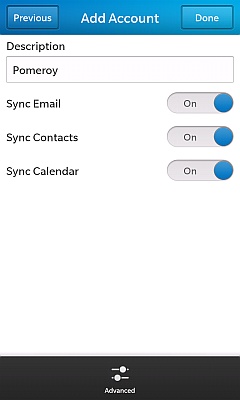
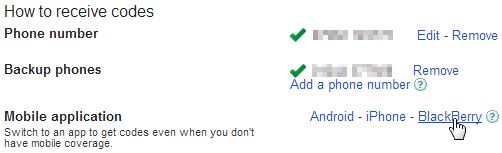
I say I entered my password, but I use Gmail’s 2-step authentication (and you should too), so what I entered was the “application-specific password” I’d generated previously. See my earlier article for details. Having done this, in theory everything should work.

Broken CalDAV

Update: it looks like this problem has been fixed in BlackBerry OS 10.0.10.90, so make sure you upgrade, if you’re encountering issues with Google CalDAV.

Unfortunately there’s a snag. At the moment, CalDAV access is broken. One of the symptoms is an error message along the following lines: “Your email and contacts accounts were successfully added. At this time, the www.google.com/calendar/dav/[email protected]/events server is unavailable and your calendar account can’t be added. Please try again later.” BlackBerry is aware of this and has posted a KB article in which it states:

This is a previously reported issue that is being investigated by our development team. No resolution time frame is currently available.

There are two proposed “workarounds”, neither of which really fixes the problem. The first is to try again, 24 hours later. Ha. Let me know if that works for you. The other option is to use ActiveSync instead. Sorry – isn’t Google phasing that out, BlackBerry? As a business user, the “No resolution time frame” comment is particularly irksome.

Extra Calendars

Once the CalDAV issue is fixed, you may want to know how to integrate multiple Google Calendars to your device. There are two things to know. Firstly, if you browse to your calendar sync settings you can in theory switch on syncing your additional calendars. I say “in theory” because I haven’t been able to test it yet.

The second thing to know is that you can add multiple Gmail CalDAV accounts (e.g. if you have access to a spouse’s calendar), but how to do it is not immediately apparent. You’ll need to go to System Settings -> Accounts -> Add Account. This time, go straight to “Advanced”. This takes you to the “Advanced Setup” screen, and here we see a slight weakness in the BlackBerry OS 10 user interface design. There’s no scroll bar suggesting there are more items off-screen. This is misleading, because underneath “POP”, if you slide the options upwards, you’ll find “CalDAV” and “CardDAV”. Choose CalDAV and follow the manual instructions below.

Manual Setup

Automatic setup might not work for you. Or it might work, but only give you IMAP, not contacts and calendar. In this event, you’ll need to use the “Advanced” option. Note that if you do this in the middle of setting up email, it will only give you the option of configuring IMAP. You’ll then need to go back to System Settings -> Accounts -> Add Account -> Advanced (twice), to set up CalDAV and CardDAV. See my comments above about the CalDAV/CardDAV options not being immediately apparent.

IMAP settings

  • Address: imap.gmail.com
  • Port: 993
  • Encryption: SSL

At the bottom of that screen, the “Edit Folder Settings” button allows you to choose which IMAP folders (Gmail labels) you’d like to sync.

SMTP settings

  • Address: smtp.gmail.com
  • Port: 465
  • Encryption: SSL

CalDAV settings
Server address will be something like www.google.co./calendar/dav/calendarID/events. You’ll need to know the calendar ID. In my case, this is my email address. To double-check that, go to your Google Calendar. Under the “My Calendars” panel on the left, you should see a drop-drown indicator next to the name of your calendar (the name may by your own name). Click that, then “Calendar Settings” on the pop-up menu. At the bottom of the calendar settings page, you should see “Calendar Address”. To the right of this will be displayed the Calendar ID.

CardDAV settings
The simplest of all to configure. You just need the server address: google.com.

A Note About Passwords

If you’re using 2-step authentication, the same application-specific password should work for all four protocols. If you encounter authentication problems, consider generating a new password for each. Read my earlier article for details.

ActiveSync

Go to System Settings -> Accounts -> Add Account -> Advanced (at the bottom of the screen) -> Microsoft Exchange ActiveSync. Here are the settings you’ll need:

  • Domain: google
  • Username: your email address
  • Server address: m.google.com
  • Port: 443
  • Use SSL: on
  • Push: on

This gives you full sync across email, calendar and contacts, with all your settings in one place. Simpler than setting up the other protocols, but beware: it may stop working one day…

Google logo copyright © Google Inc. All rights acknowledged.

Alfresco on Windows Server with Active Directory Authentication

Alfresco LogoLet’s be honest about this: the documentation for Alfresco, the SharePoint-like Enterprise Content Management System is opaque.

Today, I installed the free Community Edition of Alfresco on a Windows Server 2008 R2 virtual machine. The first thing I wanted to do was connect it to Active Directory in order to delegate authentication duties to my domain controllers. I didn’t find the documentation particularly helpful. So here’s what I did:

  1. You won’t be able to do this until you’ve fired up the TomCat server at least once – that causes the creation of the necessary files and folders.
  2. Find the repository.properties file. In the default installation, it will be in the folder, C:\Alfresco\tomcat\webapps\alfresco\WEB-INF\classes\alfresco. Open it with your favourite text editor – preferably not Notepad, since the file has Unix line endings, which Notepad won’t handle correctly.
  3. In that file, find the line authentication.chain=alfrescoNtlm1:alfrescoNtlm. Change it to read authentication.chain=ldap-ad1:ldap-ad,alfrescoNtlm1:alfrescoNtlm and save the file.
  4. Next, go to C:\Alfresco\tomcat\webapps\alfresco\WEB-INF\classes\alfresco\subsystems\Authentication\ldap-ad (or similar, if you chose to install in a different location). You need to edit the file ldap-ad-authentication.properties, but note that you may need to run your text editor as Administrator in order to be able to save your changes. Make the following edits:
    1. Insert your domain: ldap.authentication.userNameFormat=%s@mydomain.local
    2. Put connection details for your DC: ldap.authentication.java.naming.provider.url=ldap://pdc1.mydomain.local:389
    3. Choose an administrator for Alfresco, from your AD list of users: ldap.authentication.defaultAdministratorUserNames=superuser
    4. Insert the administrator’s UPN: ldap.synchronization.java.naming.security.principal=[email protected]
    5. Add the administrator’s password. Yes, in plain text. Yes, this is very bad. Take all necessary precautions: ldap.synchronization.java.naming.security.credentials=someP4ssword
    6. Put the search base (possibly a subset of your AD tree) for groups: ldap.synchronization.groupSearchBase=OU\=My Groups,DC\=mydomain,DC\=local – NB this is case sensitive, and the extra backslashes are required
    7. Put the search base (possibly a subset of your AD tree) for users: ldap.synchronization.userSearchBase=OU\=My Users,DC\=mydomain,DC\=local – again, this is case sensitive, and the extra backslashes are required
  5. Use the Alfresco Manager Tool to restart the services.

From Alfresco, you should now be able to browse users and groups from whichever OU you used.


Note: I initially did all the above using Alfresco 4.2c, only to discover there are some bugs relating to SharePoint in that release. The recommended solution until a later version is released is to try one of the nightly builds.

Alfresco logo copyright © Alfresco Software, Inc..

SOLVED: Samsung Galaxy Note II stuck on Samsung logo

Samsung Galaxy Note IIThe Galaxy Note 2 (GT-N7105). What a phone. “Too big!” you say? “I can’t see what the problem is,” I say.

Imagine my dismay then this morning, when I discovered my favourite gadget had rebooted itself (without my permission) and was sat on the animated Samsung logo, quietly glowing to itself, most pathetically. Every few seconds, the haptic motor clicked, like a feeble death rattle.

“Curtains”, I thought.

“Pull yourself together man!” I thought.

After removing the battery, rebooting and generally pleading for a reprieve failed to achieve any results, I took stock and started panicking about how many days it was since I last took a backup. A factory reset loomed.

With one last gasping hope I tried rebooting into safe mode. On the Note 2, from a powered off state, you keep the “volume down” button depressed while powering up. Also, keep the power button pressed until the Samsung logo appears.

To my great relief, the phone booted up in safe mode. I restarted the phone from there and it powered up normally. Next job: perform a backup!

Sadly, this won’t fix physical faults with your phone. Sorry if it doesn’t work for you.

Samsung Galaxy Note II image copyright © SamsungTomorrow, licensed under Creative Commons. Used with permission.

SOLVED: Outlook 2007 IMAP “The folder … cannot be selected”

Outlook IMAP errorHere’s an obscure one. I was escalated a call today (my job involves, amongst other things, third line support for email issues) where a user was unable to delete or open some items of email within Outlook 2007. An error message pops up saying, “The folder … cannot be selected. This may be because of a limitation of your IMAP server or the folder may have been deleted or moved.”

It turns out the error message is a bit of a red herring. By a process of elimination (starting Outlook in safe mode and selectively disabling add-ins) I found the culprit to be AVG Free. Whether the blame lies with AVG or Outlook 2007 is a moot point. Microsoft has taken a long time to implement IMAP correctly, so I suspect the latter. Whichever the case, no one in a corporate environment should be using a product not licensed commercially, so I sent my user off to buy Kaspersky Anti-Virus.

BlackBerry Z10, Gmail and 2-Step Authentication

Update: If you’ve arrived here looking for solutions to Gmail problems generally on the new BlackBerry OS 10, you might want to read my more recent article, Gmail + Google Apps on the BlackBerry Z10.

BlackBerry Bold 9900 and Z10
The old (Bold 9900) and the new (Z10) – any family resemblance is purely coincidental
One of the perks of my job is getting to try out some new mobile phones, once they’ve been released by my company’s preferred carrier. This week I took delivery of a BlackBerry Z10. It’s a really nice device, but given that my normal phone is a Samsung Galaxy Note 2, I’m afraid I became a little bored of the Z10 within 10 minutes of powering it up. (Yeah yeah, I know, first world problems.)

Inevitably with BlackBerry OS 10 (which is a stonkingly good OS, by the way), one of the problems was going to be that the apps are lagging behind mainstream Apple and Android offerings. Google’s Play store and Apple’s App Store have apps outnumbering BlackBerry apps by a factor of 10. Whether BlackBerry will catch up is a question not even the most far-seeing analysts can predict with confidence.

In the meantime, there will be some speed bumps encountered by dedicated BlackBerry aficionados, such as the one I ran into when attempting to set up my Gmail account today. Like all security conscious users, I have 2-step authentication enabled on my Gmail account. That means that whenever I log into Gmail using a new device or application, a text message is sent to my phone containing a one-time authorisation code, which then needs to be entered into whichever application is trying to use my Gmail credentials.

The email app on BlackBerry 10 is not (yet) capable of handling this process. That means you need to use one of the alternative methods of authentication. To start, you must (preferably from a computer) log into your Google 2-step verification page. Once there, you can be forgiven for thinking that Google has got you covered. There is, after all, a link saying “BlackBerry”:

2-step verification

If you follow the link, you’re instructed to browse to m.google.com/authenticator and download the Authenticator app to your phone, following which everything will be ticketyboo. Except it won’t. You are taken to a largely blank web page. Buried deep within Google’s online help is the reason: “To use Google Authenticator on your BlackBerry device, you must have OS 4.5-7.0.” No OS 10 support then. Bother.

Never fear. Go back to the 2-step verification page and instead choose the Manage application-specific passwords link. Go to the bottom of that page (“Step 1 of 2: Generate a new application-specific password”). Enter a name (like “BlackBerry Z10”) and click “Generate”. You’ll be given a code to enter in the IMAP password and SMTP password boxes within the email setup on your phone. Once you’ve done that, you’re good to go.

From CodeIgniter to Laravel | part 1: installation

UPDATE: I have re-written this article for the new Laravel 4. You’ll find the updated article over at Geek & Dummy.

Contents


Laravel logoIn my final “how-to” guide on self-hosted web design, I gave a special mention to a relatively new PHP framework, Laravel. I’m very familiar with CodeIgniter, but due to some of its limitations (including concerns over licensing, going forward), many developers have been moving to Laravel. Laravel has been on my “must try it out” list for some time. In this article, I’ll take you through initial installation and some of the issues I faced.

Prerequisites

Since this “how-to” follows my DIY web hosting series, I’m going to assume we’re starting with a similar setup: a virtual web site powered by Apache and PHP on Linux. Other environments work too. See the Laravel documentation for more details.

Installation

The Laravel setup guide is a little unclear about the correct location for its files. Here’s what I’ve found to work. This guide is for Laravel 3.2, but I suspect it will also hold true for later versions in due course. (At the time of writing, 4.0 is still in beta.)

If you’ve created a virtual web site with Virtualmin, you’ll have a new public_html directory at, for example, /home/fred.bloggs/domains/my.funky.site/public_html. Change to the directory above public_html (e.g. /home/fred.bloggs/domains/my.funky.site and proceed as follows, from an SSH login. Make sure you perform these steps as the web site owner (e.g. su fred.bloggs):

wget http://laravel.com/download -O laravel.zip
unzip laravel
rm laravel.zip
mv laravel-laravel-*/* .
mv laravel-laravel-*/.[gt]* .
rmdir laravel-laravel-*
mv public/* public_html/
mv public/.h* public_html/
rmdir public
chmod -R ug+w storage/views

If you read the Laravel installation instructions linearly, you’ll see that you need to make a change to application/config/application.php. It contains a line like:

'key' => 'YourSecretKeyGoesHere!',

The recommendation is that you insert 32+ random characters in place of YourSecretKeyGoesHere!. There’s another way of doing this, if (and only if) the key field is blank. Laravel comes with a CLI (command line interface) called Artisan. If you issue the command php artisan key:generate, a random key will be generated for you automatically and inserted into the file.

To remove “index.php” from your URLs, edit that same file (application/config/application.php). Find the line 'index' => 'index.php', and change it to 'index' => '',. Laravel comes with a .htaccess file in the public directory, which contains the necessary Apache magic to make this all work.

Having done the above, fire up your web browser and point it at your new site. You should arrive at a default introductory Laravel page:

laravel_default

Other frameworks

Now would be a good time put to put Twitter’s Bootstrap and jQuery in place, if you’re planning to use them. Check the download URLs are current before you do this:


wget http://twitter.github.com/bootstrap/assets/bootstrap.zip
unzip bootstrap
rm bootstrap.zip
mv bootstrap/css/* public_html/css/
mv bootstrap/js/* public_html/js/
mv bootstrap/img/* public_html/img/
rm -rf bootstrap
cd public_html/js
wget http://code.jquery.com/jquery-1.9.1.min.js

Configure your development environment

I use NetBeans for development. If you don’t already have a preferred IDE (integrated development environment), I recommend you check it out. Another favourite is Eclipse. You could use an ordinary text editor, but then you’d be missing out on a lot of things that can make your coding more comfortable and efficient.

Having installed Laravel and the other frameworks on my web server, next I use NetBeans to pull the code across to my development environment. Before you do this, still in your SSH shell, you may wish to delete some of the typical directories that Virtualmin creates but which you don’t really need:

rmdir cgi-bin/ homes/

In the NetBeans “New Project” wizard, select the option “PHP Application from Remote Server”. In the remote configuration, ensure that you choose as your “upload directory”, the directory above public_html, since that contains the private (non-web-accessible) Laravel directories, which we will also be playing with.

Once the code has copied across, you’ll want to exclude a couple of Virtualmin-generated directories from further synchronisation. In the project’s properties, go to “Ignored folders”. Add there /logs and /public_html/stats.

Where next

I’m slowly writing additional tutorials, while I take time to learn the framework. See the contents list above for other posts in this series. I also recommend you check out Dayle Rees’ tutorials. Happy coding!